
For users with Windows Vista or later operating systems, this is where you set up your audio options for Logger+ Audio functions. These functions include playback and on-the-fly recording of user-supplied recorded voice messages (wav files); monitoring of your sent CW from your computer and Morse Code announcements of QSO status (useful for visually impaired operators); and the text-to-speech option, generating voice messages from text using one of several available voice models.
If you are running Windows XP, this window will not be available. For Windows XP users, audio is configured in the Audio tab in the Configurer (this tab is not available for users of newer versions of Windows running updated versions of the Logger).
Monitor Tab
This tab opens whenever you open the Logger+ Audio Setup Window from the Config > Logger+ Audio Setup… menu item in the Entry window.
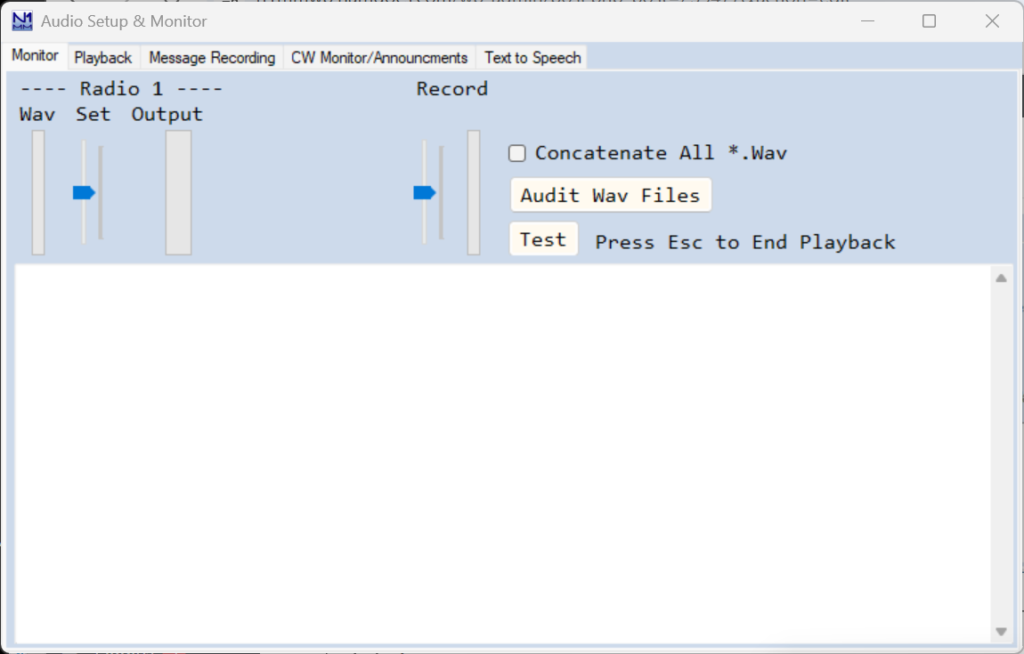
The left-hand slider (Set) sets the output level going to your radio. You will want to set this so that your radio indicates the correct microphone level and amount of compression. When playing a .wav file, the narrow “Wav” bar-graph displays the relative level of the peaks of the recording being played. The wide “Output” bargraph displays the peaks of the output going to your radio. The two are independent; if the Wav file bargraph shows relatively low peaks, you may want to re-record it to improve the signal-to-noise ratio.
The right-hand slider (Record) sets the record level for “on-the-fly” recording, and the narrow bargraph just to its right displays the relative sound level that is being recorded.
When you close N1MM+, the soundcard(s) output level(s) and microphone input(s) levels are returned to the previous settings.
When there are multiple wav files to be sent in succession, such as when voicing call signs and serial numbers from individual number/letter files, the default behavior is to send the files one after the other. Some users have reported unacceptably long delays between sending successive wav files when using multiple wav files. For such cases, there is a Concatenate All *.Wav option. This option assembles the entire message to be sent by concatenating the individual wav files into a single temporary wav file before sending it, instead of sending the files one after the other. Unlike the default case, changes made to the call sign in the Entry window on the fly after message sending has started will not be reflected in the output when using this option. Also, all wav files must have been made with identical sample rates and bit resolutions. If you experience long delays between letters and numbers that cannot be accounted for by extra “dead air” recorded at the beginning and/or end of your letter/number files, you can try using this option to see whether it removes the delays.
If you wish to use voicing of call signs and serial numbers using pre-recorded letter and number wav files for individual letters and numbers, the Audit Wav Files button can be used to determine whether the program has found a complete set of the necessary letter and number files for simple or advanced voicing.
The Test button will play a pre-recorded message, so that you can test your playback setup without having to record something first.
The lower pane of this tab reports each stored message that is sent, which can be helpful for debugging.
Playback Tab

In the first options box, the first choice uses a single soundcard for SO1V/SO2V. The other 3 are all for SO2R: SO2R Single Soundcard Mono (where an external controller is used to route the audio between radios), SO2R Single Soundcard L/R (using one channel for each radio), and SO2R Two Soundcards Mono, where each soundcard is connected to one radio.
In the second options box, select the Playback device that will feed audio to your radio. The set of possibilities displayed is dependent on your specific computer configuration.
A growing number of radios have internal “sound cards”, called codecs. If you have one of these and wish to use it as the sound card for that radio, check the Internal Radio Codec box, and for PTT control you can also check the PTT via Radio Command SSB Mode check box in the Configurer setup for the radio control port. Of course, you cannot use a single radio codec for more than its own radio, so the first option needs to be set to match.
Digital-mode users: Note that if your radio has an internal codec that you want to use for transmitting in digital modes including AFSK RTTY, you need to check the Internal Radio Codec check box regardless of whether or not you use N1MM+’s audio functions in phone modes. Also, the easiest way to control PTT in such radios is to check the PTT via Radio Command Digital Mode check box in the Configurer setup for the radio control port.
The lower pane of this tab shows interactions between N1MM+ and windows audio functions.
Message Recording Tab
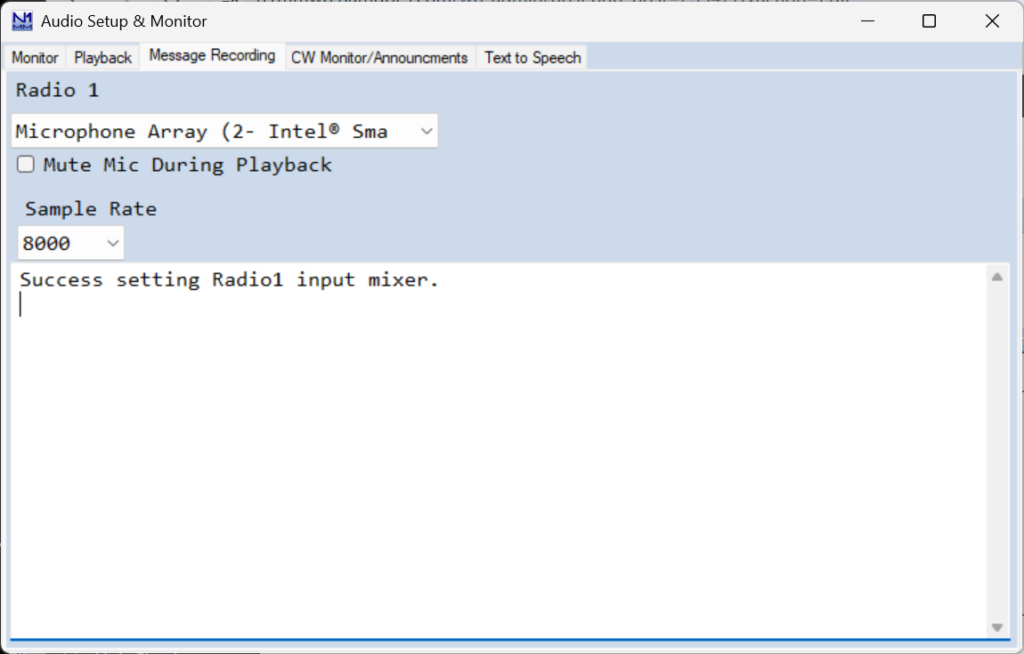
This tab will vary with your choices on the Playback tab. If you choose two-soundcard SO2R you will need to choose inputs for each card to enable on-the-fly re-recording of stored messages
The Sample Rate options are 6000, 8000 and 12000, and are set here for on-the-fly recording of wav files.
The lower pane will report the beginning and end of each on-the-fly recording event.
Your microphone will be muted during playback if you check the Mute Mic During Playback option.
CW Monitor/Announcements Tab
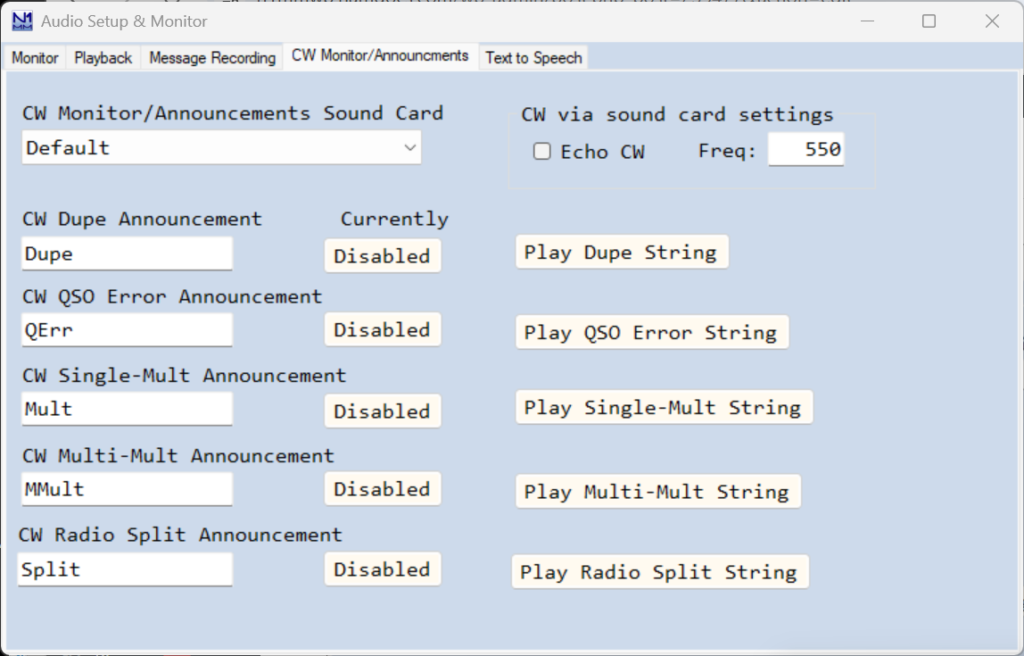
This tab is used both to enable audible monitoring of your sent CW messages from the computer, and to configure and enable audible CW announcements of QSO status (dupe, multiplier, error and split status). These announcements are useful to users with visual impairments.
In the CW Monitor/Announcements Sound Card box, choose the sound card output on your computer that will be used for monitoring sent CW from the computer and for QSO status announcements if enabled. This should normally be different from the sound card configured under the Playback tab.
To enable CW monitoring, check the Echo CW checkbox.
The pitch of the audible CW monitoring and of announcements can be set by entering it in the Freq: box; normally you would set this to the same frequency as the sidetone in your transceiver.
There are five Morse Code announcements that can be individually enabled or disabled, to announce a Dupe QSO, a QSO Error, a single multiplier, a multiple (dual or triple) multiplier, and a split-frequency QSO. The enabled/disabled state is saved per Operator. The user can enter the text to be sent for each of the five announcements. There are Play buttons for each announcement so you can preview what will be heard. The speed of these announcements in WPM is controlled by the CW speed setting on the Entry window; announcements are sent at the same speed as you are using for transmitted CW. Playback audio level is adjusted from the Windows audio panel. Note: There are some contests that require the exchange to be known before Dupe status can be determined.
Text to Speech Tab
This tab is used to configure the text-to-speech option that was introduced in N1MM Logger+ program version 1.0.10913.0. This option uses software to generate speech from text messages, using one of several available voice models. The generated speech is placed in a temporary wav file which is immediately sent.
There are several (27) available voice models that can be downloaded from within the Audio Setup window. It is also possible to create a custom voice model using your own voice (the instructions for doing this are beyond the scope of this document, but may be downloaded from the N1MM Logger+ website).
The program (piper.exe) that converts text to speech is downloaded together with the first such downloaded voice model. Connection to the Internet is required while downloading the program and voice model files, but once at least one voice model file has been downloaded, an Internet connection is not required in order to use the text-to-speech feature.
The piper.exe program that converts text to speech is unable to cope with non-ASCII Unicode characters anywhere in the pathname to files. If your Windows username contains one or more such characters (accented letters, Cyrillic letters, etc.) and your N1MM+ user/data files area is in the default location in your Documents directory, piper.exe will not be able to read or write the files it needs. The symptom will be one or more error messages in the Audio Setup window about files not being found.
The solution is similar to the solution for problems with OneDrive: the user/data files area must be installed to a new location where there are no non-ASCII characters in the pathname – for example, C:\Ham\N1MM Logger+. First, create the new directory for the user/data files area. Then download the N1MM+ Full Installer and the installer for the most recent update (available from the Downloads page on the N1MM+ website). Run the Full Installer program (there is no need to uninstall first). When the installer prompts for the location for the user files area, use the Browse button to point it to the new directory you created. After the full install, do not run the N1MM+ program yet. First, copy the contents of your original user files area (including subdirectories) into the new user files area. Then run the update installer to install the latest program update. If there are any pathnames in the configuration files that point to files in the old user files area, they should be updated to point to the corresponding files in the new user files area, but other than this, N1MM+ should continue to work as before, except that now the piper.exe program will be able to read and write the files it needs to.
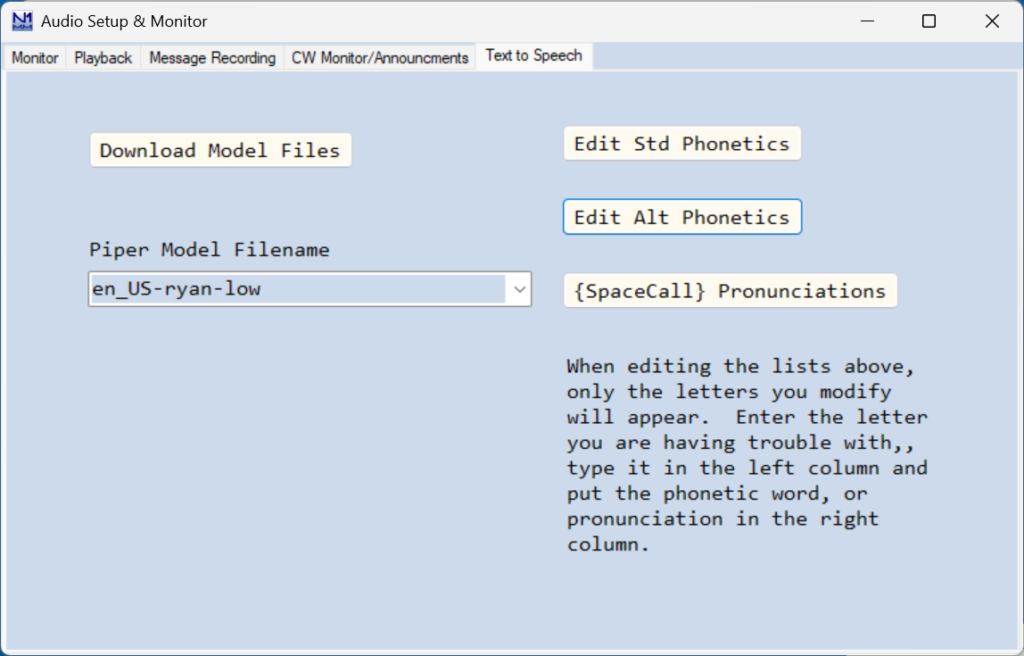
The Download Model Files… button is used to download the Piper text-to-speech program and one or more voice model files from the Internet. After the first voice model file is downloaded, you will be given the option to stop downloading, to download the next voice model file, or to download the full set of 27 voice models. The full set of voice models requires 1.65 GB of disk space, and downloading it will take quite a while, depending on your connection speed to the Internet, so for initial testing you might wish to stop after one or two voice models instead of downloading the full set right away.
The Piper Model Filename box can be used to select a voice model from the list of models that have been downloaded or custom voice models that have been added. The voice model files are stored in the PiperModelFiles subdirectory in the N1MM+ user files area, and the Piper program that does the text-to-speech computation is stored in the Piper subdirectory. These subdirectories are created by the program updater for version 1.0.10913.0 or later, but they will be empty unless and until at least one voice model has been downloaded.
There are macros provided for using two sets of phonetic letters to voice callsigns, the standard (ICAO) phonetics and an alternate set. Since some voice models may have trouble pronouncing some phonetics or letters clearly, buttons are provided in which alternative spellings (or mis-spellings) can be supplied to aid the voice model.
The Edit Std Phonetics button allows the user to supply an alternate spelling of the standard phonetic for one or more letters in cases where the voice model being used does not pronounce the regular spelling clearly.
The Edit Alt Phonetics button provides the same capability for the alternate set of phonetics. This can also be used to substitute a different word for the one initially supplied.
The {SpaceCall} Pronunciations button provides a similar capability for the individual letters used to spell out callsigns using the {SpaceCall} macro.
Setup and Testing
To test this feature, first download one or more voice models and select the voice model you wish to test with. Select the Playback tab and set the sound card output to the one you will use for listening while testing (e.g. the default sound card on your PC, or the sound card that is used for CW monitoring and announcements), rather than the sound card you would use for transmitting during a contest. With the program in Phone mode, edit one of the function key messages to include a TTS macro, for example:
F10 Call,{TTS {ICAO !}}
to speak the callsign that is in the callsign box in the Entry window in standard (ICAO) phonetics, or:
F10 Num,{TTS 1 2 3 4 5 6 7 8 9 0}
to speak the digits from 1 to 0 in succession. Save the edited function key message set and press the function key to play the message back. You can use this to test different voice models and different text (different spellings, for example). When you are happy with your choice of voice model and function key messages, remember to switch the sound card under the Playback tab back to the one that is used with your transmitter.
TTS Macros
There are eight macros used in function key messages for TTS:
{TTS}, {ICAO}, {AltICAO}, {SpaceCall}, {SpaceNR}, {SplitNR}, {TTSParms} and {TTSTrim}
{TTS text} – Converts the ‘text’ to speech and immediately plays the generated TTS wav file.
- There can be several {TTS} macros within a function key message.
- {TTS} macros cannot be combined with wav files in the same function key message.
- The playback speed can be changed with the {TTSParms} macro. See below.
- The {ICAO}, {AltICAO}, {SpaceCall}, {SpaceNR} and {SplitNR} macros are used inside {TTS} macros, as described below.
- The {TTS} macro text can contain the # (serial number) and @ (receive frequency) macros. Note that serial numbers using # will be voiced as single numbers, for example 1256 will be voiced as “one thousand two hundred fifty six”. For alternative voicings of serial numbers, see {SpaceNR} and {SplitNR} below.
- The ! or {CALL} macro for the other station’s callsign and the * or {MYCALL} macro for your own callsign should only be used inside ICAO macros. You might not like the results if one of these is used elsewhere – the program might attempt to pronounce the callsign, or part of the callsign, as if it was an English word.
- The {TTS} macro text can contain , . ? and space to modify the speech and spacing. Do not place these speech delay characters outside of the {TTS} macro.
- A space is added when a space and a Capitalized word follows a period.
- Commas in the message can be used to add a small delay.
- Adding multiple consecutive spaces does not increase the delay between words.
- In some cases, creative misspellings may improve the speech.
- If you want to spell out letters without using phonetics, as in acronyms, it may help to separate them with spaces, as in “R I T”, or to spell them out, as in “are eye tee”.
- The letter A is a special case. Some, if not all, voice models will interpret a single A as the indefinite article “a” and not the letter “A”, and pronounce it as a short “uh”. Spelling it as “ehy” instead of “A” seems to work better.
{ICAO text} – Converts the ‘text’, or * for your callsign or ! for the other station’s callsign, to standard ICAO phonetics. This is only used inside a {TTS} macro. The {ICAO !} macro inside a {TTS} macro is functionally equivalent to the {CALL} macro in CW and digital modes; it is not quite identical to the ! macro when using voicing wav files in phone modes, because the callsign in TTS macros cannot be edited on the fly.
- The {ICAO} macro can appear multiple times inside a {TTS} macro.
- Some voice models may not pronounce some phonetics clearly, in which case an alternative spelling of the word used in the phonetic might improve the clarity. The Edit Std Phonetics button in the setup window provides this capability.
{AltICAO text} – An alternative version of the {ICAO} macro, using an alternative set of phonetics (America, Boston, Canada, Denmark, …). The Edit Alt Phonetics button in the setup window allows for different spellings to improve clarity, or for the substitution of different words (Amsterdam instead of America and so on).
- The alternate phonetic alphabet is provided for use in spelling out variable content such as the other station’s callsign. While it is also possible to use it for unchanging message text such as your own callsign, section, gridsquare and so on, this is not really necessary since you can spell those out explicitly using whatever phonetics or spellings you wish.
{SpaceCall} – Voices the callsign from the focus Entry window as individual letters with spaces between the characters. This is only used inside a {TTS} macro, and takes the place of the {CALL} macro as used in CW and digital modes.
- You would use {SpaceCall} in F5 if you wanted to come back to callers without phonetics:
F5 Call,{TTS {SpaceCall}} sends K3CT as “kay three see tee”, for example. - Some letters get special treatment. For example, because voice models may pronounce a single “A” as the indefinite article “a” rather than the letter A, the letter A is changed to “ehy” when voicing using {SpaceCall}. If other special treatment is required for this or any other letter, the {SpaceCall} pronunciations button in the setup window can be used.
{SpaceNR} – Voices the serial number as separate digits. Example: 1256 will be voiced as “one two five six”. This can be used inside a {TTS} macro instead of the # macro.
{SplitNR} – Voices the serial number split into parts, one or two high order digits and the lower two digits. This can be used inside a {TTS} macro instead of the # macro.
Examples:
1256 will be voiced as “twelve fifty-six”
984 will be voiced as “nine eighty-four”
Warning: serial numbers above 9999 are not handled well by {SplitNR}.
{TTSParms x,y,z} – Change voicing parameters controlling playback speed (x), pitch variation (y) and/or voicing randomness (z). One, two or all three parameters may be supplied, except that if you wish to specify the third parameter (z), you must also specify the second parameter (y). Parameters are normally numbers in the range 0.0-1.0 using the “.” character as the decimal separator (commas as decimal separators are not allowed inside the TTSParms macro).
- Possible parameter combinations include {x}, {x,y}, {x,y,z}, {,y} and {,y,z}. {x,,z} and {,,z} are not allowed.
- Parameter changes take effect for the current message and apply to subsequent messages until overridden by another {TTSParms} macro.
- Except after an {END} macro, only one {TTSParms} macro is allowed in a function key message.
- The {TTSParms} macro changes apply to the entire message (up to, or starting from, an {END} macro if there is one). The position of the {TTSParms} macro within the message does not matter, except that a second {TTSParms} macro can be placed after an {END} macro to force it to be executed after the part of the message before the {END} macro has been sent. This can be used to send part of a message at a different speed from the rest, for example:
F10 Rpt Exch,{TTSParms 0.8}{TTS {SplitNR} P A}{END}{TTSParms 1.0}{TTS {SpaceNR} Pennsylvania}
- Playback speed (length_scale parameter in piper.exe): Range 0.3 to 1.0. Lower numbers result in higher playback speed. A value of 1.0 produces the slowest (voice model) speed. Initial default = 1.0
- Deprecated: values in the range 3 to 10 will be accepted and multiplied by 0.1 before being passed to piper.exe.
- Pitch variation (noise_w parameter in piper.exe): Range 0.0 to 1.0. Lower numbers result in less pitch variation, flatter sounding voicing. Higher numbers result in more expressive pitch changes. Initial default = 0.8
- Voicing randomness (noise_scale parameter in piper.exe): Range 0.0 to 1.0. Lower numbers result in less variability, slightly faster, may sound more robotic. Higher numbers result in more variability, slightly slower. Cannot be specified without also specifying the pitch variation parameter. Initial default = 0.66
{TTS_SPEED n} – Deprecated; synonym for {TTSParms m} where m = 0.1*n. Changes the voice message playback speed for the current and subsequent voice messages.
{TTSTrim} or {TTSTrim n} – Trims the beginning and end of the current message using a threshold value. If a value is not provided, a threshold of 1000 is used. The threshold represents the level of the .wav file that will be considered “silence”. The higher the number, the more background noise will be removed at the beginning and end. When the threshold is provided, the range of n is 0 to 6000. If you chose too high a value, the beginning or end of the message may be truncated.
Sample function key message file:
# RUN
F1 CQ,{TTSParms 0.8}{TTS CQ Contest CQ Contest, {ICAO *}, {ICAO *}}
F2 Exch,{TTS Number {SplitNR}, Pennsylvania}
F3 TNX,{TTS Thanks, {ICAO *}}
F4 {MyCall},{TTS {ICAO *}}
F5 His Call,{TTSTrim}{TTS{ICAO !}}
F6,
F7 QRZ?,{TTS Q R Zed?}
F8 Stack,{STACKANOTHER}
F9,
F10 Repeat,{TTSParms 0.8}{TTS {SplitNR} P A}{End}{TTS {TTSParms 1.0} {SpaceNR}, Pennsylvania}
F11 LogPop,{LOGTHENPOP}{TTS Roger Now {ICAO !}, number {SplitNR} in Pennsylvania}
F12 Wipe,{WIPE}
# S&P
F1 CQ,{TTS Q R Zed? {ICAO *}}
F2 Exch,{TTS Number {SplitNR}, Pennsylvania}
F3 TNX,{TTS Thanks, {ICAO *}}
F4 {MyCall},{TTSParms 1.0}{TTS {ICAO *}}
F5 His Call,{TTSTrim}{TTS{ICAO !}}
F6,
F7 QRZ?,{TTSParms 0.6}{TTS Q R Zed?}
F8,
F9,
F10 Repeat,{TTSParms 0.8}{TTS {SplitNR} P A}{End}{TTS {TTSParms 1.0} {SpaceNR}, Pennsylvania}
F11,
F12 Wipe,{WIPE}
Call stacking works with TTS, as implemented in the above example. Here is how to use it:
The program must be in Run mode, with ESM turned on.
Adjust the function keys to your liking, for example:
F11 LogPop,{LOGTHENPOP}{TTS Roger Now {ICAO !}, number # in Pennsylvania}
F8 Stack,{STACKANOTHER}
In the Configurer, Function Keys tab, set the Next Call key to the function key with the {LOGTHENPOP} macro (F11 in this example).
Enter a callsign into the Entry window and press the {STACKANOTHER} key (F8) to stack that callsign. If needed, adjust the stack window text size with the font sizer and location on the screen.
Enter a second callsign and press Enter to send the regular exchange message (F5+F2) to start a QSO with that station.
Enter the received exchange and press Enter. This will log the QSO, pop the stacked callsign off the stack and send the Next Call (F11) message to start the next QSO with the station whose callsign was just popped off the stack.
Enter the received exchange and press Enter to send the regular TU message (F3) and log the second QSO.
You can stack multiple callsigns, or your partner can stack the callsigns in Partner mode.
Notes
- When converting the Entry window callsign to voice, any change to the callsign after the function key is pressed will NOT change the transmitted callsign.
- It is not possible to play a combined message containing both a TTS macro and a user *.wav file.
- “combined message” includes the Run exchange if it is sent either with the Enter key in ESM, or with the Insert or ; key regardless of ESM status; in all of these cases the message that is sent combines the F5 and F2 messages, which therefore must both be of the same type.
- “combined message” also includes any message that contains an {F1}-{F12} macro.
- When the “Send corrected call before end of QSO” option is checked in the Configurer, if the F3 message uses wav files then the program will try to use letter/number wav files to send the other station’s call sign regardless of whether the F5 message uses wav files or TTS macros.
- When using TTS, there may be some function key macros that interfere with TTS or do not function (for example, force-log macros do not work in the same message key as TTS macros).
- When TTS is used, Logger+ Audio concatenation is turned off.
- This feature might not work with a 32-bit CPU.
- Slow/marginal computers may have delays the first time they play a message or a smaller delay when playing a callsign.
- When a TTS message is played at a different voice speed than the prior TTS message, there is some additional execution overhead.
- You may want to have an alternate way to send the call sign & exchange in addition to the normal F5 and F2, for example using {SpaceCall} or {SpaceNR} in one and {ICAO !} or # or {SplitNR} in the other. In order to keep ESM in sync, it may be useful to put an {EXCHSENT} macro in the alternate exchange function key. See the description of {EXCHSENT} in the function keys and macros documentation.
