
The WSJT Decode List Window
The WSJT Decode List provides a bi-directional interface between the Band Activity Panel in WSJT-X or JTDX and N1MM+’s contest log. Since these modes are quite different in several ways from traditional digital modes (as well as CW and SSB), and since the actual operating in these modes is done from the WSJT-X or JTDX program window, not from an N1MM+ window as in other modes, it is recommended that users familiarize themselves with the WSJT-mode program in non-contest situations before trying to set up and operate in contests with N1MM+.
Key Features
- QSO initiation, auto-sequencing, and logging from within the WSJT-X or JTDX program
- Contact logging in both the WSJT-X or JTDX log and the N1MM+ contest database
- Callsign prioritization (normal, mult, double mult) based on contest contacts in the N1MM+ log
- Dupe callsign warnings based on contest rules (bands, modes) and existing contacts in the N1MM+ log
- All rig control functions are carried out by N1MM+ on WSJT-X’s or JTDX’s behalf, eliminating the need for configuration changes when changing modes between WSJT and traditional modes
- Support for SO2R in WSJT modes
Configuring the WSJT Decode List Window
Within N1MM+
There are several places in the Configurer that need to be set up for WSJT-X interoperation with N1MM+. These include the Mode Control page and the WSJT/JTDX Setup page in the Configurer window (note: in versions 1.0.7645 and earlier, the settings that are now on the WSJT/JTDX page were on the Broadcast Data page and the Digital Modes page). You also need to ensure that the Contest Setup is configured to include Digital modes (otherwise digital mode contacts will not be given points credit).
To enable logging from WSJT-X to N1MM+, configure per the following settings on the Configurer’s > WSJT/JTDX Setup page.

In the normal single-computer configuration, the IP address will be 127.0.0.1 and the port number must match between WSJT-X and N1MM+ (the recommended default port number is 2237 – in SO2R, the port number for Radio 2 should be changed to 2239 in both programs). If N1MM+ and WSJT-X are running on different computers, the IP address entered in each program must be the IP address of the other computer. If you are using the multicast IP address feature in order to allow sharing of the communications with other programs such as JTAlert and GridTracker, a multicast IP address starting with 224 or 239 must be used in all of the intercommunicating programs (the suggested multicast address is 224.0.0.1, or in SO2R for Radio 2, 224.0.0.2). When using a multicast address, start WSJT-X from N1MM+ before starting other programs that will use the same address, as the WSJT-X server needs to be running before the other applications can communicate via that address.
To enable logging from JTDX to N1MM+, in addition to configuring the UDP port as for WSJT-X above, you also need to configure the TCP port for JTDX logging to use port 52001 and check the Enable box in the “JTDX / Others TCP Settings” area.
In order to allow N1MM+ to call up the WSJT-X or JTDX program, you must also enter the location of the WSJT-X or JTDX program. Rather than attempting to type in the path to the WSJT-X or JTDX program manually, it is recommended that you use the Select button. Clicking on this button opens a standard Windows Open File dialog window, in which you can navigate to the location of the executable program (wsjtx.exe or jtdx.exe) and select it to fill in the box automatically. Note that although the button in this window says “Open”, clicking on this button does not open the file or start the program; it merely enters the path to the program into the configuration file for later use.
The bottom section on this page implements the Auto Load feature for the Decode List window. If the Enable check box is checked, calling up the WSJT-X or JTDX program from the Window > Load WSJT/JTDX menu item will also automatically open the Decode List window as well (recommended).
Starting with version 1.0.7860, N1MM+ supports running two copies of WSJT-X or JTDX in SO2R (but not in SO2V). There are boxes on the WSJT/JTDX Setup page in the Configurer for entering the port number(s) and program location for the second radio. The UDP/TCP port number(s) for the second radio are different from the UDP/TCP port number(s) for the first radio, and will need to be changed in the settings for the Radio #2 (EW2) instance of the WSJT-X or JTDX program. You can use the same copy of the WSJT-X or JTDX program .exe file from both radios, even though they will use different settings; each one will store its settings in a different location.
In SO2R, both Entry Windows do not need to be in the same mode. In a mixed mode contest, you could, for example use one radio for WSJT modes and the other radio for CW/SSB/RTTY/PSK. Or, you could use both radios for WSJT modes on different bands, taking care never to transmit in the same (odd/even) time slot with both radios if you are entering a contest in the Single-Operator category.
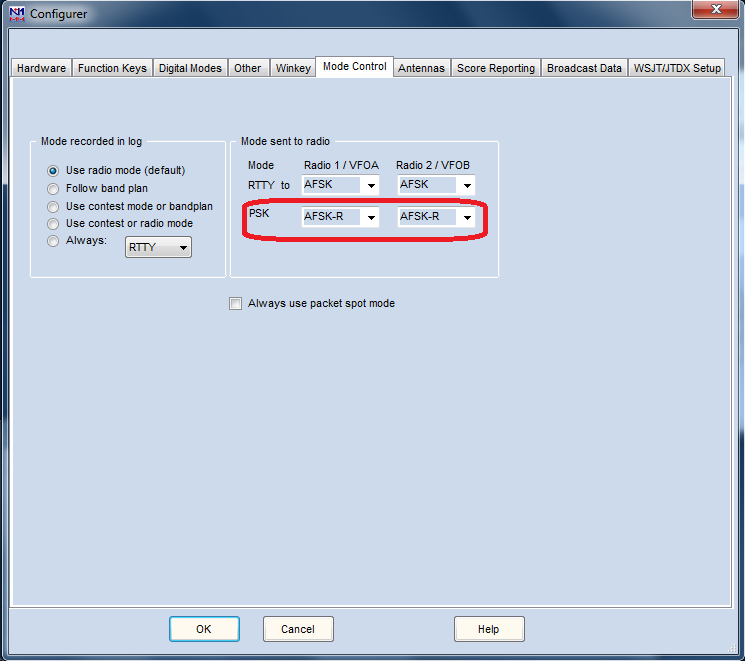
When you are using WSJT-X or JTDX, the radio should be in the same mode as you would use for PSK or other sound card digital modes. N1MM+ uses the settings under the Mode Control tab in the Configurer to control the mode used by the radio. Still in the Configurer, on the > Mode Control page, on the right-hand side under Mode sent to radio, you need to set the mode in the DIGI row (called the PSK row in versions prior to 1.0.7937) correctly for your radio. The modes that appear in the pull-down lists on this page may not match the mode names used in your radio. The correct choice might be PSK (e.g. Elecraft K3/K3S or IC-7600/7700/7800 series), or AFSK-R (e.g. IC-7300, Flex, recent Yaesu or Kenwood radios), or if your older radio does not have a separate Data mode for digital modes, it might be USB. Consult the Digital Mode Mapping table in the Supported Radios chapter of this manual for the mapping between mode names in your radio and the mode names that appear in the pull-down list on the Mode Control page of the Configurer. If you are unable to determine which mode setting to use, you can leave the choice set at “No change”, in which case you will have to set the correct mode on the radio manually yourself.
If you are using a USB audio codec that is internal to the radio, use the “Config > Logger+ Audio Setup…” menu item to open the Audio Setup & Monitor window. Select the Playback tab, set the sound card choice to the radio’s USB audio codec, and (important!) check the “Internal Radio Codec” checkbox. Also, in the Configurer, set the PTT control to use CAT commands by opening the port setup for the radio control port and checking the “PTT via Radio Command Digital Mode” checkbox. If your radio has menu commands for selecting the audio source, make sure the radio’s audio source in data modes is set to the internal audio codec.
Note that for duplicate and multiplier information to be recorded and transferred correctly, the correct contest must be selected in the N1MM+ Contest Setup window, the Mode Category in this window must include digital modes, and the program must be in Digital logging mode (the easiest way to do this is to type FT8 or FT4 into the call sign box in the Entry window and press Enter).
Note that the contest Mode category in the contest setup dialog window must contain DIGITAL. If the contest mode is RTTY, contacts in other modes (including FT8 and FT4) will be assigned zero points. After changing RTTY to DIGITAL or SSB+CW to SSB+CW+DIGITAL in the contest setup window to correct this, you may need to use the Tools > Rescore Current Contest menu item to rescore any FT8 or FT4 QSOs that had not originally been assigned the correct score.
Within WSJT-X/JTDX
First, if you have made custom changes to the WSJT-X or JTDX settings and wish to retain those same settings when running together with N1MM+, you might want to follow the procedure described in the colored text box at the end of this section before starting to configure the special instance of the program that is used with N1MM+.
You must make the WSJT-X (JTDX) configuration changes described below from WSJT-X (JTDX) after it has been called from within N1MM+, not after it has been started stand-alone. The stand-alone configuration settings do not apply when WSJT-X/JTDX is run from within N1MM+. Changes you make in one instance of the program (stand-alone, from N1MM+ for Radio 1 or from N1MM+ for Radio 2 in SO2R) will not apply to any of the others.
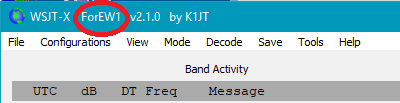
You can tell which instance of WSJT-X you are operating from or making changes in by looking at the title bar of the main WSJT-X window. If it says WSJT-X – ForEW1, this is the copy that is running from the N1MM+ Entry Window 1. If it says WSJT-X – ForEW2, this is the copy that is running from Entry Window 2 (SO2R setups only). If it just says WSJT-X, that is a stand-alone copy. Each of these three copies has its own separate file area where configuration files and the WSJT log files are stored.
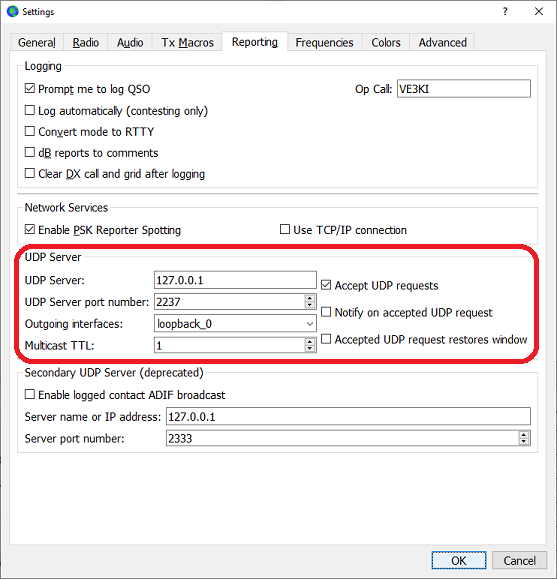
After starting WSJT-X or JTDX from N1MM+, configure per the following settings on the > File > Settings page in the UDP Server panel under the Reporting tab:
In the “Logging” area, the upper two check boxes control how logging in WSJT-X is controlled. Most users will likely want one or the other checked – i.e. either have the program prompt the user to log the QSO at the end of the QSO sequence, or else do the logging automatically. If neither one is checked, you must remember to click on the “Log QSO” button at the end of every QSO, and it is very easy to forget to do this, in which case the contact will not be logged.
In the “UDP Server” area, the “Accept UDP requests” check box must be checked in order for the WSJT Decode List window to work. This enables the passing of duplicate/multiplier information from N1MM+ to WSJT-X or JTDX, as well as allowing WSJT-X/JTDX to use N1MM+ for rig control if it is called up from the N1MM+ Window menu.
The “UDP Server” address and port number must be coordinated with the values used in the N1MM+ Configurer. In the most common single-computer configuration, the address would be 127.0.0.1 and the port number would be 2237 (2239 for Radio 2 in SO2R). If you are using the multicast IP address feature, the suggested address in all of the intercommunicating programs would be 224.0.0.1 (or for Radio 2 in SO2R, 224.0.0.2).
In JTDX, there is another TCP port that needs to be set up in the “External logbook connection” area. For SO1R or for the first radio in SO2R, the default TCP port is 52001. For the second radio in SO2R, this would be changed to correspond with the setting in the N1MM+ Configurer’s WSJT/JTDX Setup tab (suggested 52006).
In WSJT-X, do not check the Enable check box in the “Secondary UDP Server” (WSJT-X version 2.1.0) or “N1MM Logger+ Broadcasts” (WSJT-X version 2.0.1) area. This is not used when WSJT-X is run from inside N1MM+.
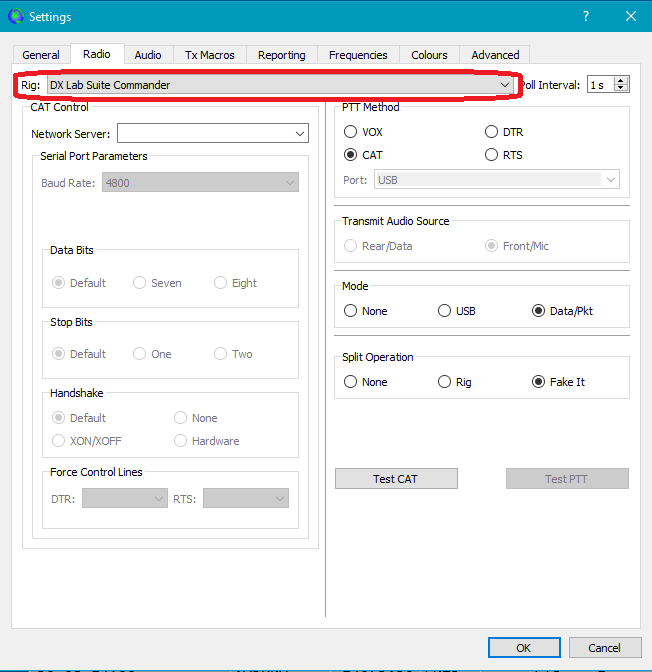
In order to enable N1MM+ to perform rig control when you call up WSJT-X or JTDX from the Window > Load WSJT/JTDX menu item, under the Radio tab in WSJT-X or JTDX change the rig control method to “DX Lab Suite Commander”.:
For SO2R, in the setup for the Radio #2 (EW2) copy of WSJT-X or JTDX, immediately below the Rig: box, you will see a text box called “Network Server”. Enter the following into this text box: 127.0.0.1:52004 . You do not need to enter anything in this box for SO1R, or for Radio #1 in SO2R, only for Radio #2 in SO2R.
Note that you do not actually run DXLab Suite’s Commander program; N1MM+ uses the same method as Commander to communicate with WSJT-X or JTDX, so the same Rig setting can be used in WSJT-X/JTDX. Choose your PTT Method, radio’s Mode and Split Operation method depending on your radio.
Do not let the instruction to set the Rig type in WSJT-X to “DX Lab Suite Commander” fool you into trying to run Commander at the same time as N1MM+. When WSJT-X/JTDX is run from inside N1MM+, the programs use the same UDP port that is used by Commander. If both N1MM+ and Commander were running and both using this port, their messages would interfere with one another, leading to failures of rig control in WSJT-X/JTDX and/or failures of communication with the Decode List window. Also, N1MM+ and Commander both want to control the radio via the same radio control COM port, which is not permitted by the operating system.
If you choose CAT as the PTT method, what that really does is tell WSJT-X or JTDX that N1MM+ will be handling PTT control. You must have a method of PTT control configured in the N1MM+ Configurer for this to work. You can check the “PTT via Radio Command Digital Mode” check box in the setup window for the radio control port in the Configurer, or configure a serial port in the Configurer for PTT control, or if you are using a Winkeyer, connect a PTT cable from the Winkeyer’s PTT output to the rig’s PTT input jack. Any of these will work with the CAT PTT method selected in WSJT-X/JTDX when it is run from inside N1MM+. If you are using a SignaLink to perform the PTT function, or if you are using the rig’s own VOX function, select VOX as the PTT method in WSJT-X/JTDX.
The Mode section in the WSJT-X and JTDX setup is used to tell the program which mode to put the radio in while operating in JT modes. If your radio has a special radio mode for sound-card data operating modes that you want to use, make sure to select the Data/Pkt setting in the setup here. You must also ensure that the N1MM+ Mode Control is set properly for your radio as described in the previous section. Consult the Digital Mode Mapping table for the correct mode setting for your radio. For older radios that do not have a data mode, you might need to choose USB in order to put the radio into USB mode. If you are unable to determine the correct settings for N1MM+ Mode Control, you can choose None in WSJT-X. If you do this, then it will be up to you to verify that the radio is in the correct mode, and if not, select the correct mode on the radio before starting to use WSJT-X each time.
The Split Operation pane in the WSJT-X and JTDX setup controls how WSJT-X/JTDX handles audio frequencies outside the “ideal” 1500-2000 Hz range. If either Rig or Fake It is chosen, then if an audio frequency outside that range is chosen, whenever WSJT-X/JTDX commands N1MM+ to put the rig into transmit, it will also request that N1MM+ QSY the radio by a multiple of 500 Hz so as to put the audio frequency back into the “ideal” range. This avoids problems with audio harmonics or with reduced audio gain in other parts of the bandpass. If Rig is chosen, the QSY will be done using the rig’s split operation capability; if Fake It is chosen, the main VFO will be QSYed every time you switch between transmit and receive. With some rigs, there may be an objectionable delay or other problems when switching to transmit with the Rig setting chosen; if this happens to you, try using the Fake It setting instead. If you choose None, the radio will not change frequency between transmit and receive, and you may need to restrict your choice of the transmit audio frequency in the waterfall to avoid problems that may occur near the edges of your transmitter’s bandpass.
There is another setting under the General tab in the WSJT-X/JTDX Settings window that is not strictly speaking necessary, but that will have an effect on operating, and that is the “Double-click on call sets Tx enable” check box. When this is checked, either clicking or double-clicking on a call sign in the Decode List window will immediately enable transmit from WSJT-X. We recommend you test both with and without this option to see which you prefer. You might also want to check some of the other options, depending on your operating preferences.
The first time you open WSJT-X or JTDX from N1MM+ you may notice that all of the WSJT-X/JTDX settings have been restored to default values – for example, your call sign and grid square may not be entered under the General tab. If you want to avoid having to manually re-enter all of your preferred settings (other than the ones described above), there is an optional way to transfer them over from your stand-alone setup to the setup within N1MM+.
In WSJT-X, use the File > Open log directory menu item to open a Windows File Explorer window open to the directory where WSJT-X stores its settings. If you do this from the stand-alone version of WSJT-X, this will be C:\Users\[yourusername]\Appdata\Local\WSJT-X. If you do it from WSJT-X after it has been called up from within N1MM+, the directory will be C:\Users\[yourusername]\Appdata\Local\WSJT-X – ForEW1 (or ForEW2 for the copy of WSJT-X called up for the second radio in SO2R). You can navigate to the …\WSJT-X directory, find the file called WSJT-X.ini, copy it and paste the copy into the …\WSJT-X – ForEW1 directory. Then rename the copy to WSJT-X – ForEW1.ini (after deleting or renaming any existing file with that file name). If you had already made the configuration setting changes described earlier on this page, you will have to make them again. From now on the two configurations will be independent; changes made to one will not affect the other.
In JTDX, the same procedure applies, except that the path names and file names will say JTDX instead of WSJT-X.
Configuration for a Specific Contest (WSJT-X only)
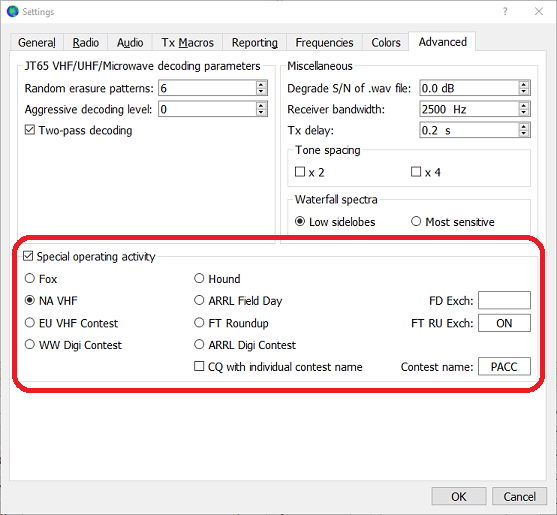
- For general non-contest logging, do not check the “Special operating activity” checkbox,
- For most contests, check the “Special operating activity” checkbox, the radio button adjacent to the contest that you intend to operate, and in some cases the Exchange box at the right, as follows:
- For the FT Roundup – W/VE stations should insert their two character state/province abbreviation. DX stations should use the expression “DX”, which will enable sequential serial number exchanges.
- For the ARRL Field Day – Enter the exchange information describing your station configuration (e.g. 1D EMA – see ARRL instructions).
- For the WW Digi contest at the end of August, use the NA VHF Contest setting (during pre-contest testing, you can leave the “Special operating activity” check box unchecked and use normal non-contest mode; the WW Digi contest exchange is compatible with the normal non-contest mode in WSJT-X).
- Note that when you are operating in contest mode, WSJT-X will use only a subset of the regular messages, and this may confuse other operators who are operating in non-contest modes. For this reason, it is best not to use the contest mode outside of the contest and pre-contest test sessions.
- If during the contest you are called by someone who is in non-contest mode while you are in contest mode, the other station will not receive some of the messages it is expecting and its auto-sequencing may not work correctly. In such situations you may have to initiate sending of the missing message directly instead of relying on auto-sequencing, in order to complete the contact with the non-contest station. Use the “Now” buttons or the “Next” selectors in the lower right part of the WSJT-X window for this purpose.
- When one of the contest modes is selected, WSJT-X will open a third log window. This window is for information only; you can minimize it to the Task Bar to free up screen space, but do not close it.
Setup Checklist
- Make sure rig control, including PTT, is working in N1MM+ for other modes
- Set the UDP address and port in the Configurer under the WSJT/JTDX Setup tab (for 99% of users, the default values will be correct; if not, consult the detailed instructions above)
2a. (this particular step is for JTDX only, not for WSJT-X) Set the TCP address in the Configurer - Set the path to WSJT-X or JTDX in the Configurer
- Under the Mode Control tab in the Configurer, set the “Mode sent to radio” for DIGI according to the radio type (AFSK-R for IC-7300/Flex/recent Yaesu/Kenwood, PSK for K3/K3S or IC-7600/7800 series, USB for radios with no special mode setting for sound-card digital modes). If you do not wish N1MM+ to select the mode automatically, you can use “No change”, in which case you will be responsible for changing the rig mode manually every time you change operating modes
- If you are using a USB audio codec internal to the radio, then in N1MM+ use the Config > Logger+ Audio Setup… menu item to open the Audio Setup window. Under the Playback tab in that window, select the USB audio codec as the sound card and check the “Internal Radio Codec” checkbox. If your radio has menu commands for selecting the audio source, make sure the radio’s audio source in data modes is set to the internal audio codec. If you wish to use CAT commands for PTT, then in the port setup for the radio control Com port in the Configurer, check the “PTT via Radio Command Digital Mode” checkbox.
- Set up the desired contest in N1MM+, and in the contest setup dialog make sure the Mode category includes DIGITAL
- Now use the Window > Load WSJT/JTDX menu item to start WSJT-X or JTDX
- After starting WSJT-X/JTDX from N1MM+, in its Settings > Radio window the Rig must be set to “DX Lab Suite Commander” (the actual DXLab Suite Commander program does not have to be installed on your computer, and if it is installed, it must *not* be running; N1MM+ takes its place)
- Set WSJT-X’s PTT method to CAT in order to have N1MM+ handle PTT, regardless of what actual method N1MM+ uses
- Set the Mode in WSJT-X to Data/Pkt in order to have N1MM+ control the rig’s mode according to the setting in the Configurer under the Mode Control tab
- Set Split Operation in WSJT-X to Rig or Fake It, unless there is no rig control in N1MM+ (“Manual Radio”)
- Under Reporting, set the UDP Server to Accept UDP requests
12a. (this particular step is for JTDX only; not for WSJT-X) Set the TCP address in External logbook connection area - (WSJT-X only) Under the Advanced tab in the Settings window, choose the Contest mode applicable to the contest and configure the sent exchange for contest types that require it (FD, RTTY RU)
- If the WSJT Decode List window is not already open, open it from the Window > WSJT Decode List menu item
- Log contacts in WSJT-X/JTDX, *not* in the N1MM+ Entry window
Launching WSJT Decode List
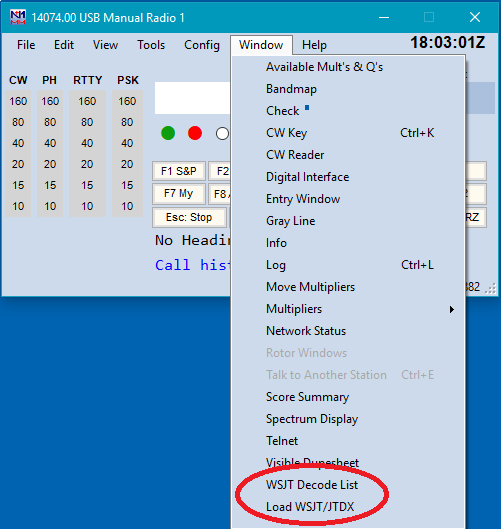
To start WSJT-X or JTDX from within N1MM+, use the N1MM+ > Window > Load WSJT/JTDX menu item (last one in the list) to start WSJT-X/JTDX, as configured under the WSJT/JTDX Setup tab in the Configurer. In addition to the WSJT-X or JTDX windows, there will also be a small N1MM+ window that opens:

The green box near the left of this window indicates that communications between the two programs is working. The WSJT Decode List window must be open for this to happen. If this box either stays red or turns red during an operating session while the Decode List window is open, that indicates that the communications has stopped working. If this happens, try closing this window and WSJT-X/JTDX and then restarting it from the N1MM+ Window > Load WSJT/JTDX menu item. If that does not resolve the issue, there is probably a configuration error in one or both programs that will need to be fixed.
This Radio Connection window opens in “Always On Top” mode. Do not use the X in the top right corner to try to hide this window; closing the Radio Connection window will also close the Decode List and WSJT-X/JTDX windows.
When WSJT-X or JTDX opens, two new windows will appear (three, if WSJT-X is in contest mode). One of those, called the Wide Graph window, is a waterfall window, which you use to help select audio operating frequencies. The other is the main WSJT-X/JTDX operating window – you will do all of your operating from this window and the Decode List window, and not from the N1MM+ Entry window. This includes changing frequency and operating mode (between FT8 and FT4, for example). If WSJT-X is in contest mode, there will be a third contest log window opened in WSJT-X. This window is informational; you can minimize it to the Windows Task Bar to free up screen space, but do not close it.
If you have checked the Auto Load check box on the WSJT/JTDX Setup page, the Decode List window will open automatically at the same time as the WSJT-X or JTDX program. If you have not checked this option, you can open the WSJT Decode List from the N1MM+ > Window > WSJT Decode List menu choice:
Opening the WSJT Decode List window, whether automatically when WSJT-X or JTDX is loaded or manually from the Window menu item, will automatically initiate the UDP Server communications between WSJT-X/JTDX and N1MM+ for the transfer of duplicate/worked/multiplier status from N1MM+ to WSJT-X or JTDX. Once the window has been opened, you will do all of your operating from the main WSJT-X or JTDX window plus the Decode List window, and not from the N1MM Entry Window. In fact you can even minimize (but do not close) the WSJT Decode List window and just use the main WSJT-X/JTDX window. You can hide the N1MM+ Entry window behind another window and minimize other N1MM+ windows to the Windows Task Bar if you need to to free up screen space while you are operating WSJT-X/JTDX.
If something (such as anti-malware software, or a configuration error in one or the other of the programs) prevents the transfer of logging information, you need to fix that. For example, you may need to configure a firewall in your anti-malware program to permit N1MM+ and WSJT-X/JTDX to use the UDP or TCP ports they need to use to communicate with each other. DO NOT try to bypass the automated logging by entering exchange data directly into the N1MM+ Entry window and pressing Enter to log it. Doing so may result in incorrect information being logged.
Using WSJT Decode List
General
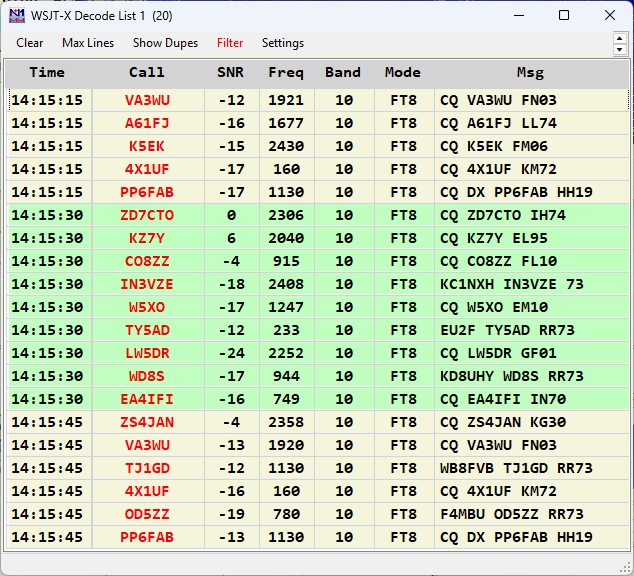
With the WSJT Decode List enabled, a list of recent callsigns will be displayed with callsign colors indicating each callsign’s contest priority (by default, these will be grey for dupe or zero points, blue for workable but not a multiplier, red for new multipliers). Callsigns in the corresponding WSJT-X/JTDX Band Activity panel will reflect those same contest color priorities as a background color. The only callsigns that are marked are callsigns of stations calling CQ (or optionally, 73, RR73 and/or RRR as well). Callsigns of stations with QSOs in progress are not marked and do not appear in the WSJT Decode List. Different time cycles will be indicated in the window by different background color shading to help you determine whether the CQ that station sent was in the current cycle or a previous cycle.
The column widths and the order of the columns can be adjusted by using the mouse in the header. Right-clicking in the header will open a list of column names from which you can choose which ones are to be displayed.
Decode List Menu items
The menu bar in the Decode List window includes a number of items to control the display in this window.

Clear – erases the contents of the window
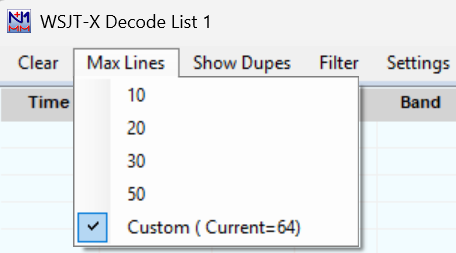
Max Lines – used to control the number of lines stored. This may be different from the number of lines actually displayed. If the number of stored lines is larger than the window can display, there will be a scroll bar to allow scrolling back through the stored lines. The larger the number of stored lines, the more computational load, meaning that on slower computers, you will want to keep the number of lines relatively small. Default values of 10, 20, 30 and 50 are available in the popup menu, or you can choose Custom to enter a different number.
Show Dupes – this item can be turned either On or Off, depending on whether you want dupe and other zero-point callsigns to be displayed in the list or not.
Filter – The options on the filter menu can be used to further include or exclude WSJT messages in the decode list. This can be used to limit messages to only those containing a specific string, such as a contest name when the band segment used also has non-contest operators on the air, or to include various “73” messages for tail end calling. Note that string filters take precedence over “73” messages meaning that if you choose to limit CQ messages to only those containing, for example, “FD” or “WW” the 73 messages will not be displayed unless the entered filter string is also present in the message. This is highly unlikely in practice.
Note that the Filter item in the menu bar will change in color to red if any filter settings are enabled. Filter settings are persistent.
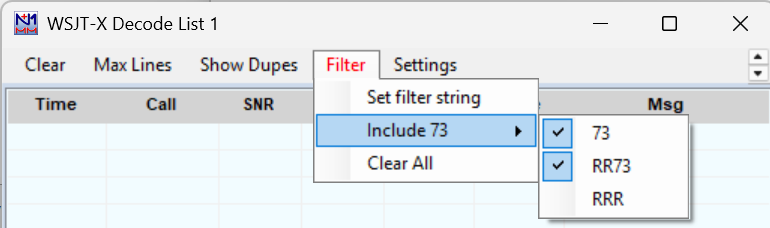
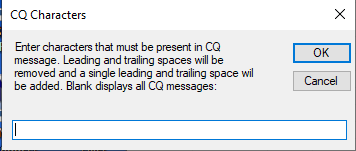
Choosing “Set filter string” will open the filter string entry window. Enter the text that must be present in the CQ message to be displayed in the decode list. To cancel the filtering, reopen the window and click on “Cancel”.
To include “73” messages to facilitate tail-ending, choose the “Include 73” option. The submenu that opens will allow you to to select or deselect messages containing “73”, “RR73”, or “RRR”. This sub menu will stay open and not close until you click anywhere outside the menu.
The “Clear All” menu item clears all filter settings.
Settings – used to customize display settings.
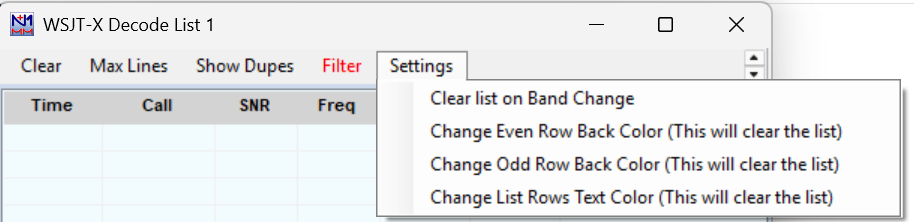
“Clear list on Band Change” does what it says – clears the stored list when the band is changed in WSJT-X or N1MM+. This will prevent you from trying to call a station whose callsign was decoded on the previous band instead of on the current band.
The other three items are used to customize the background colors for the two (odd/even) cycles and the foreground text color for text other than callsigns. Using any of these three o
Operating using the Decode List window
To initiate a contact with a station in the list, you may either click or double-click on a callsign in the Logger’s WSJT Decode List window, or you may double-click on the callsign in the WSJT-X or JTDX Band Activity or RX Frequency window. This will transfer the call sign and grid square information to WSJT-X, and if WSJT-X’s “Double-click on call sets Tx enable” setting option is checked, it will start to transmit on the next valid time slot. Note that if you click or double-click on an “old” callsign, i.e. one that was sending CQ during the 15-second (FT8 – 7.5 seconds in FT4) sequence before the most recent one, WSJT-X/JTDX will not start transmitting until the correct time slot for calling that station (e.g. in FT8, if the other station called CQ on an “even” time slot starting at 0 seconds or 30 seconds, WSJT-X/JTDX will only call that station on an “odd” time slot starting at 15 seconds or 45 seconds).
When you click or double-click on a callsign, either in the WSJT Decode List window or in the WSJT-X/JTDX Band Activity window, that call sign will also appear in the N1MM+ Entry window. This is part of the logging process. Do not enter the exchange into the Entry window. Simply complete the QSO in WSJT-X or JTDX, up to and including the point where the QSO is logged. If you have not chosen the “Log automatically” option in WSJT-X/JTDX, you will need to mouse click in WSJT-X/JTDX’s Log Contact window to log the contact. After completing and logging a contact in WSJT-X or JTDX, that contact will be logged in the WSJT-X or JTDX ADIF log and the N1MM+ contest database simultaneously.
Do not type anything into the Entry window or any other N1MM+ window; in fact, it is possible to operate in FT8 or FT4 with all of the N1MM+ windows minimized to the Windows Task Bar and still have all of your FT8/FT4 QSOs recorded in the N1MM+ log. It is not actually necessary that the WSJT Decode List window in N1MM+ be visible (although you may prefer to use it for choosing stations to work); it can be minimized to the Task Bar and will still carry out its function of relaying dupe/multiplier status to WSJT-X or JTDX.
Since all of the logging activity is carried out in WSJT-X, operators should familiarize themselves with features of WSJT-X that can be used to help complete QSOs. This is particularly important when the basic auto-sequencing process runs into trouble, as commonly happens in situations with high QRM levels such as contests. Operators should familiarize themselves with the “Log QSO” button, and with the use of non-standard message sequences with the help of the “Next” and “Now” columns to the right of the standard messages (message tab 1 in WSJT-X). This may be facilitated by associating the function keys F1-F6 with the standard messages using the “Alternate F1-F6 bindings” check box under the General tab in the WSJT-X Settings window. For a more in-depth discussion of some contest logging issues with WSJT-X, see this NCJ article on FT4 and FT8 contesting.
When a callsign is listed in the WSJT-X or JTDX DX Call field, the Decode List interface will persistently copy that callsign into the N1MM+ Entry Window callsign field (for example, the call may stubbornly reappear after using [Wipe] to clear the N1MM+ Entry window). After you have completed a QSO in WSJT-X and it has been safely logged, you can use the Esc key in WSJT-X to clear the DX Call field while still running WSJT-X. This will clear the callsign field in the Entry window as well. If you are entering a contest that allows multiple modes, having WSJT-X or JTDX put calls into the Entry window, or having it clear the Entry window, is definitely not something you want to have happen while you are using a non-WSJT mode (RTTY, CW, SSB, PSK). Therefore, you should always close the WSJT Decode List window and shut down WSJT-X/JTDX before changing to a non-WSJT mode.
To change modes from a WSJT mode to a “normal” N1MM+ mode (CW, SSB, RTTY, PSK31/PSK63), first clear the DX Call box in WSJT-X or JTDX (the Esc key will do this), then close WSJT-X or JTDX. If this does not close the WSJT Decode List window, close it as well. Type the name of the new mode into the call sign box in the N1MM+ Entry window and press Enter. Now QSY to the frequency you want to operate the new mode in (for example, by typing the frequency into the Entry window) and carry on operating in that mode. To switch from that mode back to FT8 or FT4, either use the > Window > Load WSJT/JTDX menu item, or just type FT8 or FT4 into the Entry window. Then, if the Decode List window does not open automatically, use the > Window > WSJT Decode List menu item to open the WSJT Decode List window.
WSJT Decode List FAQs
Rig Control – Can both WSJT-X and N1MM+ control the radio?
Yes, if you are calling up WSJT-X from within N1MM+ using the > Window > Load WSJT/JTDX menu item and N1MM+ and WSJT-X have both been configured appropriately. When you do this, N1MM+ handles rig control on behalf of WSJT-X, using the same technique as is used by the DXLab Suite Commander program (which is why WSJT-X is configured to use “DX Lab Suite Commander” as its rig control method). If you change modes from the WSJT-X/JTDX Mode menu, or if you change bands or frequencies in WSJT-X/JTDX (just below the Band Activity list), WSJT-X/JTDX will change the frequency in the radio via N1MM+.
Generally speaking, the radio mode you use for WSJT-X will be the same as the radio mode you would use for PSK or other sound card digital modes. If the Mode sent to radio is not set up correctly under the Mode Control tab in the Configurer, N1MM+ may put the radio into the wrong mode when using WSJT-X. If this happens to you and you are unable to determine the correct settings to use in the Configurer, you can try setting the Mode under the Radio tab in the WSJT-X Settings window to None, and then make sure you switch the radio into the correct mode manually before starting to use WSJT-X.
If you have some method of sharing rig control, such as one of the Win4K3Suite/Win4YaesuSuite/Win4IcomSuite programs, or SmartSDR with a Flex radio, then perhaps you may be able to use a stand-alone copy of WSJT-X or JTDX concurrently with N1MM+, including the Decode List window, without loading WSJT-X/JTDX from within N1MM+. However, detailed setup instructions for doing this are beyond the scope of this document, and there is no guarantee that it will continue to work with future versions of either program.
No Rig Control – Does it work without rig control?
It is possible to use WSJT-X without any rig control at all, but this requires some careful attention to detail when changing bands. You will need to change bands manually in both programs every time you change bands on the rig. Checking for duplicates and multipliers will not work correctly if the N1MM+ program is not set to the band you are operating on. Operating without rig control also means that some of WSJT-X’s features, notably the “Split” or “Fake It” techniques used to keep the sound card audio in the 1500-2000 Hz “sweet spot”, as well as the automatic choice of operating frequency depending on the mode selection, will not work.
My radio does not go into transmit when I try to transmit from WSJT-X. What causes this and how can I fix it?
There are several possibilities.
First, if you have configured WSJT-X to use CAT for PTT control, you must have a method of rig control configured separately and working in N1MM+. The simplest such method may be to use VOX, if that works with your radio. Next simplest is to check the “PTT via Radio Command Digital Mode” option in the setup for the rig control port in N1MM+, again assuming your radio supports this. In extremis, you can configure WSJT-X to use RTS or DTR for PTT on a a separate serial port interface that is not used by N1MM+, but in most such cases it would be preferable to configure that serial port for PTT in the N1MM+ Configurer rather than in WSJT-X.
Second, if you have configured WSJT-X’s Mode control to use Data/Pkt mode on the radio, you must ensure that the Mode Control setting in the N1MM+ Configurer is set appropriately for your radio. With some radios, if the wrong mode is selected here, PTT may stop working. A test for this problem is to set WSJT-X’s Mode control to None, and then set the mode on the radio manually to the correct mode for sound card digital communications.
If PTT works intermittently, or very slowly (e.g. takes several seconds), the culprit might be the Split Operation setting in WSJT-X/JTDX. With some radios, the “Rig” setting seems to require a lot of handshaking between the two programs that delays the start of each transmit cycle. With some other radios, it seems to be the “Fake It” setting that takes more time. You might find that “Fake It” works more reliably than “Rig”, or vice versa, depending on your radio.
My radio is changing frequency when WSJT-X transmits. What gives?
This is by design, and is controlled by the “Split Operation” section in the WSJT-X/JTDX Settings window. The basic idea is to try to keep the audio frequency used in the sound card during transmit within the “ideal” 1500-2000 Hz window. This avoids potential problems with the radio’s transmit filtering, which may roll off at low and high audio frequencies, and is also intended to minimize the chances of audio harmonics of a low-audio-frequency signal being transmitted, by ensuring that any such audio harmonics are outside the transmit filter’s passband.
When “Split Operation” is set to “Fake It”, the program achieves this goal by simultaneously changing the rig’s frequency and the sound card audio frequency in opposite directions by the same amount (always a multiple of 500 Hz), so that the audio frequency used in the sound card is within the “ideal” range. When the program goes back to receive, the rig is QSYed back to the original frequency so that received signals appear at the same places in the waterfall.
If “Split Operation” is set to “Rig”, instead of changing the rig’s main VFO frequency, the program uses the rig’s second VFO and Split capability to achieve the same result. With some radios, this method appears to involve more handshaking between the rig, N1MM+ and WSJT-X/JTDX, which makes this method paradoxically slower or less reliable than the brute-force “Fake It” method, which is why we suggest switching from “Rig” to “Fake It” if you are having problems using the “Rig” setting (or vice versa, if the “Fake It” setting is the one that seems to be having problems).
Compatibility with DXLab Suite Commander – Can I run Commander at the same time?
No. The Decode List window uses the same UDP port as Commander to communicate with WSJT-X/JTDX. If both programs are running, their messages will interfere with each other, leading to failures of rig control in WSJT-X/JTDX and failures of communication between the Decode List window and WSJT-X/JTDX. This is in addition to any errors that might occur as a result of having Commander and N1MM+ both trying to open the radio control port at the same time.
Compatibility with JTAlert – Can I run JTAlert at the same time?
Yes, by using the multicast IP address feature in N1MM+ versions since 1.0.9600.0. The same multicast IP address (e.g. 224.0.0.1) must be used in all of the programs that are sharing the communications. Start WSJT-X from N1MM+ before starting other applications that use the same multicast IP address, in order to ensure that the WSJT-X server is running before the other applications start. Note that if you enable both the WSJT-X logging interface to N1MM+ and the JTAlert logging interface,, your contacts may be double-logged into the N1MM+ contest database.
WSJT-X/JTDX seems to have lost all of my personalized settings after I set it up in N1MM+ – How can I restore them?
The settings in the instance of WSJT-X or JTDX run from within N1MM+ are entirely separate from the settings in the stand-alone instance. If you have set up personalized settings in the Settings window, or adjusted the gain and threshold settings in the WSJT-X/JTDX waterfall window, these will not be automatically carried over into the N1MM+ instance. The N1MM+ instance will start up with default settings.
If you have a lot of personalized settings and would like to avoid having to reset them all individually, you can copy the settings from the stand-alone instance into the N1MM+ instance by copying the WSJT-X.ini (or JTDX.ini) file from the log directory used stand-alone into the log directory used from the N1MM+ instance. This is described in more detail at the end of the WSJT-X/JTDX Setup section.
Copying the setup file from the stand-alone instance into the N1MM+ instance’s log directory will overwrite the special settings needed for interoperation with N1MM+. You will need to redo the settings changes in the Radio, Reporting and Advanced tabs in the Settings window as described in the WSJT-X/JTDX Setup section. If at any time during this process you get a Rig Control error message from WSJT-X/JTDX asking whether you want to reconfigure the rig control interface, click on OK and then do (or redo) the changes under the Radio and Reporting tabs as described in that section.
Supported Contests – Does this only work with specific contests or can I use it with my general log?
You can use the WSJT Decode List with your general DX or VHFDX log or with one of the contests supported by WSJT-X.
For general logging, use WSJT-X or JTDX in normal non-contest mode and use either the DX log or the VHFDX log in N1MM+ (the VHFDX log displays grid squares, the DX log does not; you can use the VHFDX log on HF, in which case you may want to change the Band Panel display using the right-click menu in the Entry window). Make sure the Mode category in the Contest Setup window for your DX or VHFDX log is set to SSB+CW+DIGITAL. If you leave it at the default SSB+CW, digital mode contacts made from WSJT-X may not be logged correctly, and the dupe checking will be wrong.
For contest logging, if the contest exchange sequence is different from the normal non-contest exchange sequence in WSJT-X, you will need to set the contest mode in WSJT-X under the Advanced tab in the Settings window. Check the check box called “Special operating activity” and then select the applicable contest and if necessary, fill in the contest exchange box. WSJT-X only supports a select few contest exchange types: NA VHF (for ARRL and CQ VHF contests with a 4-character grid square exchange); EU VHF (for European VHF contests with a 6-character grid square and serial number exchange); ARRL Field Day with its unique exchange; RTTY Roundup (for ARRL RTTY and similar contests with W/VE state/province code for W/VE stations and serial number for DX stations); and the WW Digi contest (4-character grid square exchange).
In N1MM+, open a contest log of the appropriate contest type, make sure the Mode category includes DIGITAL, and in the Entry window, put N1MM+ into WSJT-X/JTDX mode (e.g. by typing FT8 or FT4 into the call sign box and pressing Enter).
Callsign Colors – What do the callsign colors mean?
The callsign colors displayed by WSJT Decode List and transferred as background colors to callsigns in the Band Activity window in WSJT-X/JTDX are derived from your N1MM+ settings found in the > Config > Manage Skins, Colors, and Fonts > Colors window under 3. Callsign Background Colors. By default those colors are:
- Grey = dupe or non-workable (zero-point contact)
- Blue = normal (new contact but not a new multiplier)
- Red = new multiplier
- Green = double multiplier (not applicable in contests supported by WSJT-X at this time, but may apply in future)
These background colors are separate from the background colors used in WSJT-X/JTDX itself. Those colors apply to the entire line, and are selectable from the WSJT-X/JTDX Settings window under the Colours tab. The multiplier colors from N1MM+ apply to the callsign only, not to the rest of the line.
Serial Numbers – Will serial numbers from the two programs be in sequence?
In a word, no. If you make some contacts from N1MM+ (in RTTY, for example) and some contacts from WSJT-X (in FT8, for example), the serial number sequences from the two programs will not be in sequence. There is no way for WSJT-X to know what serial numbers you have used in N1MM+, so it will issue its own serial numbers independently of what N1MM+ does and vice versa. Don’t try to edit serial numbers after the fact to make the sequence look pretty – just accept whatever the two programs generate. Contest managers will accept this; what matters most is that your log reflects accurately what your software actually sent.
What do I need to do to switch between CW/SSB/RTTY and FT8?
Once N1MM+ and WSJT-X/JTDX have been configured correctly, you can switch from CW/SSB/RTTY to JT modes simply by typing either FT8 or FT4 into the Entry window’s call sign box and pressing Enter. Alternatively, you can use the N1MM+ Entry Window’s > Window > Load WSJT/JTDX menu item. Doing either of these will not automatically change the frequency or the WSJT-X/JTDX operating mode. Use the Mode menu in the WSJT-X/JTDX menu to select the operating mode. If this does not automatically tune the radio to the desired dial frequency, use the frequency selector in the WSJT-X/JTDX operating window to choose the dial frequency you wish to operate on.
To change modes from WSJT-X/JTDX to CW/SSB/RTTY/PSK, you must first clear the DX Call box in WSJT-X/JTDX and then close the WSJT-X/JTDX window. Once that action has completed, you can switch modes by using a Band Panel button, or if that does not work, by typing CW, SSB, USB, LSB, FM, RTTY or PSK31 (as appropriate) into the Entry window’s call sign box and pressing the Enter key. This should automatically close the Decode List window; if that window does not close automatically, close it using the X in the top right corner of the window. If the radio’s frequency does not change to an appropriate frequency for the mode you want to use, type the desired frequency in kHz into the call sign box and press Enter. From this point on, normal operation in N1MM+ should resume.
In JT modes, make sure the rig’s IF filtering is appropriate for FT8/FT4 (wide), and using the frequency selector in WSJT-X, tune the radio to a frequency where contest FT8 or FT4 QSOs are taking place (on the HF bands, the regular non-contest FT8 frequencies are generally not good places to try to make contest QSOs – you can add contest frequencies to the frequency list in the WSJT-X Settings window to make this easier).
Note that if you leave WSJT-X running with the WSJT Decode List window active while you are trying to make CW/SSB/RTTY contacts using the same Entry window, WSJT-X will take control of the N1MM+ Entry window and you may be unable to log contacts. WSJT-X is persistent in sending the characters from its DX Call field into N1MM+’s Entry Window callsign field. Even if DX Call is empty (blank) it sends a blank to N1MM+ – wiping out anything you may try to enter in N1MM+. You must close the WSJT Decode List window and the WSJT-X program when operating from N1MM+. Conversely, you must do all of your FT8 and FT4 operating from WSJT-X. Do not try to enter anything into the N1MM+ Entry window while WSJT-X is active and the WSJT Decode List window is open.
If N1MM+ is configured for SO2R, you can use the above technique to change modes for either radio. Alternatively, in a multi-mode contest you could have one radio set up for WSJT modes and use the other radio for CW/SSB/RTTY/PSK modes. WSJT-X would maintain control over the Entry window for its radio, but the other Entry window would operate normally in other modes. Since N1MM+ does not normally allow both radios in SO2R to be on the same band, when changing modes while remaining on the same band you might have to QSY the inactive radio to a different band.
Why are my FT8 and FT4 contacts being scored with zero points?
If your FT8 and FT4 contacts are being assigned zero points in the Log and Score Summary windows, it is likely that you have selected the wrong Mode category in the N1MM+ contest setup. Use the File > Open Log in Database… menu item to open the contest setup dialog window, and change the Mode category from RTTY to DIGITAL (ARRL RTTY contest), or from SSB+CW to SSB+CW+DIGITAL (VHF contests, general DX logging).
The logging interface into N1MM+ does not refresh the contest score when you change the contest category. Use the > Tools > Rescore Current Contest menu item to rescore previously-logged QSOs, and the score should be accurate thereafter (as long as you don’t change contest settings again).
