
Function Keys, Messages and Macros
Definitions and Fundamentals
One of the things that differentiates contest logging programs from general-purpose loggers is the ability to send stored messages, to save energy during long contests. N1MM Logger can send stored messages in CW, SSB and digital contests. These messages can incorporate macros, short-form statements which perform program tasks automatically.
It will help you to follow the discussion below if you first understand, in general terms, how N1MM Logger’s message-sending capabilities are organized. The architecture consists of three primary components: Function Key Files, Messages, and Macros
- Function Key Files are text files with a .mc extension that can be edited with a text editor (Notepad) or the program’s internal Function Key Editor
- Each row of text in a Function Key file is either a Comment or a Message
- Comments begin with a pound sign “#” in the first column, and help to explain the purpose of surrounding Messages. Comments are black text in the Function Key Editor
- Each row of text in a Function Key file is either a Comment or a Message
- Messages are lines of text in a Function Key file that do not begin with a pound sign “#” in the first column
- Messages begin with a label (text that will appear on the keys in the Entry Window), followed by comma “,”, followed by the message itself. If there is no comma, the message part will be considered to be empty
- Messages can contain ordinary text, macros, or – in messages for phone contests – WAV filenames (names of wav files supplied by the user containing recorded voice messages)
- The label is arbitrary – it does not determine which function key corresponds with the message. It may be helpful to the operator to start the label with the name of the function key, but this is purely for the operator’s convenience
- The association between messages and function keys is determined solely by the position of the message in the file, not by the contents of the label
- The first 12 message lines are called Run Messages. They are assigned, in sequence, to the keyboard Function Keys F1 – F12 when you are in Run mode. Run Messages are blue text in the Function Key Editor
- The next 12 message lines (13 – 24) are called Search and Pounce Messages. They are also assigned, in sequence, to the keyboard Function Keys F1 – F12, but only when you are in Search and Pounce mode. Search and Pounce Messages are green text in the Function Key Editor
- Macros are special text expressions surrounded by curly braces “{…}”
- There are also a few single-character macros: !, *, #, @
- Macros can either trigger a program action or expand to a string of text to be transmitted in CW or digital modes
Three default Function Key message files are included with the program, one for each mode: SSB Default Messages.mc”, “CW Default Messages.mc, and Digi Default Messages.mc. These are assigned automatically when you open a new contest (>File >New Log in database), as indicated on the Associated Files tab of the Contest Setup Dialog. You can edit the messages in the default files, export the messages to a new .mc file, or load different messages from an existing .mc file (for example, a .mc file that you download from the website’s >File >Sample Function Key Files gallery). We’ll get further into this below.
Early in the use of computers for amateur radio contesting, the term “macro” was used to denote any stored message. We follow a different convention – for us, the term Macro means a message component that either triggers a program action or expands to a string of text to be transmitted in CW or digital modes. The use of the .mc filename extension for our Function Key message files is a left-over from those days. Don’t be misled.
F1 is normally used as the CQ function key. If you use F1 for some purpose other than sending a CQ you are likely to run into surprises.
- When the CQ function key is invoked, the program will switch automatically into Run mode regardless of whether it was in Run mode or S&P mode to begin with
- The current frequency will be remembered as the CQ frequency
- Changing frequency on the radio away from the CQ frequency will automatically switch the program back into S&P mode (unless configured otherwise)
- Depending on configuration options, changing frequency on the radio to the last-used CQ frequency may automatically switch the program into Run mode
- Switching between Run and S&P modes changes which message definitions will be used (1-12 for Run, 13-24 for S&P)
All of the above work seamlessly and well when you use F1 to send your CQ message, but can give unexpected results if you use F1 for some other purpose.
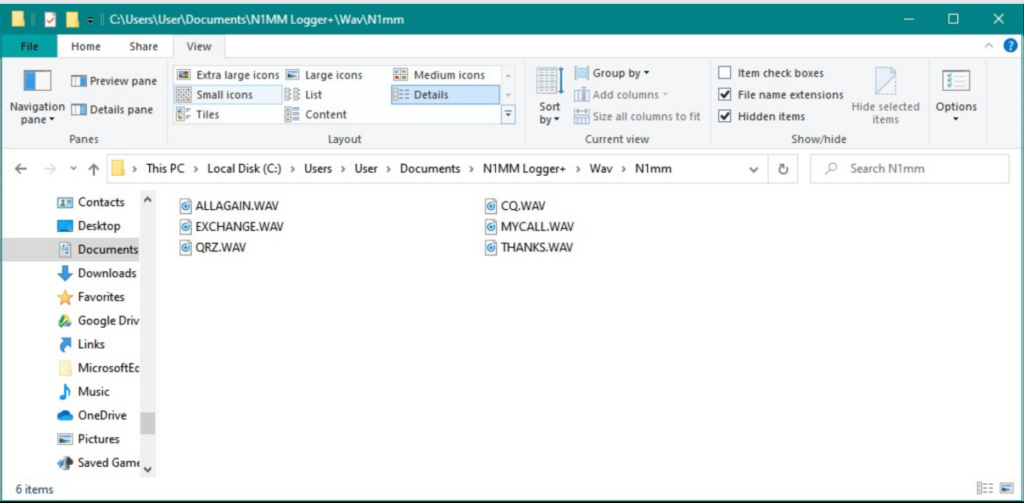
N1MM Logger Classic found its wav files assuming the starting directory was the N1MM Logger program directory. Typically users would place their wav files in a sub-directory of the N1MM Logger program directory called wav. To call up a wav file in this sub-directory, you would specify the file name in the form wav\filename.wav (or wav\{OPERATOR}\filename.wav if you were using operator-specific files) in your function key messages.
N1MM Logger Plus finds its wav files assuming the starting directory is the wav sub-directory created by the installer inside the N1MM Logger+ user files directory (*not* the program files directory). To call up a wav file in this sub-directory, you specify the file name in your function key messages as filename.wav, i.e. without the leading wav\ (or if you are using the {OPERATOR} macro, as {OPERATOR}\filename.wav, again without the leading wav\). If you edit your message files by removing the leading wav\ on file names in messages, you will be able to access wav files you have placed in the wav sub-directory.
Alternatively, if you wanted to continue to use the same message files you used with Classic without editing them to remove all those leading wav\’s, you could create a new wav sub-sub-directory inside the wav sub-directory in the N1MM Logger+ user files directory (for example, if the user files area were at the default location, these wav files would be located at Documents\N1MM Logger+\wav\wav\filename.wav, or Documents\N1MM Logger+\wav\wav\{OPERATOR}\filename.wav – note the two levels of wav\ in the path name), and once you have placed your wav files in that new sub-directory (or in operator-specific sub-directories under that wav\wav sub-directory if you are using the {OPERATOR} macro), you could call those wav files up using your old function key message files.
The Function Key Message Editor
The Function Key Message Editor is the key tool for managing your Function Key messages. It provides the best way for assigning, managing and editing Function Key Message files using a Notepad-like editing window. You can import and export function key message files, edit them, and save them.
The easiest way to open the Function Key Message Editor is by typing Alt+K in the Entry Window, or by simply right-clicking on the message buttons in the Entry Window. The editor will display the message file associated with the current program mode (CW, SSB or digital). If you want to open the message files associated with the other modes, select >Config >Change CW/SSB/Digital Function Key Definitions and select the desired mode.
If right-clicking on a message button or pressing Alt+K results in an error message to the effect that the function key editor cannot be opened because the operating mode is not set, or if the function key editor opens up but the messages you see are for the wrong mode, you must first set the operating mode (CW, SSB or digital) before opening the function key editor. You do this by typing the mode (CW, SSB, RTTY or PSK) into the call sign box and pressing Enter. Once you have done this, right-clicking on a message button or pressing Alt+K will open the function key editor with the messages for the mode you entered.
The Function Key Editor dialog window:

The Save and Cancel Buttons
- Save assigns the messages to the current contest and saves them to the file indicated in the title bar of the Function Key Editor. If you want to save those changes to a different file, use Export. Note: It is easy to change a default function key file without meaning to, if you forget that it is the file in the title bar and Save a modified version. If you do this, use the Sample Function Keys function below to retrieve the defaults, and then save them to the original file name.
- Cancel closes the editing window without saving. If you have made any changes, or imported a file, the program will ask you whether you want to save the changes. Answer Yes and the editor assigns the messages to the current contest and saves them to the file indicated in the title bar of the Function Key Editor. Answer No and the editor just closes, abandoning any changes you may have made.
The File Menu
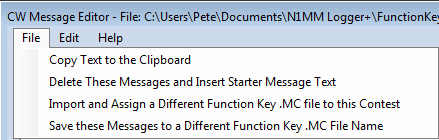
- Copy these Messages to the Clipboard places the entire contents of the editor on the clipboard
- Delete These Messages and insert Starter Message Text if you want to revert to the standard messages for the current mode, this option will copy them into the editor in place of the messages that were there, retaining the original filename. You will be asked if you wish to save your changes. OK makes the changes in the database and in the open .mc file; Cancel reverts to the previous message set.
- Import and Assign a Different Function Key (.MC) file to this Contest assigns a file that you choose to this contest. It is entered on the Associated Files tab and will be automatically opened whenever you open this or another instance of this contest.
- Save these Messages to a Different Function Key (.MC) filename opens a dialog where you can copy the current contents of the Function Key Message Editor to an .MC file of a different name.
There has been a significant change in the way Default [mode]Message text is handled.
A set of Default .mc files is loaded in the FunctionKeyMessages subfolder in the N1MM+ user files folder at program installation. If you wish, you may modify these to your heart’s content, changing them to fit each contest, or you may create and save contest-specific .mc files. Note, though, that if you start with a Default CW file, for example, make changes in the Function Key Editor, and Save them, they will be saved under that filename.
If you wish to restore the original Default messages, you can do the following:
- Click on “Import and Assign a Different Function Key File” on the File menu, and select the Default [mode] Messages.mc file you wish to revert.
- Click on “Delete these Messages and Insert Starter Message Text” (also on the File Menu).
- Click the Save button in the Function Key Editor, to save the Starter messages to the database and to the Default [mode] Messages.mc file, effectively recreating it in original form. If you exit without clicking Save, you will be prompted to decide whether you want to save the changes or not.
The Edit or Right-click Menu
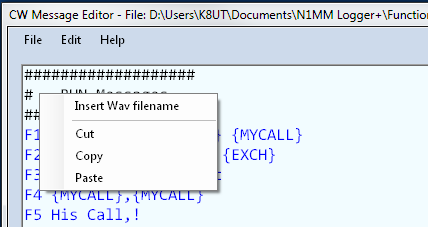
If you select the drop-down menu item >Edit, or right-click in the Function Key Message Editor Window, you’ll see a short menu. Three of the choices – cut, copy and paste – are the familiar Notepad editing commands and should need no explanation.
- Insert wav filename selection does what its name implies. Click on it and you will be asked to select an existing wav filename from the N1MM Logger+\Wav directory. Select a Wav file, and its filename will be inserted at the location of your cursor. The intended use of this function is to make it easy to construct complex SSB messages, combining macros and filenames.
Each database remembers your preferred Function Key file for a particular contest. For example, if you assign CQWWCW.MC to the CQ Worldwide CW contest in 2014, the database will remember your preference and also automatically assign the same file to the CQ Worldwide CW 2015 contest. However, if you open a new database for your logs, that memory is lost and you will begin with the default assignment of CW Default Messages.MC.
Function Key Message File Contents
Refer to the previous Fundamentals section and the Function Key Editor Dialog window screenshot for the following explanations
N1MM Logger accommodates up to 24 messages for each mode (CW, SSB and Digital), each divided into two sets of 12, one for Run mode, the other for Search and Pounce (S&P). (For more information on Run vs. S&P and other features of function key usage, see the Entry Window chapter section on Function Keys). This means that your Function Key message files can have as many as 24 active lines, plus an unlimited number of Comment lines
Comment Line – any line that begins with a pound sign “#”
- Comment Example: #This is a comment line
Message Line – any line that does not begin with a pound sign “#”
- Simple Message Example: F1 CQ, CQ
Message lines have two elements – a Label and the Message itself. The Label is separated from the Message with a comma “,”. In this example, the label is “F1 CQ” and the transmitted message is “CQ”
- Simple Message Example with a Macro: F1 CQ, CQ de {MYCALL}
In this example, the transmitted message is “CQ de” followed by my callsign, which the program will retrieve from the >Config >Change Your Station Data “Call” dialog
- Message Example with multiple Macro: F2 Exch,! {SENTRST} {EXCH} de {MYCALL}
In this example of a contest exchange, the transmitted message begins with the other station’s callsign “!”, followed by an RST report “SENTRST”, followed by the contest exchange (which could be an incrementing contact number, a state, a CQ zone, or any number of parameters based on the contest and the contents of the Sent Exchange box in the Contest Setup dialog), followed by “de”, and finally my callsign
In message files, # starts a comment line. Any line not starting with # is used as a function key definition, regardless of whether it looks like one or not.
Each active (non-comment) line contains a button label (appears on the button in the Entry window), then a comma, then the contents. If you want to put an ampersand in a label (as in S&P), you must type in two ampersands (as in S&&P).
The label is arbitrary. It is suggested that you put the fkey name (F1, F2, etc.) and a very brief description in the label, because this makes the button labels in the EW act as visible documentation for the fkeys even if you never use the mouse. However, putting F3 in a label DOES NOT automatically mean that this message will go into F3.
The association between lines in the mc file and the function keys is strictly positional. The first non-comment line (starting with any character other than #) is the F1 message regardless of what the label says. The second line is the F2 message. And so on.
There are up to 24 active lines in a file. The first 12 are for Run mode, the second 12 are for S&P. If there are fewer than 12 active lines, function keys after the last one will be empty, and S&P keys will be identical to Run. If there are exactly 12 active lines, S&P will be identical to Run. If there are between 12 and 24 active lines, the S&P lines after the last one will be identical to their Run counterparts. So for example, if there are 15 active lines, the first 12 are Run F1-F12. The next 3 are S&P F1-F3, and S&P F4-F12 will be identical to Run F4-F12.
There may not be any skipped lines in the file. If you leave a line out, all the following lines will effectively be shifted up by one.
Message Content Limitations
- Label length is limited to 29 characters, though you would never want to use that many
- Message total length is limited to 255 characters
- Message line count is usually 24 – 12 for Run and 12 for Search & Pounce. However, if you do not assign S&P messages the program will automatically substitute the Run messages in their place. For example if your S&P messages for F9 – F12 are identical to those in Run, you can leave those lines out of the file. But be careful, because you cannot have any gaps in the sequential numbering of the S&P messages. Blank lines are counted as message lines!
- The association between messages and function keys is strictly positional. The message in the first non-comment line will be sent by F1 in Run mode, regardless of what the label says; the message in the second line will be sent by F2 in Run mode; the message in the 13th line will be sent by F1 in S&P mode; and so on
Function Key Examples
In addition to the three default message files that install with the program, there are also a large number of Sample Function Key files available for download on the website. The advantage of these sample files, over the default files, is that they have been customized for the major contests and can be used without further modification.
There are sample function key files on the web site under >Downloads >Category listing >Function Key files for SSB, CW and Digital operation. Open the category for the mode in which you are interested download the selected files. To use them, you can name these files when you set up for a new contest, or you can import them into the function key editor. You can examine them either in the function key editor or simply from a text editor like Notepad.
The program comes preloaded with standard generic function key message files for all three modes, called CW Default Messages.mc, SSB Default Messages.mc and Digi Default Messages.mc . These work for contests with simple exchanges (like CQ WW or CQ WPX), and basically for all SSB contests.
If you are using the Default Messages.mc file for a given mode and use the function key editor to make changes, those changes will be permanent, i.e. they will apply to all future contests where you use that file. Therefore if you make changes for a particular contest but you don’t want those changes to apply to other contests, you should use a contest-specific mc file instead of the generic default file. You can create or download contest-specific files and use the Associated Files tab in the Contest Setup dialog to name the file you want to use for that contest. Once you have done that, future contests of the same type will automatically use the same message files as the previous contest of that type.
SSB
Unless you are using text-to-speech, SSB files contain wav file names. These wav files must be supplied by the user. Normally they are recorded in the operator’s own voice, to avoid confusion caused by using different voices in “live” vs. recorded transmissions. They are assumed to be in the wav subdirectory of the N1MM Logger+ user files area. (Note: If you have moved the user files area during a reinstall, perhaps to avoid problems with OneDrive, there may be more than one N1MM Logger+ folder in your system; the one to use for your user files, including wav files, is the one that is pointed to from the Help > Open Explorer on User Files Directory menu item.) If an {OPERATOR}\ or {WAVDIR}\ macro appears in the file name, the file will be found in a sub-subdirectory named with the current operator’s call sign (or an alternate designator specified by a {SetWavDir} macro). It is possible for !, # and @ macros to appear as well, but only if a complete set of individual wav files for each letter and number is found in the wav\LettersFiles sub-subdirectory (or a sub-sub-subdirectory named in the Configurer under the Other tab, DVK Letters File Path box). There is one sample SSB file on the web site (SSB_Default_Messages.mc). The differences between different contests are mainly in the contents of the recorded wav files, not in the contents of the function key messages.
Basic example file illustrating the use of the {OPERATOR} macro:
F1 CQ,{OPERATOR}\CQ.wav
F2 Exch,{OPERATOR}\Exchange.wav
F3 TNX,{OPERATOR}\Thanks.wav
F4 {MYCALL},{OPERATOR}\Mycall.WAV
F5 His Call,empty.wav
F6 Spare,empty.wav
F7 QRZ?,{OPERATOR}\QRZ.wav
F8 Agn?,{OPERATOR}\AllAgain.wav
F9 Exchg?,{OPERATOR}\Exchange query.wav
F10 Spare,empty.wav
F11 Spare,empty.wav
F12 Wipe,{WIPE}
F1 CQ,{OPERATOR}\CQ.wav
F2 S&P Exch,{OPERATOR}\S&P Exchange.wav
F3 Spare,empty.wav
F4 {MYCALL},{OPERATOR}\Mycall.WAV
F5 His Call,empty.wav
F6 {MYCALL},{OPERATOR}\Mycall.wav
F7 Rpt Exch,{OPERATOR}\Repeat Exchange.wav
F8 Agn?,{OPERATOR}\AllAgain.wav
F9 Spare,empty.wav
F10 Spare,empty.wav
F11 Spare,empty.wav
F12 Wipe,{WIPE}
Make sure your wav directory contains a subdirectory named with your call sign, and that that directory contains all of the filenames listed in the file except for “empty.wav”, which is installed with the program.
CW
CW files contain the actual text that is to be sent in Morse code, possibly intermixed with substitution macros (like {MYCALL}, !, #, {EXCH}) and control macros (like {WIPE}, {CLEARRIT}). Note that if the {EXCH} macro is used, you must enter the correct exchange in the Sent Exchange box in the Contest Setup dialog – consult the Contest Setup instructions for the contest. There are CW files on the web site in the Sample Function Key Files gallery for most major contest types.
Generic CW example
F1 Cq,cq test {MYCALL} {MYCALL} test
F2 Exch, {SENTRSTCUT} {EXCH}
F3 Tu,tu {MYCALL} test
F4 {MYCALL},{MYCALL}
F5 His Call,!
F6 Repeat, {SENTRSTCUT} {EXCH} {EXCH}
F7 Empty,
F8 Agn?,agn?
F9 Nr?,nr?
F10 Call?,cl?
F11 Empty,
F12 Wipe,{WIPE}
F1 Qrl?,qrl? de {MYCALL}
F2 Exch,{SENTRSTCUT} {EXCH}
F3 Tu,tu
F4 {MYCALL},{MYCALL}
F5 His Call,!
F6 Repeat,{SENTRSTCUT} {EXCH} {EXCH}
F7 Empty,
F8 Agn?,agn?
F9 Nr?,nr?
F10 Call?,cl?
F11 Empty,
F12 Wipe,{WIPE}
Sprint CW examples
Whether you operate the NA Sprint or not, these examples will illustrate the use of various macros in combination with text in function key definitions.
Sprint CW Example #1
This Function key set is based on a set posted by Kenny, K2KW:
F1 CQ,* * NA
F2 Exch, * {EXCH}
F3 TU,EE{S&P}
F4 {MYCALL},*
F5 His Call,!
F6 QSO B4,B4 E E
F7 ?,?
F8 Agn,AGN
F9,
F10,
F11,
F12,
F1 CQ,* * NA
F2 Exch,! {EXCH} *
F3 TU,EE{RUN}
F4{MYCALL},*
F5 His Call,!
F6 QSO B4,B4 E E
F7 ?,?
F8 Agn,AGN
F9,
F10,
F11,
F12,
Running Message Notes
- For F2, there is a space before the *; E.G. “[space] * {EXCH}”
- For F3, “EE” is there to confirm the QSO. You could easily use “TU”.
- After the “EE” is sent on the F3 message, the {S&P} macro puts you into the S&P mode. Then just hit your UP/DOWN arrow to QSY.
- Personally I have F6 programmed as {EXCH} to send a repeat on the exchange
S&P Message Notes
- Note the difference in the sequence for the F2 message compared to the Running F2 message
- For the F3 message, the {RUN} macro puts you in the running mode, ready to work a tail ender and send him the correct QSO sequence
- Personally I have F6 programmed as {EXCH} to send a repeat on the exchange
Sprint CW Example #2
This function key set is based on one posted by Pete, N4ZR:
F1 CQ,* * NA{CLEARRIT}
F2 Exch, * {EXCH}|
F3 TU,E~E {CLEARRIT}
F4 {MYCALL},*
F5 His Call,!
F6 QSO B4,B4 *
F7 Rpt Exch,{EXCH}
F8 ?,?
F9,
F10,
F11,
F12,
F1 CQ,* * NA{CLEARRIT}
F2 Exch,! {EXCH} * {RUN}
F3 NR,#
F4 {MYCALL},*
F5 His Call,!
F6 Name,PETE
F7 State,WV
F8 ?,?
F9,
F10,
F11,
F12,
Note two things about this set:
1. The {RUN} macro is in S&P F2, not F3. This worked great for me – when I pressed Enter to send the S&P exchange, the exchange was sent, the QSO was logged, and the mode changed to {RUN} with the cursor in the call sign box. Therefore I did not have to press F3 to get from S&P to Run. The main problem with this is that if anyone asks for a repeat of the serial number, the Run keys are already active, so you have to either remember how to get the serial number from the S&P set (Shift+F3), or else just use the paddle, which is what I did.
2. There is no {S&P} macro in this set. At the end of a Run QSO, you switch to S&P mode by just QSYing. This also worked OK for me; since you are going to have to QSY anyway, there seems to be no real need to force a change to S&P mode. I also had the “QSYing wipes the call & spots QSO in bandmap” option selected, which may have helped ensure that the cursor was in the right place after QSYing by wiping the entry window. Of course I did not actually have the band map open, and I just ignored any call signs that showed up in the frame in the entry window.
Sprint CW Example #3
Customizing N1MM Logger for the North American CW Sprint by Steve, N2IC
I’m not going to try to explain how to operate the Sprint – for this, there is an excellent writeup at: http://www.kkn.net/~n2ic/sprint.html
What I will do is describe how to get the most out of N1MM Logger in the Sprint. My operation is SO2R, and my configuration is optimized for that mode. However,I’m sure you SO1R guys will pick up a few tricks from what I have done for SO2R.The most important thing is to get your options, windows and function keys setup correctly before the Sprint starts.
The Options…
Start up N1MM Logger+, and create a new SPRINTCW contest.
In the Config menu, select the following options:
- Enter sends message (ESM)
- QSYing wipes the call & spots QSO in bandmap
- Do not automatically switch to run on CQ frequency
- Show non-workable spots
- SO2R->Toggle CTRLFx Macro
Note: SO2R->Focus on Other Radio is NOT turned on
The Windows…these are the only windows I have on my screen and all fit nicely on my small monitor
- Entry Window (one for each radio)
- Visible Dupesheet (one for each radio)
- Info
- Log
- Score Summary
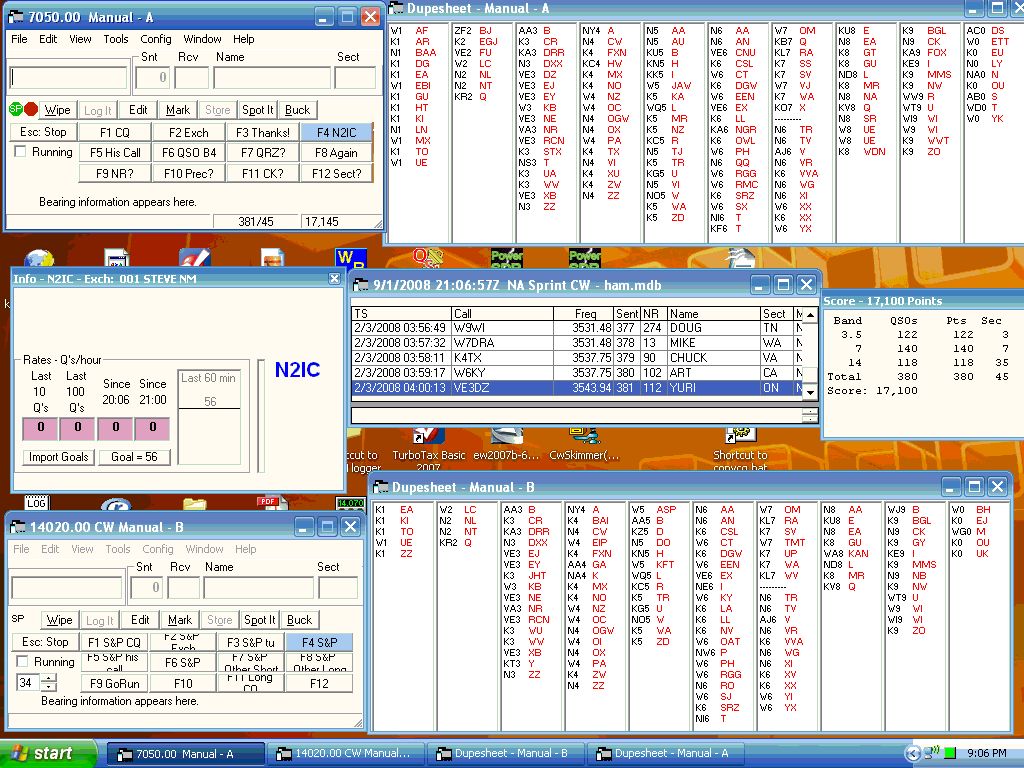
The Visible Dupesheet is really nice once you get used to it. To see if a station is a dupe, you just scan the dupesheet with your eyes, rather than frantically type a call into the Entry Window. You can change the font size in the Visible Dupesheet by dragging it wider, so that there is white space past right-most column. Then right-click in the white space for a choice of a small font or a large font.
Notice that I do NOT have the “Available Mults & Q’s” window open. Open the Bandmap window, but size it to a very small size. It’s needs to be open, even though it is of no use in Sprint.
Open the Telnet window. Select the Filters tab. Change the Bandmap DX spot timeout to 1 minute. That’s right….1 minute. Press Update. Now close the Telnet window. Don’t reopen it. It is of no value in Sprint, but it is important to change the bandmap DX spot timeout value to 1 minute. This controls how long calls stay on the bandmap and the appearance of calls in the “on deck” frame of the Entry Window. We’re obviously not using packet in the Sprint.
Function Keys ….
Here are my function key definitions. I’ll explain a few that aren’t obvious.
F1 CQ,{JUMPRX}cq na cq na * na
F2 Exch,* # steve nm
F3 TU,{CLEARRIT}T{END}{CONDJUMP}{STOPTX}
F4 (MYCALL},*
F5 His Call,!
F6 QSO B4,! QSO B4 * NA
F7 Other Short,{CTRLF10}
F8 Other Long,{CTRLF11}
F9 Go S&P,{S&P}
F10 CQ,CQ NA * * NA {RUN}
F11 Long CQ,CQ NA CQ NA * * NA {RUN}
F12 – ,-
F1 S&P CQ,{JUMPRX}CQ NA CQ NA * NA
F2 S&P Exch,! # STEVE NM {RUN}
F3 S&P TU,TU
F4 S&P{MYCALL},
F5 S&P His Call,!
F6 S&P Name,-
F7 S&P Other Short,{CTRLF10}
F8 S&P Other Long,{CTRLF11}
F9 Go Run,{RUN}
F10 CQ,CQ NA * * NA {RUN}
F11 Long CQ,CQ NA CQ NA * * NA {RUN}
F12 -,-,
With the CQ F3 key, my “thank you” message is sent. When you QSY, you will automatically be changed to the S&P mode. Do not include the {S&P} macro here -it will cause the last station worked to get “stuck” in the on-call fame of the Entry Window.
With the S&P F2 key, as soon as I send my exchange, it immediately switches to Run mode.
I can also force myself into Run and S&P modes with the F9 key.
The F7 and F8 keys send CQ’s on the “other” radio. This is very useful when the other station is sending his exchange, and you are going to lose the frequency (i.e. it will become “his” frequency). You can send a CQ on the other radio, while he is sending his exchange. Then, when he finishes sending his exchange and you need to send your “thank you” message to finish the QSO, all you have to do is hit Enter, which will stop the CQ on the other radio, and send your CQ F3 message on the active radio. However, you had better be ready to copy a new caller on the “other” radio. You also need to be sharp with the Pause key to jump between the two radios when this happens. The {CONDJUMP} macro in the Run F3 message will move your entry focus to the “other” radio, so that you will be ready to copy a new caller.
When I’m CQing on the active radio, but simultaneously doing S&P on the other radio, and hear a new station, I can just hit the Enter key. This will stop the CQ, and send my call on the other radio.
One thing you need to do is keep an eye on where your transmit and receive focus is (the red and green dots on the Entry Window). When you’re doing SO2R in the Sprint, there will be times where your focus is not where you might expect it, or want it. Always be ready with the \ and Pause keys to jump between radios. Yes, this takes lots of practice, and you will make mistakes. The Thursday night NCCC Sprints are good practice for this.
73 and see you in the Sprint !
Steve, N2IC
CW Messages Deep Dive
From the Config menu, you can select Change CW/SSB/Digital Function Key Definitions, and then Change CW Function Key Definitions, or you can simply right-click on one of the 12 function key buttons in the Entry window. That will bring up this window:
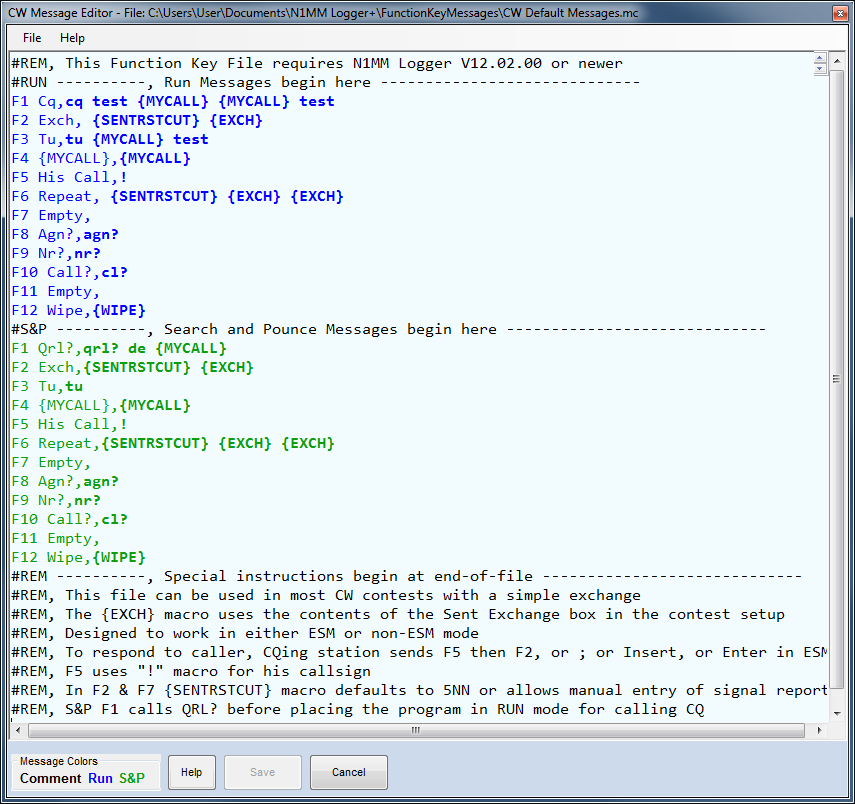
What it is displaying is the default function key message file that is now shipped with N1MM Logger+. There is much more on the Function Key Message Editor here, but for the moment, let’s use what we find already in place.
Going down from the top, note the macro {MYCALL}. An alternative to this is the single-character macro *. Either one denotes your callsign, from the Station Data window. This is a text macro. There are two types of macros, text macros and action macros – text macros substitute a string of text for the macro, while action macros perform some program action. Both are often used in combination with regular text in a message, as shown here – when you press the function key or click the on-screen F1 button, the program will send CQ TEST N4ZR N4ZR TEST (substituting your call for the asterisk). There’s a table of the many recognized Macros in the chapter by that name in the manual but for now let’s go on.
Conventionally, F2 is used for your contest exchange. The sample file uses the {EXCH} macro, which is a text macro that substitutes whatever you put in the Sent Exchange part of your Contest Setup. Say, for example, we were setting up for a contest where the exchange is signal report, your name and your state. When N4ZR sets up the contest, he puts PETE WV in the Sent Exchange. Now when he presses or clicks F2, the program will send PETE WV.
You do not need to use the {EXCH} macro; it is merely a convenience. You can always hard-wire the exchange directly into the message definition (use # for serial numbers).
Also in Run F2 is the macro {SENTRSTCUT}. Many of us just put 5NN explicitly in F2, but this macro is a little cleverer. It sends the signal report (nominally 599, but can be modified from the Entry window on a per-QSO basis) using N instead of 9 (CW only).
One fine point – you might think of putting the 5NN in your Sent Exchange in the Contest Setup dialog – after all, everyone’s 599, right? Well, don’t, because it will screw up your Cabrillo log. Just resign yourself to putting 5NN or {SENTRSTCUT} in your function key messages wherever you want it sent.
The next handy trick to notice is in Run F5, where ! is used. That always denotes the other station’s call, grabbed from the Entry Window
A final tip – most macros are in the form of {WORD}, where “word” is the macro (the main exceptions are *, ! and #, which do not appear inside curly brackets). The curly brackets around the macro name are necessary so that the program knows it’s time to substitute something or take some action. It is awfully easy to type a square bracket or common parenthesis instead of the curly bracket, so look carefully.
From now on, if you want to change the content of any message buttons, just right-click in the area of the buttons, and the editor we just left will reappear.
OK – you’ve hooked up your interface, so now you’re ready to send some canned CW. As explained above, you can either hit the function key F1, or click on the F1 button. Either way, the program will switch your radio from Receive to Transmit (assuming you have PTT connected – you can also use VOX or break-in, of course) send the message, and then go back to Receive again.
RTTY
Digital file messages generally begin with {TX} and end with {RX}, except for program control macros.
The way the keys below are designed, they will work in many RTTY contests without any changes. Whether these particular ones suit your situation will depend on your antennas, your power, QTH, etc.; but maybe these will give you some ideas to work with:
F1 CQ,{TX} CQ TEST * * CQ {RX}
F2 EXCH,{TX} 599 {EXCH} ! {RX}
F3 TU,{TX}{ENTERLF} ! TU * QRZ? {RX}
F4 {MYCALL},{TX} * {RX}
F5 His Call,{TX}{ENTERLF}! {RX}
F6 QSO B4, {TX} QSO B4 * CQ {RX}
F7 Rpt Exch,{TX} {EXCH} {EXCH} {EXCH} {RX}
F8,{TX} AGN AGN * {RX}
F9,
F10,
F11,
F12,
F1 CQ,{TX} CQ TEST * * CQ {RX}
F2 EXCH,{TX}{ENTERLF} ! TU 599 {EXCH} {EXCH} {RX}
F3 TU,{TX} ! TU {RX}
F4 Call Him,{TX} * * {RX}
F5 1×1,{TX} ! * {RX}
F6 0x1,{TX} * {RX}
F7 Rpt Exch,{TX} {EXCH} {EXCH} {EXCH} {EXCH} {RX}
F8 Agn,{TX} AGN AGN {RX}
F9,
F10,
F11,
F12,
If the contest exchange includes an RST, you can use the {SENTRST} macro to send the signal report from the Snt box in the Entry window in place of 599 in the exchange message.
General RTTY example
When using the above keys it is assumed that ESM is on. The Run mode keys F5, F6 and F7 are not very useful when you are S&Ping, this is why I put those keys to better use by programming them differently from the Run mode keys.
Note also that you can use up to 24 additional buttons (mouse only, no keyboard access) on the digital interface window. For example, you can set up 0x1, 0x2, 0x3 and 0x4 calls, single, double and triple exchanges, separate requests for his zone and state and repeats for your zone only and for your state only, and so on.
Example RTTY where the time is part of the exchange (like BARTG)
In the following table only the keys that are different from the general example above are shown:
F2 Exch,{TX}599 {EXCH} {EXCH} {TIME2} {TIME2} ! {RX}
F7 Rpt Exch,{TX} 599 {EXCH} {EXCH} {TIME2} {TIME2} {RX}
Per-Operator Function Key Files
There is an option, selectable under the Other tab in the Configurer, which allows individual operators in a multi-operator station to each have their own function key message files. This gives different operators the capability to have function key message files tailored to their individual preferences. The function key file for all operators is based on the function key message filename specified under the Associated Files tab in the contest setup window. The master function key file is edited when the OPERATOR is set to the station call sign.
In phone contests it is not necessary to use this option simply to change the voice in recorded messages (see the description of the {OPERATOR} macro in the next section on SSB function key messages instead). However, by using individual per-operator function key files, it is possible for one operator to use a function key message file that includes ! and # macros for voicing of call signs and serial numbers using pre-recorded letters and numbers, while another operator can use a function key message file that does not include these macros, and speak call signs and serial numbers into the microphone. In CW and digital modes, by using this option different operators can tailor their function key messages to match their individual preferences.
When this option is enabled, changing operators using the OPON or Ctrl+O command will switch the function key message file currently in use to that operator’s personal function key message file. These operator-specific files are stored in a sub-directory of the main function key messages directory. The first time an operator whose call sign is different from the station call sign signs on using Ctrl+O or OPON, the personal function key message file for that operator is initialized from the “master” file specified under the Associated Files tab in the contest setup window. Subsequently, that operator can make changes to the file using the Function Key Message Editor without having any effect on other operators’ function key message files, thus enabling each operator to have their own individual files. The “master” file specified under the Associated Files tab can be edited only by the operator whose call sign is the same as the station call sign. See the description of Per-Operator Function Key Messages under the Other tab in the Configurer section of the manual for more information on how this is implemented.
If an operator changes the function key message filename specified under the Associated Files tab in the contest setup window during the contest, all operators will be assigned new message files based on the new filename as they OPON.
Special Measures for SSB Function Keys
CW and RTTY messages are quite straightforward. SSB messages, however, require additional instruction.
The SSB Default Message.mc file, as shown in the Function Key Editor
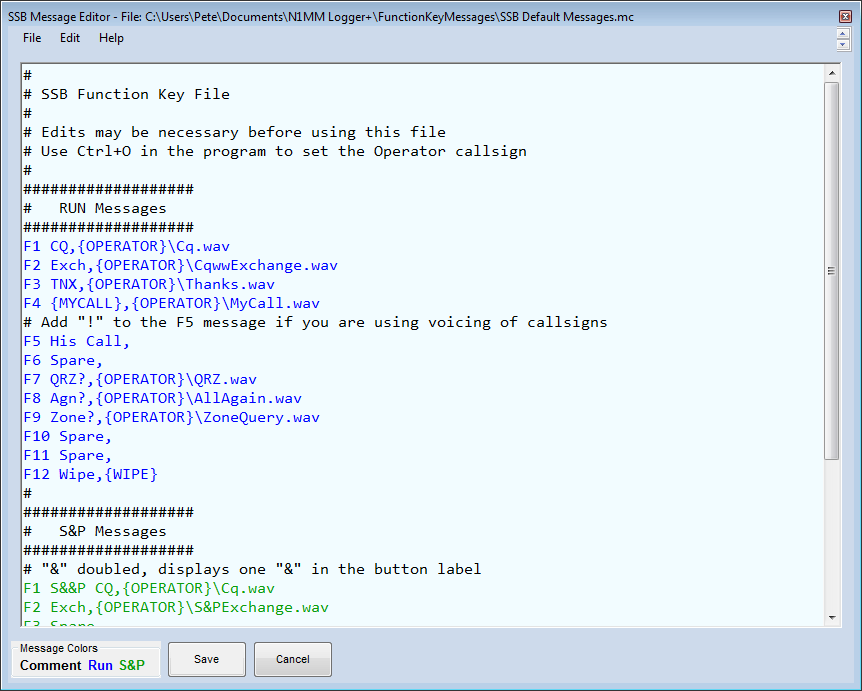
This screenshot shows the default SSB function keys, as supplied with the program initially. You’ll note that the F5-His Call message as-delivered is a single space character. If you are using character-by-character voicing of call signs, you can use the “!” macro character (without leading or trailing spaces) as the F5 message. This is the macro that is used to tell the program to voice a callsign by putting together letter and number files, so it would not normally be used. If you are not voicing call-signs or serial numbers (see below), you should not have the “!” macro in your SSB definitions. The same goes for the “#”, “*”, and “@” macros. Instead of the “*” or {MYCALL} macro, use an explicit filename like mycall.wav.
The Wav files referenced in the message file must be supplied by the user. For use with this file, they must be placed in the N1MM+ user Wav\ directory path. In the case where a station has multiple operators, use the {Operator} macro in the function key wav file path as shown above. Then place each operator’s Wav files in an operator callsign subdirectory. N1MM Logger+\Wav\[operator]\. For example, K3CT’s Wav files when operating at N1MM’s station would be located in N1MM Logger+\Wav\K3CT\ . The {WAVDIR} macro can be used in place of {OPERATOR} in wav file pathnames in order to support multiple sets for the same operator.
Use the CTRL+O or OPON command to change the operator and tell the program to switch to that operator’s Wav files. If using multiple sets for the same operator, use {SetWavDir} to set the value used for the {WAVDIR} macro.
Playing Multiple Wav Files
To play more than one wav file with a function key, separate the wav file strings with a comma.
F1 CQ,{OPERATOR}\Cq.wav,{OPERATOR}\Cq.wav
The {Operator} Macro
As you probably noticed above, there is an {OPERATOR} macro in the path for each of the .wav message files. The purpose of this is to enable you to change the stored message files to match the operator currently on duty (in a multi-op or guest op situation), so that the voice used in the stored message files will be the same as the live operator’s voice when using the microphone. For example, if a set of messages (such as CQ.wav) are stored in the Wav\N1XYZ subfolder, then if N1XYZ is the operator and the message refers to {OPERATOR}\CQ.wav, the program will send his stored CQ.wav file when that key is pressed. The same is true for stored letters and numbers, used in voicing callsigns and serial numbers, except that those are stored in the path which is identified on the Other tab of the Configurer. The default letters wav file path is: {Operator}\. Therefore, if your callsign is “N1XYZ”, the letter and number files should be placed in the wav\LettersFiles\N1XYZ\ subfolder in the N1MM+ user files area .
The current operator is displayed in the title bar of the Info window, and also in large blue letters inside that window, to the right. It is pre-filled with the callsign in the Station Data. To change the operator, just press Ctrl+O and enter the desired call-sign.
Even if you operate alone, and never need to change operators, we recommend you leave the {OPERATOR} macros in place and put the wav files in folders with your callsign as the title. That will make it easy to add a guest op, and in the meantime the substitution for {OPERATOR} will be provided from the Station Data page.
Instead of the {OPERATOR} macro in wav file pathnames, the {WAVDIR} macro can be used. By default, the result of using {WAVDIR} will be the same as if the {OPERATOR} macro had been used. The purpose of the {WAVDIR} macro is to allow for the possibility of using different wav file directories for different phonetics or language changes by the same operator. When the program starts or when operator changes (OpOn or Ctrl+O), {WAVDIR} is set to the operator callsign. The {OPERATOR} macro can continue to be used in function key files but its use is being deprecated and the program default SSB function key messages have been changed to use {WAVDIR}. Those operators that want to vary wav or letters files for phonetics or language changes should change their function key files to use {WAVDIR} and the new {SetWavDir} macro.
Recording on the Fly
If you need to record or re-record a function key file in a hurry, you can do so from inside the program, so long as the Function Key message calls only a single .wav file. This method also assumes that the microphone is connected to the radio via the sound card (either permanently, or temporarily while you are making the recording). Despite the limitations, this is still very useful, particularly for split operation in SSB contests where you want to specify a listening frequency that changes often.
The key sequence to start and stop on-the-fly recording is Ctrl+Shift+Fkey, in either Run or S&P mode.
When you start on-the-fly recording, a message will appear in the status line of the Entry window. If all is well, it will read “start recording:[file path and name]. Press Ctrl+Shift+Fkey after you have finished recording, and the status line will read “recording saved: [file path and name]. If you get an error message, and the Entry window is not large enough to read the whole thing, simply stretch it horizontally until you can.
If you invoke a .wav file that is not found (for example, by having the wrong .wav file or an incorrect path in the .mc file), you’ll be warned in the same place. To trouble-shoot path problems, you may have to stretch the Entry window horizontally, because there is only limited space for the message in the status line.
Voicing Call-signs, Serial Numbers and Frequencies
The option of voicing call signs, serial numbers and frequencies character-by-character appears to be growing in popularity among SSB contesters. One operator, to protect the sleep of his wife and young children, even created such a complete set of voicing files that he could operate an entire Sweepstakes without a microphone.
When voicing is used, the !, # and @ macros can be used in SSB messages, and the program will send the individual letter and number files that make up the call name or number that is to be sent, or if a complete or partial callsign is recorded as a wav file, it will use that as all or part of what it sends. The individual letters, numbers, special characters and callsigns/callsign fragments used for voicing are stored in the location defined in the letters file path on the Other tab of the Configurer . Again, if you wish to have more than one operator, you will want to insert the {OPERATOR} macro in the letters file path in the Configurer, and then record in a subdirectory named with the operator’s call-sign, so that Ctrl+O can be used to tell the program which operator’s letter files to use.
Function key messages that use voicing may have more than one wav file or macro in them. Use commas to separate the individual wav file names and macros within a message. For example, to send 59 followed by a serial number, you could program your F2 exchange key as follows:
F2 Exch,fivenine.wav,#
where fivenine.wav is a wave file containing “five nine”. The # macro is separated from the wav file name with a comma.
Note: If you do not want to use voicing, be sure that your Run F5 key is programmed to a single space, not “!”.
Simple Voicing
This technique is used for voicing call-signs, as the simplest way of voicing serial numbers, for giving your listening frequency when operating split, and for voicing the {SENTRST}, {ROVERQTH} and {COUNTYLINE} macros. The operator must record files for the letters A-Z, the numerals 0-9, and a few special characters – query.wav for the “?” character, stroke.wav for the slash indicator used with reciprocal operating callsigns, portable operation, etc. (which you denote in your log using the “/” or slash character), and point.wav to voice the decimal point (in a frequency, for example). You can optionally also record a file called strokep.wav for the “/P” (portable) indicator (e.g. to send “stroke portable”, instead of “stroke papa” with the separate stroke.wav and P.wav files). When the ! macro is included in a function key definition, and the key is pressed, the program substitutes a sequence of .wav files for the number or callsign. N1MM is parsed into N.wav+1.wav+M.wav+M.wav. The # and @ macros work the same way for serial numbers and frequency, respectively.
When voicing callsigns or serial numbers the software looks in the user programmable “Letters Wav File Path” for all files. This path is set in Config, Other tab and it allows the user to select the directory to use below Wav\LettersFiles. The default path is: {WAVDIR}\, which normally defaults to the same as {OPERATOR}\, meaning it will look for files in Wav\LettersFiles\[OperatorCallsign].
If the Entry window callsign exists as a “callsign”.wav or a character group fragment (two or more characters/numbers) in this directory, the character group wav file is played when voicing the callsign. If any unvoiced remaining characters exist, they will be voiced as individual letter wav files. When defining function key wav file names, use file names that will not appear in callsigns (use something like CQ_RUN.wav instead of CQ.wav, otherwise a callsign like WZ9CQY will be voiced with your complete CQ message between the WZ9 and the Y!).
Advanced Voicing
This technique is used to voice serial numbers in a way that is considered to be more intelligible than a simple string of numbers. The theory is that “One hundred twenty three” will likely be more easily understood than “one two three”, because of the redundancy added by the “place markers.”
In order to implement advanced voicing, you will need to record the following wav files. These files must be stored in the user programmable “Letters Wav File Path” (Config, Other tab). The letters file path may contain the {Operator} or {WAVDIR} macro, which is essential if you have more than one operator or the operator is using multiple sets of Wav files. Example: If the path in the Configurer is {OPERATOR}\, the letter and number files will be in the Wav\LettersFiles\{Operator}\ subfolder in the N1MM+ user files folder (which you can find using the Help > Open Explorer on User Files Directory menu item in the main Entry window).
0.wav through 19.wav (20 files)
20.wav through 90.wav (only the even tens intervals) (8 files)
HUNDRED.wav and THOUSAND.wav
When you try to voice a number for the first time after program start, the program checks to see whether all the needed files for advanced voicing are present. The outcome of the check is displayed in the bottom section of the Info window, so be sure to open it. If one or more are missing, serial numbers will be voiced using the simple voicing method. The same check is also made when changing operators (with Ctrl+O).
A complete table showing the files voiced for each number can be found in the files section HERE, in the file called “Advanced voicing of serial numbers.txt”/ There is one further variation – if you have Logger set to use leading zeros, then one or two leading 0.wav files are voiced before the number, as appropriate. We do not recommend using leading zeros with Advanced Voicing. As you can imagine, “zero eleven” is probably not an improvement in intelligibility over “eleven” or “zero one one.”
A good way to get natural-sounding numbers is to record full compound numbers, like “one hundred ten” or “two thousand four hundred and thirteen” with a program like Audacity (see below), and then use it to cut up the recording into the various components you need. This will help you get a natural intonation pattern, making your voiced numbers easier to understand. For example, numbers like “thirteen” are generally only at the end of compound numbers, and will typically be voiced naturally with a falling intonation.
Recording Letters and Numbers
This is the hardest part of voicing. A more natural-sounding output will be much easier for other stations to understand, a particularly important point with serial numbers. The question of how to reduce the robotic sound is a complicated one, as users of the phone companies’ 411 service will appreciate.
The program-induced lag between numbers is very brief, so the real tricks are:
- trimming the individual voice files so that they have as little “dead air” as possible before and after the letter or number.
- adjusting the speed, intonation and audio level of the individual number files so that they go together as naturally as possible.
The best single tool we have found so far for this purpose is the freeware Audacity audio editor. It incorporates a variety of excellent tools for trimming, equalizing levels, and so on. A lot will always depend on how much time the individual op is willing to devote.
When recording with Audacity, be sure to “Export as .WAV” using the default file creation settings; these work fine with N1MM Logger, while some of its other .wav file options will not.
Here’s a tip some people have found to be helpful. This may or may not work for you.
- Do not record individual letters and numbers. Instead, record callsign-like strings, such as AB1CD, EF2GH and so on. Try to speak at the same speed you would during a contest. Then use Audacity (or whatever editor you favor) to cut the recording apart, trim off any dead time, and equalize the levels. You can even use the Change Tempo tool (under Effects) to speed up your recorded letters and numbers to sound more natural while retaining your voice’s pitch and other characteristics – amazing!
Processing All Recordings with Audacity
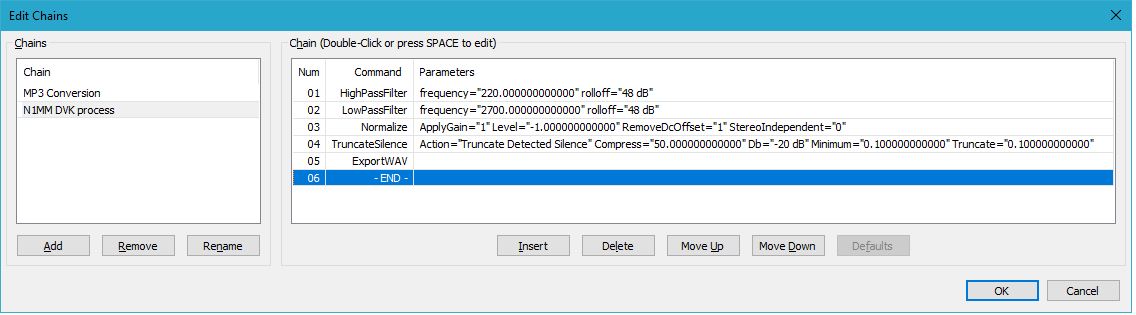
Audacity is capable of processing files in bulk using “Macros” (formerly called “Chains” in older versions of Audacity). If you are using callsign voicing you may find this capability helpful. Macros are created and run from the Audacity Tools menu. You can select multiple files to process. The macro shown below does the following:
- Removes high frequencies
- Removes low frequencies
- Normalizes the levels
- Truncates silence (watch out for silence between syllables/words)
Should I Use Voicing?
This remains controversial. Is the saving in energy during a contest worth the potential loss in intelligibility? You can potentially operate an entire contest using “search and pounce”, without ever having to say a word yourself. On one hand, when you are running, voicing the other station’s call-sign is pretty safe, since he knows who he is, and needs only to be confident that you’re calling him. On the other hand, some operators feel that the loss of the “human touch” may deter casual contesters from calling in.
From an intelligibility standpoint, voicing serial numbers is less attractive. In poor conditions, the “robotic” quality may make copy harder, particularly for non-English-speakers. The jury is still out on this one as well.
Voicing vs Text-to-Speech
Voicing as described here uses individual wav files to voice a restricted set of program macros (the !, # and @ macros as used in function key messages). This is not to be confused with text-to-speech, which is in principle capable of voicing arbitrary plain-language text without having to pre-record every word or phrase that is to be used. Starting with version 1.0.10913.0, N1MM Logger+ now is capable of using text-to-speech in SSB message files. Text-to-speech does not use pre-recorded wav files; instead, it generates speech from text messages using a “voice model”. This voice model can use one of several predefined voices, or it can use a custom voice model generated using your own voice. For information on this text-to-speech feature, see the description of the Audio Setup window.
Macros
One of the great strengths of N1MM Logger+ is its ability to send stored messages during contest QSOs, and to embed macros in those messages. Macros are so called because they either expand to a given text string, for CW and digital modes, or execute some program function. An example of the first is the {EXCH} macro, which expands to the exchange which you entered in the Contest Setup Dialog’s Sent Exchange field – for example, if you enter John CT, that is what will be sent whenever the {EXCH} macro is encountered.
The second (program control) type of macro is much more complex and more powerful. These macros can switch the program from RUN mode to S&P mode, an essential attribute during NA Sprint; set or clear your transceiver’s RIT function; or a myriad of other possibilities. In the sections that follow, you will find a comprehensive list of all the macros available in N1MM Logger+, as well as useful examples of how stored messages can be structured for efficient operating.
General Macro Commands
General macros can be used in all the places mentioned above.
* Send this station’s callsign
* (asterisk) sends the station callsign as registered in the >Config >Station Info dialog. Same as the {MYCALL} macro.
! Send the callsign entered in the Callsign field
! (exclamation mark) sends the callsign entered in the Callsign field of the Entry window, or if that field is empty the last call logged. Use this macro rather than {CALL} if you wish to have the Send Corrected Call function work correctly.
# Send serial number for this QSO
# (pound sign or octothorp) sends serial number for this QSO, or if there is no call sign in the Entry window, the serial number for the previous QSO. When voicing numbers, Configurer, Other tab, “DVK Letters Path” is used for the location of the wav files. Typically this will contain {Operator}\ so operator specific wav files will be played.
@ To voice the current receive frequency
@ (at sign) voices the current receive frequency, if you have recorded files for individual letters and numbers. Configurer, Other tab, “DVK Letters Path” is used for the location of the wav files. Typically this will contain {Operator}\ so operator specific wav files will be played. The frequency will be voiced to the nearest 100 Hz, dropping .0 if receiving on an even KHz frequency. This capability can be used to avoid having to rerecord CQ messages on 40m split. Here is an example: {operator}\CQ Listening.wav,@,{operator}\AndThisFreq.wav
{CALL} Send the previous or uncorrected call from the Callsign field of the Entry window
{CALL} Sends the call in the Callsign field of the Entry window as it was at the time the message started, or (if that field is empty) the last call logged. Note: This will send the call as it was when the message STARTED. Use the ! macro instead to use the Send Corrected Call function. Do not use the {CALL} macro in F5 (HisCall key) if you use ESM; instead, use the ! macro in F5. This is critically important if you ever hit [ENTER} in ESM before you have finished typing the call-sign, because if you do, the characters entered after you hit [ENTER} will not be sent unless you use ! . Likewise, if you use the [INS] or ; key to send the exchange, make sure you use ! in F5 and not {CALL}.
{CHNAME} Sends the Name in the Call History file
{CHNAME} If a Call history file is loaded into the current database, and a callsign is entered for which a name is present in the file, then this macro will send that name. Call History lookup does not have to be enabled for this macro to function.
{CLUSTER} Cluster callsign from Station info dialog
{CLUSTER} Cluster callsign from Station info dialog. See examples
{COMMENT} to add string to a QSO
{COMMENT} to comment field of current or last QSO
{CQ} Defines an alternate CQ message
{CQ} Allows a function key not defined in Config, Function Keys tab to be used for an alternate CQ message key.
{Telnet cmd} Sends a command to the Telnet window (if open)
{Telnet cmd} use for sh/dx and other telnet commands..
{END} Stores all macro text after the {END} macro string and executes it
To use the {END} macro, the function key must send a message. If nothing is sent, the {END} macro is ignored. The {END} macro stores all macro text after the {END} macro string and executes it after CW, SSB or DIGI messages are sent. One use of the {END} macro is to send CAT commands to the radio(s) after a transmission ends. All QSO message text placed after the {END} macro command is not sent.
{END} Macro Examples
The {END} macro signals the program that the remaining {} commands are to be executed when the program returns from sending the CW, SSB or DIGI messages. Here is an example:
Message: F1 {STEREOOFF}CQ TEST *{END}{STEREOON}
Whenever the F1 key is pressed, the stereo bit on the LPT port will be set to OFF. CQ will be sent via the current mode, and after the message is complete, the stereo bit on the LPT port will be turned back on. Thus, one can listen to just the second radio while the CQ is being sent, then listen to both radios after it is finished.
Only macros that do not involve sending messages are executed when they are placed after the {END} macro. For example, if you put {MYCALL} or “5NN” after the {END} macro, they will be ignored. Why? Well, the message is over, there is nothing more to send. Conversely, all macros that only trigger program functions (don’t send messages) are executed before any messages are sent, unless they appear after an {END} macro. Macros that do not involve sending messages are only executed after the message is sent when they are placed after the {END} macro. For example, if you put {MYCALL} or “5NN” after the {END} macro, they will be ignored. Why? Well the message is over, there is nothing more to send. Conversely, all macros that only trigger program functions (don’t send messages) are executed before any messages are sent, unless they appear after an {END} macro.
{EXCH} Sent Exchange
{EXCH} Sent Exchange, using the contents of the Sent Exchange box in the Contest Setup dialog. This macro is for convenience, and works in many (but not all) contests. It is always possible (and in some contests necessary) to hard-wire the contest-specific exchange into exchange messages instead of using the {EXCH} macro. When the sent exchange includes a serial number (001 or # in the Sent Exchange box), the number sent will be for the current QSO if there is a call sign in the entry window, or for the previous QSO if there is no call sign in the entry window.
{EXCHSENT} Sets “exchange has been sent” status
{EXCHSENT} Tells the program that the exchange has been sent. The ESM state changes when the exchange is sent using the Exchange function key (F2). If you wish to use an alternate format for the exchange from a different function key without first sending the regular Exchange message, this macro can be used to change the ESM state the same as if the Exchange key had been used.
{FORCELOG} Forces the program to log a contact
{FORCELOG} Same effect as Ctrl+Alt+Enter, but does not ask for a note to be entered. Note that force-logged contacts with invalid exchanges can result in incorrect score calculations.
{FORCELOGNOTE} Forces the program to log a contact but with a note
{FORCELOGNOTE} Same as {FORCELOG} but asks whether you want to enter a note to explain the forced entry
{FREQ} Frequency from the contact in the Entry window
{FREQ} Frequency from the contact in the Entry window. Substitutes “R” for decimal on CW
{FREQUP}, {FREQDN} Change the radio frequency, typically after a contact is completed
Change the frequency by the increment in Configurer->Other. Used after the {END} macro.
{FREQROUND} Frequency from the contact in the Entry window
{FREQROUND} Frequency from the contact in the Entry window, rounded to the nearest kHz
{GRID} Gridsquare from Station info dialog
{GRID} Gridsquare from Station info dialog
{GRIDSQUARE} Gridsquare from grid textbox (contact in Entry window)
{GRIDSQUARE} Gridsquare from grid textbox (contact in Entry window)
{GRIDBEARING} Bearing between own gridsquare and grid textbox
{GRIDBEARING} Bearing between own gridsquare and grid textbox (contact in Entry window)
{REVGRIDBEARING} Reverse bearing between own gridsquare and grid in textbox
{REVGRIDBEARING} Reverse bearing between own gridsquare and grid textbox (contact in Entry window)
{KMGRIGDISTANCE} Distance in kilometer between own gridsquare and grid textbox
{KMGRIGDISTANCE} Distance in kilometer between own gridsquare and grid textbox (contact in Entry window)
{LOG} Logs the current contact. Same as the Log It button in the Entry Window
{LOG} Logs the current contact. Same as the Log It button in the Entry Window. Digital: Put the {LOG} macro after the {RX} macro.
{SwapContests} Wipes the current contact, changes to the next-to-last contest log and unwipes the contact.
{SwapContests} should be placed in a function key or bandmap button. When pressed it will switch to the next-to-last contest preserving the QSO data partially entered.
{SwapContests contest-name state} Wipes the current contact, changes to contest-name and unwipes the contact.
{SwapContests contest-name state} Allows setting function keys or bandmap buttons to switch to specific contests. Note that the contests must be in the same database, and the latest instance of the contest is loaded. State is only needed when the contestname is QSOPARTY, and is the same as the abbreviation in the contest setup.
{SwapContestsn} Wipes the current contact, cycles through the last n contests and unwipes the contact.
n may be 3, 4, 5 or 6. {SwapContests3} will switch among the last three contests, {SwapContests4} will cycle through the last four contest logs, and so on.
{LASTCALL} Call of last station logged
{LASTCALL} Call of last station logged
{LASTEXCH} Exchange of last station logged
{LASTEXCH} Exchange of last station logged. For ROPOCO and LZOPEN only. It does NOT work for other contests!
{MYCALL} My Call from Station info dialog
{MYCALL} My Call from Station info dialog, same as *
{NAME} Sends the name as entered in the Entry Window name field
{NAME} Sends the name as entered in the Entry window name field for specific contests. (Example: TARA) or when no Entry window name field, searches the name in the call history table
{NAMEANDSPACE} Sends the name as entered in the Entry Window name field
{NAMEANDSPACE} Sends the name as entered in the Entry window name field (Example: TARA) or when no Entry window name field, searches the name in the call history table and adds a space behind it
{OTHERFREQ} Is replaced by the frequency of the non-active radio
{OTHERFREQ} Is replaced by the frequency of the non-active radio. Used for passing stations to other bands. Substitutes “R” for decimal on CW
{OTHERFREQROUND} Is replaced by the frequency of the non-active radio to the nearest kHz
{OTHERFREQROUND} Is replaced by the frequency of the non-active radio, rounded to the nearest kHz. Used for passing stations to other bands.
{OTRSP XXXX} Sends a command to an OTRSP device
{OTRSP XXXX} Used to send a command to an OTRSP (Open Two-Radio Switching Protocol) device. XXXX can be any command known to the OTRSP device
{OTRSP RX} Sends the OTRSP RX command to the OTRSP device
{OTRSP RX} Sends the OTRSP RX command to the OTRSP device to activate RX corresponding to the currently active radio.
{OTRSPOTHER RX} Sends the OTRSP RX command to the OTRSP device
{OTRSPOTHER RX} Sends the OTRSP RX command to the OTRSP device to activate RX corresponding to the currently inactive radio. For example, if Radio 1 currently has keyboard focus and the {OTRSPOTHER RX} macro is invoked, the OTRSP RX2 command is sent to the OTRSP device, but keyboard focus remains on Radio 1.
{PGDN} Change frequency up
{PGDN} Change frequency up equal to amount set under ‘PgUp/PgDn Incr (kHz)’ ‘in the Configurer under the ‘Other tab’. Can be used after the {END} macro, as in NA Sprint function-key messages
{PGUP} Change frequency down
{PGUP} Change frequency down equal to amount set under ‘PgUp/PgDn Incr (kHz)’ ‘in the Configurer under the ‘Other tab’. Can be used after the {END} macro, as in NA Sprint function-key messages
{PREVNR} Sends the QSO # of the last logged QSO
{PREVNR} Sends the QSO # of the last logged QSO
{DIGQTCR} Opens the QTC Receive window
{DIGQTCR} WAE contest only. Open the QTC Receive window
{DIGQTCS} Opens the QTC Send window
{DIGQTCS} WAE contest only. Open the QTC Send window
{QTC} Sends the TU message after a block of QTCs has been completed
{QTC} WAE contest only. In CW, can be used in the TU message sent after a block of QTCs has been completed. In RTTY, used in the Send All Heading SQTC message for the QTC block number (see the Config > WAE > Open QTC setup area in the Entry Window)
{LRMHZ} Frequency Left Radio/VFO-A in MHz
{LRMHZ} Frequency Left Radio/VFO-A in MHz. Example: 28 when on 28.1234 MHz
{RRMHZ} Frequency Right Radio/VFO-B in MHz
{RRMHZ} Frequency Right Radio/VFO-B in MHz. Example: 14 when on 14.1235 MHz
{RUN} Switches to RUNning mode
{RUN} Switches into Running mode
{S&P} Switches to S&P mode
{S&P} Switches to S&P mode
{SPACE} Equivalent to pressing the spacebar key
{SPACE} Equivalent to pressing the spacebar key. Useful in non-ESM mode for auto-filling the exchange. For example: F2 exchange, 5nn 4{END}{SPACE}
{SPOTME} Send a self spot to the connected cluster
{SPOTME} Spot yourself in ARRL contests (and other contests that allow self-spotting, upon request from the contest sponsor). Only works in RUN mode. Will not spot you on the same frequency (within the tuning tolerance set in the Configurer under the Other tab) more often than every 10 minutes.
{STEREOOFF} Sets stereo audio OFF
{STEREOOFF} Stereo audio will be set to OFF
{STEREOON} Sets stereo audio ON
{STEREOON} Stereo audio will be set to ON
{TIMESTAMP} Date and Time from the contact in the Entry Window
{TIMESTAMP} Date and Time from the contact in the Entry Window
{TX} Keys PTT from a function key
{TX} CW/SSB: when sent in a function key will key ptt. Use Esc to turn off. This is a manual PTT from the keyboard. RTTY: Check out the Digital macros below. Note: This does not appear to work with some radio/interface combinations.
{CLEARRIT} Reset the RIT to zero
{CLEARRIT} Reset the RIT to zero. Could be used in the message that confirms the contact, usually F3, or in the CQ message (usually F1). Use the RIT when the station is calling, and when the contact is logged the RIT clears (using F3). Note: Will only work for radios that support that function. Most ICOM radios do not. Consult the radio’s manual.
{CTRL-A}…{CTRL-Z} Sends Ctrl+A character to TNC
{CTRL-A}…{CTRL-Z} Sends Ctrl+A character to TNC. All characters from the alphabet can be used (A to Z). Not valid in MMTTY and PSK. See examples
{ENTER} Sends ENTER character to TNC
{ENTER} Sends ENTER to TNC
{ENTERLF} Sends Return/Line Feed characters to the TNC
{ENTERLF} Sends Return/Line Feed to the TNC. Try this if {ENTER} doesn’t seem to work
{ESC} Sends Escape character to TNC
{ESC} Sends Escape character to TNC. Not valid in MMTTY and PSK. See examples
{DATE} Short date in Windows format
{DATE} Short date in Windows format as set in Regional settings
{DATE1} Date in Nordlink-TF/WA8DED format
{DATE1} Date in Nordlink-TF/WA8DED format (dd.mm.yy)- format: 26.02.99
{SENTRST} Sends the RST as entered in Entry window Snt field
{SENTRST} Sends the RST sent as entered in Entry window Snt field. Do not expect the RST to be correct if the Snt box is not populated. In voice modes, if voicing serial numbers and callsign, can be used to send the report from the Snt field. In CW and digi, if there is no Snt field in the Entry window, this macro and the following space will be removed from the sent message.
{SENTRSTCUT} Sends the RST of the current contact using cut format
{SENTRSTCUT} Sends the RST of the current contact using cut format. The most common use is to send the number 9 as the character N (note that this is not useful in RTTY, as 5NN takes longer to send than 599 in RTTY). If the callsign box is blank, the current contact mode is not set. Therefore, do not expect the sent RST to be correct if the callsign box is blank. If you want to send exchanges with a blank callsign box, remove this macro and insert 5NN in the appropriate function key message. In CW and digi, if there is no Snt field in the Entry window, this macro and the following space will be removed from the sent message.
{TIME} Time in Windows format
{TIME} Time in Windows format as set in Regional settings
{TIME1} Time in Nordlink-TF/WA8DED format
{TIME1} Time in Nordlink-TF/WA8DED format (hh:mm:ss)- format: 17:36:55
{TIME2} Short GMT time (hhmm) format
{TIME2} Short GMT time (hhmm)- format: 1736 – Information on how this macro works in digital contests can be found at: Time2 – How it works in the Contest Setup Instructions for digital mode contests.
{DAYTIME} Date in TAPR DayTime format
{DAYTIME} Date in TAPR DayTime format – format: 1907291736
{DATEGMT} Date and GMT time
{DATEGMT} Date and GMT time in Windows format (as set in Windows Regional settings)
{TIMEGMT} GMT time
{TIMEGMT} GMT time – format: 17:36:55
{F1} – {F12} Sends function keys F1 through F12
{F1} – {F12} Sends text assigned to function keys F1 through F12
{SOCALLSTACK} Enables single operator callsign stacking
{SOCALLSTACK} This macro enables single operator callsign stacking. When in RUN mode, this macro gives the operator the ability to stack and retrieve a single callsign when multiple stations are calling. The stacked callsign does not need to be a full call and it can contain a “?”. Single operator call stacking can be used in SO1V/2V or SO2R mode, in both entry windows, and with/without ESM. When in RUN mode, {SOCALLSTACK} will move a call or partial call and place it in the callsign frame and bandmap. If a stacked call exists on the call frame, the callsigns will be exchanged. If the callsign contains a question mark (“?”), the cursor will highlight the question mark when the text is popped off the stack. If the callsign does not contain a question mark, the cursor is placed at the beginning of the callsign upon return to the entry window. Using the existing command ALT+D, it is possible to delete a stacked call from the bandmap and call frame without popping it off the stack with when the callsign entry window is blank. {SOCALLSTACK} will also pop the call off the stack if ESM replaced the stacked call with the string CQ-Frequency. When this occurs, the stacked call will be visible in the bandmap. Callsigns stacked by {SOCALLSTACK} can be popped off the stack by pressing the space bar when the CQ-Frequency literal is on the call frame. {SOCALLSTACK} in effect only stacks one other call. To stack multiple calls, use {STACKANOTHER}. More info and examples in the chapter: Single Operator Call Stacking.
{STACKANOTHER} Stacks additional callsigns
{STACKANOTHER} Macro to stack additional callsigns in all modes. Equivalent to the key combination CTRL+ALT+G. More info and examples in the chapter: Single Operator Call Stacking. Also used in multi-operator call stacking or Partner Mode.
{CLRSTACK} Clears the call stack
{CLRSTACK} Clears the call stack
{LOGTHENPOP} Logs the current station and starts a QSO with a stacked callsign in Run mode
{LOGTHENPOP} RUN mode only. Intended for use with the call stacking feature. It logs the current station, sending corrections if enabled, pops the next call off the stack, and starts the next contact. The macro can be used with or without ESM. If you are using ESM, the “Next Call” key (Configurer, Function Keys tab) should be set to point to the message containing the {LOGTHENPOP} macro. If there is a callsign on the stack, ESM will automatically send the “Next Call” key in place of the normal “End of QSO” key . The suggested “Next Call” key message is: {LOGTHENPOP} TU NW {F5}{F2} (Note: Do NOT use ! in place of {F5}, and in contests with serial numbers, do NOT use # in the {LOGTHENPOP} message). In CW, if {LOGTHENPOP} can not pop a call off the stack and the logged callsign was changed, send corrected call if enabled and the TU message. More info and examples in the chapter: Single Operator Call Stacking.
{LOGTHENNEXT} Non-automated version of {LOGTHENPOP}
{LOGTHENNEXT} works the same way as {LOGTHENPOP}, except that if {LOGTHENNEXT} is used in the ESM Next key, the ESM Next key automation will be disabled and to perform the functionality the operator will have to press the function key instead of using the Enter key.
{ROVERQTH} Sends the Rover QTH
{ROVERQTH} Sends the Rover QTH. Check out the chapter: Setup QSO Parties – CW and SSB – for more information on Rover support. If voicing is used for serial numbers and callsigns, will voice the Rover QTH.
{POPPREVNEEDEDQ} Recalls the previous call & grid/exchange and places them in the entry window textboxes
{POPPREVNEEDEDQ} Cycles through the QSOs recently logged and places the call, grid/exchange in the entry window. Useful in VHF contests where you are moving one or more stations from band to band. The currently popped QSO is highlighted in the log window.
{POPNEXTNEEDEDQ} Operates the same as {POPPREVNEEDEDQ} but in the other direction
{POPNEXTNEEDEDQ} See {POPPREVNEEDEDQ}
{VARYMSG1} {VARYMSG2} A method for sending alternating function key messages VARYMSG VARYMSG2
{VARYMSG1} {VARYMSG2} These macros can be used in all modes. They allow the user to control how often an alternate form of a function key message is sent instead of the primary form. There are two such macros (VARYMSG1 and VARYMSG2); each can be used only once in a given Function Key set. The form of the macro is {VARYMSGn&Primary Message&Alternate Message&How Often to Send Alternate&}. Substitute the form of the message you want to send most often for Primary Message. Substitute the message you want to send at intervals for Alternate Message. Finally, specify how often you want to send the Alternate message in “How Often to Send Alternate”. A “0” in the “How Often to Send Alternate” field sends the Primary Message every time. A “1” in the “How Often to Send Alternate” field sends the Alternate Message every time. Placing a number, N, greater than 1, in the “How Often to Send Alternate” field sends the Alternate Message every Nth time.
Examples:
To send a varying CQ message in CW, in the CQ Key definition for the Run F1 function key,
{VARYMSG1 &CQ * *&CQ CQ * *&3&} will send a slightly longer CQ every 3rd time.
To send a varying TU message in SSB, in the Run F3 TU Key definition,
{VARYMSG2 &TU.wav&TUMYCALL.wav&2&} will send the TU.wav recorded message after a completed QSO, and send the TUMYCALL.wav recorded message containing a longer thank you message (with your call sign in phonetics, for example) only after every 2nd QSO.
Any function key text before or after the {VARYMSGn} macro string is preserved. So, RTTY users may place the {TX} {RX} macros before and after the {VARYMSGn} macro string. The primary and alternate {VARYMSGn} fields may contain other macros but the two {VARYMSGn} macros may not be nested.
{CTRLHOME} – Force the cursor into the callsign box
{CTRLHOME} forces the cursor into the callsign box and selects the text in the callsign box, regardless of where the cursor (keyboard entry point) was when the message was invoked. Can be used in the CQ (F1) and/or TU (F3) messages to avoid accidentally typing callsigns into the exchange box.
CATHEX and CATASC Radio Hex Macro Commands
{CAT1HEX} {CAT2HEX} Sends hex commands to radios 1 and 2
The {CAT1HEX} and {CAT2HEX} macros can be used to send commands to radio # 1 (CAT1HEX) or radio # 2 (CAT2HEX) requiring hex data input. The macro name must be followed by the radio hex data and closing terminator }. An example is shown below. There must be two hex characters per byte including zero (zero is entered as 00). Spaces are allowed anywhere in the hex command string to make entry and verification easier.
You can not place more than one CAT1HEX or CAT2HEX macro in a function key message but the message can contain one of each macro. The exception to this rule is when the {END} macro is used. More than one radio command can be sent to the radio by placing a \ character between the radio commands. Spaces are allowed around the \ character. Multiple radio commands are broken into separate radio commands and sent to the radio using internal command pacing.
Depending on the computer speed and the number of commands in the string, the use of these macros may delay the operation of the program during sending of CW or other program operation. There are no precautions which prevent the use of these macros while the radio is transmitting. If the user wants to switch an antenna port safely, use the {ANTRX#TOGGLE} macros which contain a TX inhibit.
An example of an Icom command is: {CAT1HEX FEFE66E01C0102FD \ FE FE 66 E0 1C 01 02 FD }
{CAT1ASC} {CAT2ASC} Sends ASCII commands to radios 1 and 2
The {CAT1ASC} and {CAT2ASC} macros can be used to send commands to radio # 1 (CAT1ASC) or radio # 2 (CAT2ASC) requiring ASCII data input. The macro name must be followed by the radio ASCII data and closing terminator }. An example is shown below. All leading spaces before the radio command portion begins are removed and not sent to the radio. All other spaces in the command are sent to the radio.
You can not place more than one CAT1ASC or CAT2ASC macro in a function key message but the message can contain one of each macro. The exception to this rule is when the {END} macro is used. More than one radio command can be sent to the radio by either placing a \ character between the radio commands or by concatenating them together. Spaces before or after the \ character are sent to the radio. Multiple radio commands using the \ separator are broken into individual radio commands and sent to the radio using internal command pacing.
Special characters may be included in the radio command string by delimiting the two character hex value with <>. The leading < and trailing > characters are not sent to the radio. Spaces are not allowed inside the <> characters. If the ASCII radio command requires you to use characters that are interpreted by the Logger as macros (*, !, #), then in order to hide the character from the Logger’s macro processing and send it to the radio, it must be encoded using this hex notation (replace * with <2A>, ! with <21> , and # with <23>).
Depending on the computer speed and the number of commands in the string, the use of these macros may delay the operation of the program during sending of CW or other program operation. There are no precautions which prevent the use of these macros while the radio is transmitting. If the user wants to switch an antenna port safely, use the {ANTRX#TOGGLE} macros which contain a TX inhibit.
Examples of several forms of this command are: {CAT1ASC PB1;\PB2;} {CAT1ASC PB1;PB2;} {CAT1ASC P<42>1;PB2;} . You may place a space between the macro name and the radio CAT command to improve readability. All leading spaces after the CAT1ASC macro command name are removed. As an example of the use of hex notation, this command contains a macro character {CAT1ASC *UM0} and will not work correctly; the correct form using hex notation would be {CAT1ASC <2A>UM0} . If the radio command needed to be terminated with a CR (Orion), the command would be {CAT1ASC <2A>UM0<0D>}
CATAHEX, CATIHEX, CATACTHEX, CATAASC, CATIASC, CATACTASC Macro Commands
{CATA1HEX} {CATA2HEX} {CATACTHEX} {CATA1ASC} {CATA2ASC} {CATACTASC} Sends commands to the active radio
The {CATA1HEX} {CATA2HEX} {CATA1ASC} {CATA2ASC} macros send commands to the active radio, sending ASCII or HEX commands to the specified active radio (1 or 2, depending on the number in the macro name) in SO2R mode (or VFO in SO2V). These are used for commands that should only be sent to the active radio (the radio with transmit focus), not to the inactive radio. These radio specific commands can be used by SO2R users that do not have identical radios. These macros follow the same syntax as the CAT1HEX and CAT1ASC macros.
The F-key macro text passes through a routine that removes CAT macros for radio(s) that do not qualify based on Active/Inactive status. This allows one F-key string to be used for multiple purposes.
An example of a Pro3 macro string that switches DualWatch and the Rx antenna based on the radio activity is shown below. {catA1hex fefe6ee0 12 00 00fd}{catI1hex fefe6ee0 12 00 01fd}{catA2hex fefe6ee0 07 c0 fd}{catI2hex fefe6ee0 07 c1 fd}.
The {CATACTASC} and {CATACTHEX} macros can be used if both radios accept the same CAT commands (e.g. identical radios), eliminating the need to use pairs of {CATA1ASC}{CATA2ASC} or {CATA1HEX}{CATA2HEX} macros.
Macro: {CATACTASC} This macro sends the ASCII command to the currently active radio. Both radios must be able to accept the same command; if the two radios require different commands, use paired {CATA1ASC} and {CATA2ASC} macros
Macro: {CATACTHEX} This macro sends the HEX command to the currently active radio. Both radios must be able to accept the same command; if the two radios require different commands, use paired {CATA1HEX} and {CATA2HEX} macros
{CATI1HEX} {CATI2HEX} {CATI1ASC} {CATI2ASC} Sends commands to the inactive radio
The {CATI1HEX} {CATI2HEX} {CATI1ASC} {CATI2ASC} macros send ASCII or HEX commands to either inactive radio (i.e. the radio that does not have transmit focus) in SO2R mode (or VFO in SO2V) mode. These macros follow the same syntax as the CAT1HEX and CAT1ASC macros.
The F-key macro text passes through a routine that removes CAT macros for radio(s) that do not qualify based on Active/Inactive status. This allows one F-key string to be used for multiple purposes.
An example of a Pro3 macro string that switches DualWatch and the Rx antenna based on the radio activity is shown below. {catA1hex fefe6ee0 12 00 00fd}{catI1hex fefe6ee0 12 00 01fd}{catA2hex fefe6ee0 07 c0 fd}{catI2hex fefe6ee0 07 c1 fd}
CATDELAY Macro Command
{CATDELAY} Suspends the entire program for a specified time
The {CATDELAY} macro suspends the entire program operation to allow CAT commands to be received and executed by the radio possibly before a transmission begins. The need for this macro is dependent on the computer speed, radio interface rate, and radio type. The form of the CATDELAY macro is {CATDELAY N} where “N” is a user programmable delay in 50ms increments. The value of N is internally limited to 20 which would be a delay of 1 second. Note that the program delay is added after all CatMacro radio commands are sent to the radio no matter where the {CATDELAY} text appears in the function key message text.
Antenna and Rotator Control Macro Commands
{AUXANTSEL} Sends an antenna activation command in a UDP RadioInfo packet
{auxantsel nn} sends a UDP broadcast packet containing the antenna number (“Code” column) and name (“Antenna” column) of an antenna listed in the >Configurer >Antenna table. Activation of the antenna and display of the name are the responsibility of an external antenna controller/band decoder application. See appendix External UDP Broadcasts
{ANTRX1TOGGLE} {ANTRX2TOGGLE} {ANTRX3TOGGLE} {ANTRX4TOGGLE} Switches antenna ports
The {ANTRX1TOGGLE} {ANTRX2TOGGLE} {ANTRX3TOGGLE} {ANTRX4TOGGLE} macros can be used to switch between antenna ports and toggle the receive antenna input on some radios when the program is not transmitting. Some radio models have multiple inputs but lack the CI-V command to control the port so the functionality of these macros is radio dependent. When the {ANTRX#TOGGLE} macro is executed, the numbered antenna port is selected. If the same antenna port macro executed again and the radio is equipped, the receive antenna will be toggled on and off with each macro execution. If the antenna port is switched to another port, the current setting of the RX antenna is stored and used when this antenna is selected again. If only one radio antenna port is used it is only necessary to assign that {ANTRX#TOGGLE} macro to a F-key to toggle the RX antenna on/off quickly.
{TURNROTOR} Turns the rotator (shortpath)
{TURNROTOR} Turns the rotator to the direction based on the calculated direction
{LONGPATH} Turns the rotator in the longpath direction
{LONGPATH} Turns the rotator to the calculated longpath direction
{STOPROTOR} Stops the rotator
{STOPROTOR} Stops turning the rotator. Note that per the manual some functions are not supported for all rotator brands
CW Macro Commands
CW macros are only substituted when used in substitutions for CW buttons.
CW Program Control and Prosign Macros
| Macro keyword | Substituted by |
| < | Increment CW speed by 2 wpm. |
| > | Decrement CW speed by 2 wpm. |
| ~ | Send half space character. See examples |
| ] | SK prosign . . . _ . _ |
| [ | AS prosign . _ . . . |
| + | AR prosign . _ . _ . |
| = | BT prosign _ . . . _ |
CW Punctuation Macros
| Macro keyword | Substituted by | Macro keyword | Substituted by |
| ? | . . _ _ . . | / | _ . . _ . |
| , | _ _ . . _ _ | . | . _ . _ . _ |
CW Macro Examples
Send the call entered in the callsign field
- Macro: !
- Send his call. The callsign entered in the callsign entry field will be sent by the program via the serial or parallel port
Send CQ with your call sent as a macro substitution
- Macro: cq~test~de~*
- The time between the words is a half space (~).
- The * will be replaced with the callsign from the Station dialog {MYCALL}
Send part of exchange faster (report sent 6 wpm faster)
- Macro: <<<5nn>>>{EXCH}
- The report 5nn is sent 6 wpm faster than the exchange ( <<< >>> ).
- It is not necessary to return the CW speed back the original speed at the end of the function key message.
Some calls have letter combinations where it’s hard for to copy correctly. E.g. 6Y2A is often copied as BY2A. To help make your call easier to copy, go to Config >Change Packet/CW/SSB/Digital Message Buttons >Change CW Buttons, and try changing the default F1 and/or F4 message where * is used for your call. In this example, 6Y2A changes F4 from * to: > 6 < ~ Y2A.
Result: the 6 is sent 2 WPM slower compared to the rest of the call, and an additional half space is added between the 6 and Y. Try other combinations of the greater than symbol “>”, less than symbol “<“, or tilde “~” to make your call easier to copy.
SSB Macro Commands
SSB macros are only substituted when used in substitutions for SSB messages. SSB wav file names can be concatenated using a comma.
{OPERATOR} Used to specify different wav files for each operator, to prevent confusion caused by having recorded wav files in a different voice than the operator’s voice using the microphone.
(WAVDIR} Used to permit multiple sets of wav files for a single operator, allowing for multiple sets of phonetics or for multiple languages. This macro is used in pathnames for wav files in place of the {OPERATOR} macro. By default, {WAVDIR} will work exactly the same way as {OPERATOR} without any need for changes. If an operator wishes to use multiple sets of wav files (including letter and number files for alternate phonetics, for example), these different sets can be selected using the {SetWavDir} macro.
{SetWavDir} Used to designate multiple sets of wav files used by the same operator. Changes the value of {WAVDIR} used in function key messages and the Letters Wav File Path. This macro can be added to a function key message or executed with key mapper or StreamDeck. This allows the on the fly switching of wav file directories for variations in phonetics, language, etc. The macro form is {SetWavDir Text} where “Text” is the new {WAVDIR} value. When this macro is combined in a function key message, the {SetWavDir} macro is executed before playing wav files. These forms of the macro can also be used: {SetWavDir {OPERATOR}} or {SetWavDir {OPERATOR}Text} (where “Text” is any string). For instance when the operator is K3CT, {SetWavDir {OPERATOR}_2} will set {WAVDIR} = K3CT_2. When {WAVDIR} is different from the operator callsign (set by OPON or Ctrl+O), the value of {WAVDIR} is displayed in the Entry window title bar.
Text-to-speech macros {TTS}, {ICAO}, {SPACECALL}, {SPACENR}, {SPLITNR}, {TTSParms}, {TTSTrim} are documented in the description of the Audio Setup window.
SSB Macro Examples
- Send the call entered in the callsign field
- Macro: !
- Send his call. The callsign entered in the callsign entry field will be sent by the soundcard. The location of the letter and number files used to make up his call sign is set up in the Configurer under the Files tab. All of the WAV files for the letters/numbers etc. must be present in that folder. See here
- Macro: !
- Let each operator have his own WAV files
- Wave file name, e.g.: {OPERATOR}\cq.wav
- If you specify WAV files like: {OPERATOR}\cq.wav , then as you change operators in a multi-operator contest station, the WAV files will change as well. Each operator will have to create a full set of wav files. Note that the WAV directory syntax indicates a subdirectory under the Wav sub-directory in the N1MM Logger+ user files directory. You can also fully qualify the file name, as in: “C:\Users\[yourWindowslogonusername]\Documents\N1MM Logger+\wav\{OPERATOR}\cq.wav”
- The {OPERATOR} macro can be concatenated with other characters; for example, if you really wanted to, you could use: {OPERATOR}CQ.wav and keep separately-named files in the same directory:
- N1MMCQ.wav
- PA1MCQ.wav
- Play exchange with operators voice: {OPERATOR}\5905.wav
- {OPERATOR} is a string substitution that is only implemented for SSB messages
- {WAVDIR} preforms the same function as {OPERATOR}, but allows for multiple sets of wav files used by a single operator without changing the operator callsign as recorded in ADIF and Cabrillo files.
- Wave file name, e.g.: {OPERATOR}\cq.wav
SO2V/SO2R Macro Commands
SO2V/SO2R macros are only substituted when SO2V or SO2R is selected. The {CTRLFx} macros work only in SO2R mode, because their functionality is not useful in SO2V.
{ACTIVEAUDIOTOGGLE} Toggles AF gain muting and unmuting of the AF gain on the active radio. This works only on radios that support this capability via the radio control port
{INACTIVEAUDIOTOGGLE} Toggles AF gain muting and unmuting of the AF gain on the inactive radio. This works only on radios that support this capability via the radio control port.
{ACTIVEAUDIOON} Unmutes audio on the active radio. This works only on radios that support this capability via the radio control port.
{ACTIVEAUDIOOFF} Mutes audio on the active radio
{INACTIVEAUDIOON} Unmutes audio on the inactive radio
{INACTIVEAUDIOOFF} Mutes audio on the inactive radio
{OTHERBAND} Sends the band of the other (inactive) VFO/radio (e.g. 80)
{OTHERMHZ} Sends the frequency of the other (inactive) VFO/radio in MHz (e.g. 3.5 and 3R5 in CW)
{OTHERFREQCUT} CW only. Sends last digits of the frequency of the other (inactive) VFO/radio as cut numbers. Uses the cut number style selected in Configurer
{JUMPRX} Changes the RX focus to the other input window. If only one input window is shown the second window will be opened
{JUMPRXTX} Changes both the RX and TX focus to the other input window. If only one input window is shown the second window will be opened
{WIPE} Wipes the focus window. If the entry boxes are all empty, restores the last wiped contact (“unwipe”)
{CTRLFX} Sends on the other radio. SO2R only and is operational in all modes. Thus a CW Button might look like: “TU {CTRLF9}” where F9 on the other radio is set to send a CQ. It is important to note that via hotkey Ctrl+Shift+L will turn this feature on or off. When off the CTRLFn macro is ignored. Entry focus moves to the other radio only when the callsign field on the current radio is empty.
{CONDJUMP} Shifts focus and sends CW message when not split. When RX and TX focus are split between two radios, and the user hits the Enter key, TX focus is first moved to the radio with RX focus. The CW message is sent. After the CW message has been completed, TX and RX focus are both moved to the other radio. When RX and TX focus are not split between radios, and the user hits the Enter key, the CW message is sent. When the CW message has been completed, TX and RX focus remain unchanged. Typical usage in Sprint is: Run F3: TU {END} {CONDJUMP}
{QSYCQ} QSY to the last focus radio CQ frequency.
{STOPTX} Forces PTT to be released. In specialized SO2R scenarios. Rarely needed, and not for SO1R use.
Multi-User Macro Commands
Multi-User macros are only substituted when in Multi-User mode.
{MESSAGE} Sends a message (via function key) to other connected computers over the network. Explained in the next section.
The {MESSAGE} macro sends a message (via a function key) to other connected stations over the network. The info will be shown in big red letters in the Info window from the receiving station(s). Place the name of the station directly after the {MESSAGE} macro if you want to send the message to one specific station. If you don’t want to send to a specific station, put “- ” in front of the message.
F8 Pass station {MESSAGE} BobsPC {TIMEGMT} {PASS 1} {CALL} {GRIDSQUARE} {GRIDBEARING}deg. {KMGRIDDISTANCE} km
Message sent to the station named “BobsPC” with info about the station in the callsign field. This is a macro which could be used in a contest where a station is sent from one band to another
F8 Pass station {MESSAGE} – {TIMEGMT} {PASS 1} {CALL} {GRIDSQUARE} {GRIDBEARING}deg. {KMGRIDDISTANCE} km
Message sent to all connected stations with info about the station in the callsign field
{PASS NAME} Substitutes the computer name for NAME. Pass frequency to the computer name on the network. The computer names are listed in the Network window. The Pass frequency is rounded to the nearest kHz.
{PASS 1800}…{PASS 241000000} Inserts pass frequency for first connected computer found on the designated band. Valid frequency values are every band in kHz 1800 through 241000000 (example: PASS 1800).
{PASSMSG NAME} Substitutes the computer name for NAME. Passes last QSO information to the computer name on the network. The computer names are listed in the Network window.
{PASSMSG 1800}… {PASSMSG 28000} Passes last QSO information to the first connected computer found on the designated band. Valid frequency values are every band in kHz 1800 through 28000 (example: PASSMSG 1800).
{LASTPASSEDFREQ} Sends the pass frequency for the station most recently alerted to expect a pass. Typical use case would be to right-click on the band button for the band you want to pass the other station to, then send a function key message containing the {LASTPASSEDFREQ} macro to tell the other station what frequency you want him to QSY to. The right-click on the band button sends a message to the operator for that band, telling him the call sign of the station being passed, and the {LASTPASSEDFREQ} macro is replaced by the pass frequency for the station he is being passed to. If the frequency includes a non-zero fractional part (rounded to one digit), an R is sent in place of the decimal point. If there is more than one station on the selected band, the Run station is selected if there is one, otherwise the first station on that band that has a pass frequency set is selected. Note that if the last frequency passed has not changed (e.g. the station being passed to is running and was passed to before), it is not necessary to right-click on the band button to reset the pass frequency.
Digital Macro Commands
The following substitutions will be made when sending function key.
In the Digital interface the macros below can be used but also all other macros shown under general macros.
{TX} Start transmission in the digital interface. Needed at the beginning of every Digital message.
{RX} Switch to receive in the digital interface. Needed at the end of every Digital message.
{CLRRX} Clear the RX window. Can be used either alone or after an {END} macro.
{CLRTX} Clear the TX window.
{SCQ} Resume CQ (placed at the end of TU message)
{GRAB} Grab first callsign from grab callsign window.
{DELALL} Delete all entries from grab callsign window.
{DELTOP} Delete top entry from grab callsign window.
{DELSEL} Delete highlighted entry from grab callsign window.
_ (underscore) MMTTY only – send idle tone.
^ Send the ! character (! sends the other station’s call; use ^ to put a ! character in a message)
{FILE:xxxx} Send a textfile. xxxxx is replaced by the name of the text file, which must be in the FunctionKeyMessages subdirectory in the N1MM Logger+ user files area. The macro works any place in a message string. If the text file only contains one line it does not add CR to end of line. When the text file contains multiple lines the CR from the last line will be removed so the following text will be on the same line (use an {ENTER} macro if you wish to separate the following text from the end of the file). Multiple {FILE:xxxx} macros are allowed in one message string
{LDIGFQ} Left Digital Interface frequency
{RDIGFQ} Right Digital Interface frequency
{PREVTIME} Send the time that was sent for the previous contact (for ANARTS and BARTG and similar contests; used for sending time in response to a request for a fill after the contact has been logged)
{ALIGN} Move signal into bandpass range. Does the same as Align Buttons on Digital Interfaces and the PSK Engine
{PROFILE0} MMTTY only. Reset to HAM default definitions for RTTY mark, space, width
{PROFILE1} … {PROFILE8} MMTTY only. {PROFILE1} through {PROFILE8} in the function keys at the start of a CQ or S&P macro will change MMTTY’s profile. This way it is possible to have one profile for CQing and another one for S&P or however you want to set them up
{Hxxxx} HAL DXP38 only. The DXP-38 commands are in the form of Hex bytes that look like $80 $EA. This macro substitution takes the text string in the form of {Hxxxx} (such as {H80EA}) and converts this to the appropriate command that should be sent to the TU. See the RTTY chapter for more HAL DXP38 info
{DI1} … {DI24} Send text assigned to the digital message keys DI-1 to DI-24 in the Digital Interface window
{LOGTHENGRAB} Run Mode only. Log the current contact and grab the top callsign from the Grab window of the DI. If the grab window is empty, logs the current contact and then switches to the TU key message instead of continuing with the rest of the message containing {LOGTHENGRAB}. The suggested function key message using this macro is: {LOGTHENGRAB} TU NW {F5}{F2} (Note: Do NOT use ! in place of {F5}, and in contests with serial numbers, do NOT use # in the {LOGTHENGRAB} message).See the documentation in the Digital Call Stacking section
$ WAE contest only. Used in the Agn RQTC message to send the QTC number when asking for a repeat of a single QTC (see the Config > WAE > Open QTC setup area > RTTY Setup menu item in the Entry Window)
{ALT-T} Same as keyboard Alt+T – toggle TX/RX state
{ALT-Q} Same as keyboard Alt+Q – return to CQ frequency
{ENABLEAFC} Turn AFC on
{DISABLEAFC} Turn AFC off
{ENABLENET} Turn NET on (not applicable in FSK)
{DISABLENET} Turn NET off
Use {TX} and {RX} together in your macros. Otherwise, {TX} alone in a macro will cause the radio to remain in transmit until you press an RX button or the ESC key
Maessage: {TX}{ENTER} ! {LOGTHENGRAB} TU NW {F5}{F2}{RX}
Log the contact, grab a call from the Grab box and give an exchange to the next station. If the Grab box is empty, this macro will log the contact and just send the TU message instead.
Message: {TX}{ENTER} ! {LOGTHENPOP} TU NW {F5}{F2}{RX}
Log the contact, pull the next callsign from the call stack and send the exchange to him (see Single Operator Call Stacking). If you want to stack another station that has called you, just Alt-Click on the call in the RX window and it will be placed on the call stack where you can get it with this macro.
Example Macros for the PK-232 (Digital Interface window)
| Button text | Macro |
| Abort | {CTRL-C}R{ENTER}TC{ENTER} |
| TX | X{ENTER} |
| RX | {CTRL-D} |
| Band Up | RB U{ENTER} |
| RxReverse | RXREV T{ENTER} |
Example Function Key Messages for the PK-232 (Entry window)
| Mode | Button text | Message |
| Running | F1 CQ | X{ENTER}CQ CQ CQ TEST DE {MYCALL} {MYCALL} K CQ{CTRL-D} |
| Running | F2 Exch | X{ENTER} ! UR 599 {EXCH} 599 {EXCH} BK{CTRL-D} |
| Running | F3 Tnx/Qrz | X{ENTER} ! TU GL DE {MYCALL} QRZ{CTRL-D} |
| S&P | F1 {MYCALL} | X{ENTER}! DE {MYCALL} {MYCALL}{CTRL-D} |
| S&P | F2 Exch | X{ENTER}! UR 599 {EXCH} 599 {EXCH} GL DE {MYCALL}{CTRL-D} |
Example Macros for the KAM
| Button text | Macro |
| Abort | {CTRL-C}R RTTY {ENTER} |
| TX | {CTRL-C}T |
| RX | {CTRL-C}E |
Example Macros for the SCS PTC (Digital Interface window)
| Button text | Macro |
| Abort | {ESC}CLR{ENTER}{CTRL-D}{ENTER} |
| TX/RX | {CTRL-Y} |
| RX-Reverse | {ESC}TR 1{ENTER} |
| RX-Norm | {ESC}TR 0{ENTER} |
| 45 Baud | {ESC}BAU 45{ENTER} |
| 75 Baud | {ESC}BAU 75{ENTER} |
| Command mode | {ESC}Q{ENTER} |
| – – – | – – – |
| RTTY | {ESC}Q{ENTER}BAU{ENTER} |
| PSK31 | {ESC}Q{ENTER}PSKT{ENTER} |
Example Function Key Messages for the SCS PTC (Entry window)
| Mode | Button text | Message |
| Running | F1 CQ | {CTRL-Y}CQ TEST DE * * * k{ENTER}{CTRL-Y} |
| Running | F2 Exch | {CTRL-Y}! HI 599 {EXCH} {EXCH} K{CTRL-Y} |
| Running | F3 CFM | {CTRL-Y}! QSL TU DE * QRZ? K{CTRL-Y} |
| S&P | F1 {MYCALL} | {CTRL-Y}! DE * * K{CTRL-Y} |
| S&P | F2 Exch | {CTRL-Y}DE * TU 599 {EXCH} {EXCH} GL DE *{CTRL-Y} |
Example Function Key Messages for MMTTY (Entry window)
| Mode | Button text | Message |
| Running | F1 CQ | {TX} CQ CQ CQ TEST {MYCALL} {MYCALL} CQ {RX} |
| Running | F2 Exch | {TX} ! UR 599 {EXCH} 599 {EXCH} {RX} |
| Running | F3 Tnx/Qrz | {TX} ! TU {MYCALL} QRZ {RX} |
| S&P | F1 {MYCALL} | {TX} ! {MYCALL} {MYCALL}{RX} |
| S&P | F2 Exch | {TX} ! 599 {EXCH} 599 {EXCH} {MYCALL}{RX} |
| Send CQ on new line | F1 CQ | {TX}{ENTERLF} CQ {MYCALL}{RX} |
Packet/Telnet Macro Commands
Packet/Telnet macros are only substituted when used in the packet/telnet buttons.
Macros for use in packet/telnet buttons
{WAIT} Wait 5 seconds (fixed value)
Macros for use in ‘Comment For All Spots’ (in Telnet/Packet window)
{GRIDSQUARE} Gridsquare from grid textbox in Entry window
{MODE} Mode used in Entry window during contact
{QTH} QTH from section/qth textbox in Entry window
{ZONE} Zone for state/province/section/oblast/other textbox in Entry window
Quoted Strings
Surrounding characters with double quotes will cause function keys or mapped keys to send those keys for processing by the textbox where the insertion point (cursor) is currently located, e.g. “/P” will cause “/P” to be appended to the callsign if the insertion point is at the end of the callsign textbox. If you want to use this when the insertion point is not at the desired position, you will first need to move the insertion point to the desired position before executing the keystroke that invokes the quoted string.
If a quoted string starts with “http” or “https” the default browser will be opened on the url specified.
If a quoted string starts with the name of a .exe or .bat file, the string will be executed as a Windows command; for example, “notepad.exe C:\contestnotes.txt” will open the Notepad program on the file C:\contestnotes.txt. The name of the .exe or .bat file must not contain any spaces (the program looks for either “.bat” or “.exe” immediately before the first space character, if any, in the quoted string).
Quoted strings can be used wherever macros can be used. They are handled like macros, but are processed after all macro substitutions have been completed. Once any macro substitutions have been performed and any quoted strings have been extracted and processed, what remains is sent as a CW or wav file message.
ESM – Enter Sends Message
ESM Overview
This section provides a step-by-step introduction to ESM. Try it, and we can almost guarantee you’ll like it.
The first step is to turn it on. Open the Config menu in the Entry Window, and select ESM
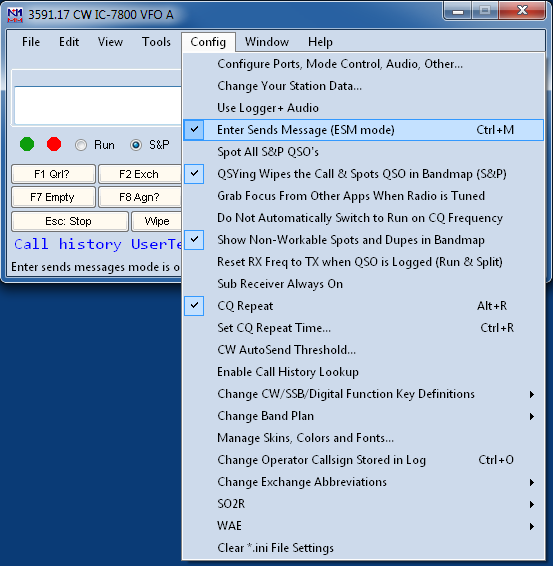
Now close the menu and enter any call in the entry window. We’re assuming that you are doing S&P.
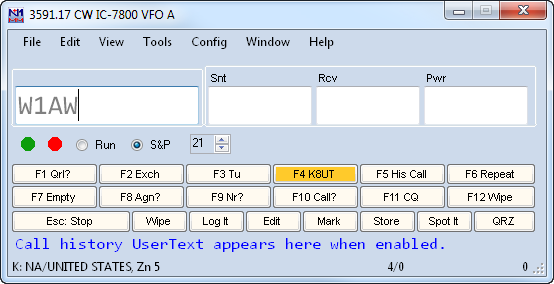
What’s different? Take a look at the F4 button. The highlight means that if you press [Enter] at this point, the F4 message will be sent (which is what you want – your call). Press [Enter], your call is sent, but the cursor remains in the callsign field, and F4 is still highlighted. If he doesn’t answer the first time, just press [Enter] again. If he answers you, hit [Space], and the cursor will move to the Exchange box. You are not ready to send your exchange to him yet, because you have not yet copied his exchange, so now F8 (Agn?) is highlighted. Type in the exchange you receive from him, and look!
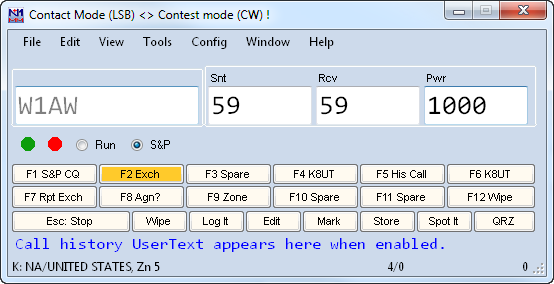
Now F2 is highlighted. That means that the next time you hit [Enter], the program sends F2 and logs the QSO.
So instead of an 8 step process to work an S&P QSO, you have either 3 or 4:
- Enter the callsign
- Press [Enter]
- (optional) If he doesn’t answer, press [Enter] when it’s time to call him again; if he does, press [Space] and copy his exchange
- Press [Enter] again to send your exchange to him and log the QSO.
What’s described above is the default behavior in S&P ESM, which assumes you won’t get answers every time (or even most times) you call somebody. If you’re louder than that, you may want to change the behavior. Go to the Configurer (the first option on the Config menu), click it, choose the Function Key tab, and look for the option “ESM sends your call once, then ready to copy S&P exchange.” Check that, and the behavior changes. Enter now sends your call once, and the cursor then moves to the Exchange textbox. At the same time, the Function Key highlight moves to F8 Agn. Type in his exchange, and the highlight moves to F2 Exchange. Press Enter, and your exchange is sent to him. If you already have a valid exchange in the Exchange textbox, whether you type it or it is pre-filled, the highlight will move directly to F2 instead of going to F8. Once F2 is sent, the QSO is logged, and the highlight moves back to F4, ready to call the next station.
One little trick to use with the Big Gun switch on is to program your call in F8 instead of “again”. This way, when you don’t get the guy on the first call, hit Enter again to repeatedly send your call until he answers (and the cursor is always in the right place when he does answer). 73 de Ted W4NZ
But suppose you’re Running (Calling CQ)? The first thing to do is tell the program. You do that by checking the box next to the word “Run”, either with your mouse or by hitting [Alt]+U. Now your Entry Window looks a bit different:
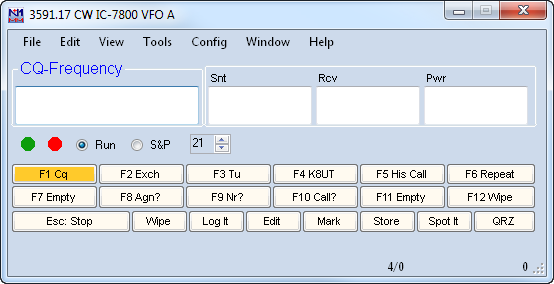
Note the highlight is now on F1, because the first thing in most Run QSOs is a CQ. Press [Enter] and the program will send F1.
Now someone answers. Type in his callsign and the window changes.
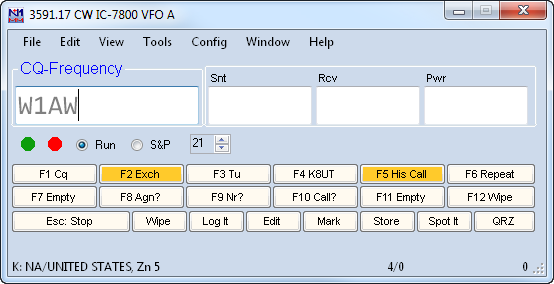
You’re starting to get the hang of this – the highlights mean that when you hit [Enter] the program will send F5 followed by F2 (on CW – on phone you would speak the callsign and then press [Enter] to send your exchange).
Once you have done that, the window changes again.
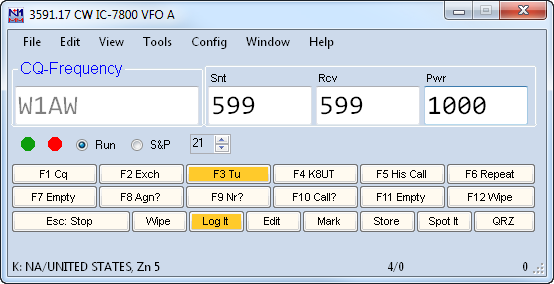
Now the highlights tell you that you have copied a legitimate exchange (in this case the program has supplied it from the callsign), and that the next [Enter] will send your F3 message and log the QSO.
So, type a callsign, hit [Enter] 3 times, and you’ve logged a QSO. Pretty slick!
Now suppose you’re like me and you fat-finger copying the exchange, so that you have nonsense in the Exchange box, like this. In that case, the program reminds you:
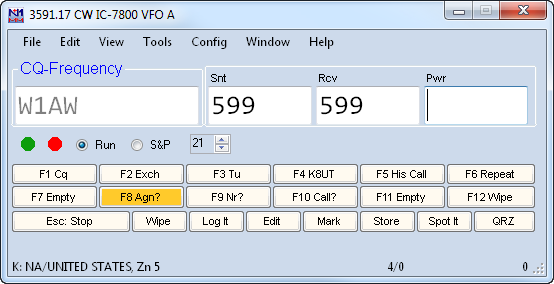
If you hit [Enter] with an incorrect exchange, the program will send the F8 message and request a repeat. Alternatively, if you see your mistake and correct it, the screen changes again to show the “F3 and Log It” highlights. Just press [Enter], the program sends the F3 message, logs the QSO, and you’re done.
Once you’ve used ESM, I predict you’ll never go back to the old way again.
The developers have reserved F1 as the “Call CQ” key. Pressing it while in Search and Pounce mode will switch you to Run mode. Although we do not recommend changing it, there are at least two ways to redefine F1: modify the ESM function key assignment table (see below) or use the {S&P} macro at the end of your F1 definition to force the program back to S&P mode.
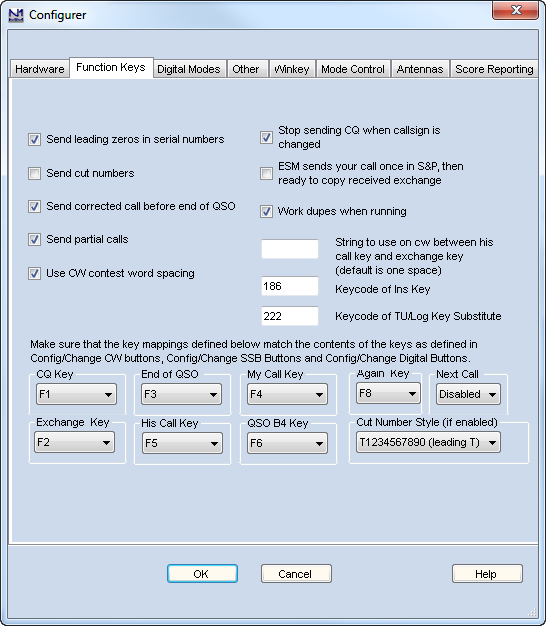
Two further refinements, and then this chapter is done. Open the Config menu again, and then open the “Configure Ports, Telnet Address, Other” sub-menu. Click on the Function Keys tab:
In the left-hand column, note that I have checked “Send Corrected Call.” This neat feature, in Run mode, keeps track of whether you have changed the callsign in the callsign box. For example, say you only copied “DL6A” at first, and filled in the rest later. Eventually, you copy DL6ABC, and when you press [Enter] to send the F3 (TU message), on CW the program sends “DL6ABC TU …” On phone, you’ll need to supply the correction.
In the right-hand column, the third checkbox is cumbersomely titled “ESM only sends your call once in S&P, then ready to copy received exchange.” In shorthand, we call this the “Big Gun switch.” If you nearly always get stations you call the first time, you can save a keystroke by having the cursor advance automatically to the exchange box after the first time you call. If you often need to call again, don’t check it. If you have checked it, and need to call a station more than once, you just press F4, regardless of where the cursor is.
ESM cursor behavior and the Digital Interface window
Because of the ability to transfer data from the DI window to the Entry window with a mouse-click, the behavior of the cursor moving between the boxes in the Entry window is slightly different when the DI window is open than when it is closed. If you are using ESM in CW or SSB with the DI window open and the cursor does not move between the call sign and exchange boxes when you expect it to, try closing the DI window.
Repeating what was last sent
When in ESM mode, you sometimes need to repeat whatever you last sent, be it your call or exchange element or other function key. The “=” key will do that. Rather than look at the Entry Window and figure out which function key to send, just press the equal key if you just want to send what you last sent again. Easy!
Don’t change the “key mappings” (below the red type on the Function Key tab of the Configurer) unless you absolutely know what you’re doing – it can make a horrible hash out of ESM.
The chart below outlines the possible combinations of information in the Entry window, and what will be sent in each situation.
Note: ESM is affected by two options in the Configurer under the Function Keys tab:
- the “ESM sends your call once in S&P, then ready to copy received exchange” check box (sometimes called the “Big Gun” option)
- the “Work dupes when running” check box (recommended)
ESM Mode Enter Key Actions
| Callsign field | Exchange field | In Run, Enter sends | In S&P, Enter sends |
| Empty | Empty | CQ (F1) | My Call (F4) |
| New Call (1st time) | Empty or invalid | His Call + Exch(F5 + F2) | My Call (F4) |
| New Call (repeat) | Empty or invalid | Again? (F8) | My Call (F4) |
| New Call (repeat) – ESM sends call once… checked | Empty or invalid | Again? (F8) | Again? (F8) |
| New Call (before sending exchange) | Valid | His Call + Exch(F5 + F2) | Exchange + Log(F2 + Log It) |
| New Call (after sending exchange) | Valid | End QSO + Log(F3 + Log It) | Log(Log It) |
| Duplicate Call | Empty or invalid | QSO B4 (F6) | do nothing |
| Duplicate Call (before sending exchange) | Valid | His Call + Exch(F5 + F2) | Exchange + Log(F2 + Log It) |
| Duplicate Call (after sending exchange) | Valid | End QSO + Log(F3 + Log It) | Log(Log It) |
| Dupe (1st time) – Work Dupes checked | Empty or invalid | His Call + Exch(F5 + F2) | do nothing |
| Dupe (repeat) – Work Dupes checked | Empty or invalid | Again? (F8) | do nothing |
| Dupe (before sending exchange) – Work Dupes checked | Valid | His Call + Exch (F5 + F2) | Exchange + Log(F2 + Log It) |
| Dupe (after sending exchange) – Work Dupes checked | Valid | End QSO + Log (F3 + Log It) | Log(Log It) |
ESM on Phone – One Special Feature
There’s every reason, when running CW or RTTY, to use stored messages for almost every transmission. Phone is different – you may not want to have the computer talk for you all the time.
- Most operators choose to say callsigns and serial numbers themselves, rather than having the computer assemble them from individual letters and numbers. See the next section for more discussion of these issues, and for information on how to set up your Function Key definitions, whether you choose to let the computer do it all or not.
- In some contests like CQWW, the exchange is so short that it may be more hassle than it is worth to have the computer voice your CQ zone.
Or… you may forget, particularly when you are running tired, and say the other station’s call and your exchange before you realize you’ve done so.
To deal with this, N1MM Logger incorporates some additional flexibility. Here’s how it works, courtesy of the inventor, N2IC:
You are in Run mode. A station answers. You type in the callsign, and you use your live voice to send the callsign and exchange. Now, the station you are
working is about to send his/her exchange. If, at this point, you hit the Enter key, your exchange wav file would be sent. That is bad – you already used your live voice to send the exchange. Instead of hitting the Enter key, hit the Space bar. Now, type in the other station’s exchange. Hit the Enter key, and the “Thanks” message will be sent, and the QSO will be logged.
In summary, the decision of whether to use the Enter key or the Space bar at that step in the logging process depends on whether you use your live voice to send your exchange, or a wav file.
Here’s an illustrated version of how it works:
You’re running, and W8QZR calls you. You type his call into the callsign field.
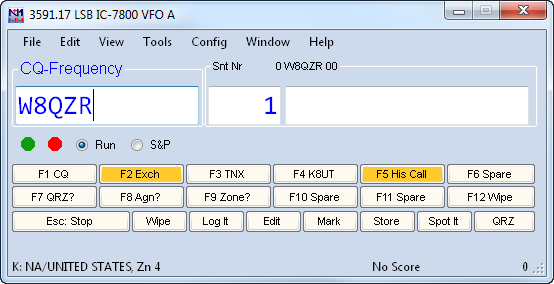
Then, for whatever reason, you say his call and the exchange instead of having the computer do it. If you then hit Enter, the program will, as it says, transmit his call and the stored exchange message. Not what you want.
Instead, you hit the Space bar.
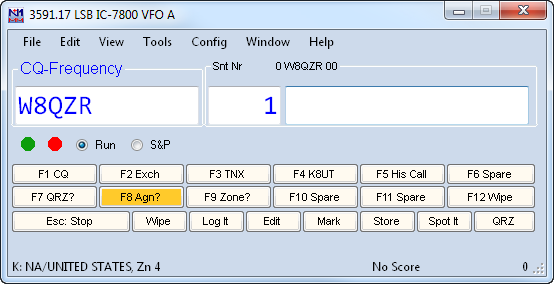
Perfect! Now the cursor is in the Exchange field. There is nothing in the exchange field yet, so F8 (Agn?) is highlighted. Type in his exchange.
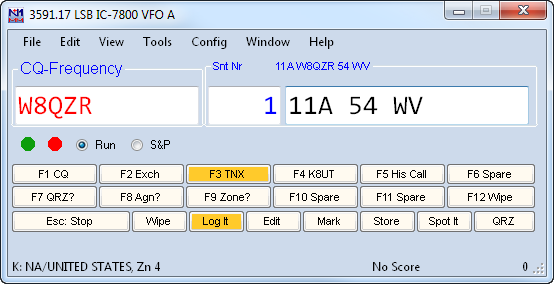
The highlight moves to the TU and “Log It” buttons, just where they should be. Hit Enter, and the computer will log the QSO, send your “TU QRZ” message and be all ready for the next QSO.
