
Multi-Computer and Multi-Op Contesting
Introduction
The purpose of Multiple Computer Networking is to support logging of QSOs on multiple computers running the same contest with the same station callsign. This is accomplished with application-defined data replication. Each computer will have its own copy of ALL the QSOs and N1MM+ will synchronize the data so that it is the same on each computer. This approach is used because contesters usually operate in a high-RF environment and using a single database would not be as reliable as having each computer log its own QSOs and replicate them on all the other computers. The station that logged the QSO, as indentified by its NetBios name is the keeper of that data. When data is out-of-sync, the QSOs on each computer will be replaced with QSOs from the computer that logged them. NEVER, EVER REPLACE A COMPUTER IN A NETWORK AND USE THE SAME NetBios NAME while in multiple-computer network mode. You risk losing ALL the QSOs from the computer you are replacing. Likewise, do not shut down networking and modify QSOs. When you bring the network back up, the system will replace your changes with the originals from the owner’s computer. You can log with the network down, but you are confined to the QSOs that you own and that you add.
There are major changes in N1MM Logger+ networking, as compared with N1MM Logger Classic, which will affect both multi-op contesting and those operators who network multiple computers for single-op categories, particularly on digital modes.
.
- You no longer need to enter computer names and IP addresses when networking on a typical LAN. When networking is turned on, N1MM Logger+ detects the presence of computers on the same subnet that are running the same version of N1MM Logger+, and automatically connects to them. You will be warned if there are discrepancies in contest or multi-op class among the computers, so that you can correct them.
- The Network Status Window is brand new in N1MM Logger+.
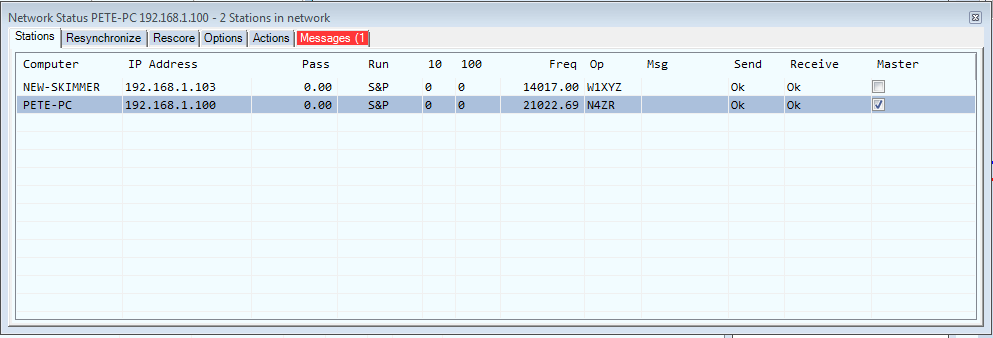
All network-related options and actions except for informational functions such as received Talk messages and band-change status have been moved to this new window. Those remain in the Info window.
A full explanation of this window and each of its functions is found here.
Key Features
- Use of standard network interface cards (NIC’s) and wireless interfaces
- Point to point or broadcast Talk capability between networked stations
- Automatic time synchronization (if non-master stations are Run as Administrator)
- Pass frequencies displayed at all stations
- DX Spots distributed by master station to all connected computers
- Spotting commands can be sent by any station on the network
- Extensive error trapping and diagnostics
- Auto resync when a station comes on-line
The “Block my transmitter …” and “Stop my station from transmitting ...” items on the Options tab of the Network Status window are software lockouts. They are subject to network latencies and cannot be guaranteed to prevent simultaneous transmitting. Because of network latencies, lost packets, network dropouts or network failures there could be short overlaps in transmissions, or even complete failure of the lockout. For protection against damage from simultaneous transmitting, and/or to be absolutely certain that contest rules forbidding simultaneous transmissions are obeyed at all times, you must use a dependable hardware lockout system (or in the case of distributed stations, strictly-applied procedural lockouts to prevent violation of contest rules). Do not depend on software lockouts to prevent equipment damage and do not expect software lockouts to give you an ironclad guarantee of compliance with contest rules!
The Simplest Multi-Op
The simplest form of multi-operator contesting involves a single radio and a single computer, i.e. it is just like single-operator contesting except that two or more operators take turns, spelling each other. Of course, you have to ensure the correct entry class is entered in the Contest Setup dialog. From there on, if you wish to keep track of which contacts were made by which operator, you should use Ctrl+O, or the OPON direct entry command in the Entry window, and enter the call sign of the incoming operator every time the operator is changed. N1MM Logger+ will keep track of which operator made each contact, and that information will be displayed in the Log window. For the simplest setups, including CW and RTTY, and SSB without voice keying messages, this is almost all there is to it.
Multiple Radios and Multiple Computers
Most multi-operator setups will involve more than one radio and/or more than one networked computer. The details of how to set up a networked computer system are in the Network Status window section of this manual.
Stored Voice Messages in a Multi-Op (Any multi-op)
If you are using stored voice messages in a phone contest and you change operators while using the same stored voice messages, the voices heard over the air could vary during a single QSO between recorded messages and live voicing. This can be very confusing to the other station. To avoid this, it is best to have each operator record a separate complete set of voice keyer messages. To do this, create a separate subfolder for each operator within your wav files folder, labelled with that operator’s call sign. Make sure the paths to your wav files in your function key messages includes the {OPERATOR} macro, as in “{OPERATOR}\CQ.wav”. Before the contest, have each operator enter his or her call sign with Ctrl+O or OPON and then record all of the voice keyer messages in his or her own voice. Once the messages are all set up, the Logger will use the operator call sign entered during the contest with Ctrl+O or OPON to select which set of recorded messages to use.
If your multi-op uses multiple computers, and if any individual operator will use more than one of these computers during the course of the contest, that operator will need to create and populate a subfolder with his personal wav files on each of the computers that he or she will be using.
“Distributed” Multi-Ops (IARU Headquarters stations, for example)
N1MM can be configured to allow some or all of the other stations outside your LAN to communicate over the internet. Possible uses for this feature are: Headquarters (HQ) stations in the IARU contest and distributed special event stations. There are two basic methods for configuring external network stations on your N1MM multi-op network: direct IP addressing of of external stations; and using a VPN (Virtual Private Network) to which all of the stations would connect. The website’s >Downloads >Additional Support Files gallery contains instructions for installing and operating a VPN – two using freeware software and describing setup for the IARU (but can be applied to networks); and another using a commercial VPN. See:
- IARU – VPN Client- and Server-side WAN setup instructions by VU2PTT.zip
- VPN-IARU-SoftEther-2020-05-23.pdf
- Distributed Multi-Op Contesting using N1MM+ with a Hamachi VPN.pdf
Footswitch Lockout Support Distributed Multi-Op Networks
Footswitch lockout support has been added for multiple distributed stations.
In the IARU contest a headquarters station is allowed to use multiple stations located within one IARU zone, but the rule of one signal per band/mode is still in effect. So there could be 2 (one running station and another looking for multiplier) or more stations on the same band and same mode and they should keep only one TX signal on this band at any time. Now you can hook up a footswitch to the LPT port 15 (the LPT port must be enabled even if it is not being used for other purposes. There is no special check box to turn the footswitch feature on/off). If the station is not in multi-multi operator category the footswitch will directly control PTT just like Alt+T. If it is a multi-multi station (connected to other stations on LAN or via the Internet in Multi User mode) it will prevent two stations on the network from both transmitting on the same band/mode combination.
This is a software lockout only, and is subject to network latencies. As such, it should be considered a backup. Multiple stations on the same band/mode should always coordinate operations (with the help of message passing over the network from the Info window), and not depend on software lockout to ensure compliance with contest rules.
Multi-Operator Capabilities and Techniques
N1MM Logger+ attempts to simplify and streamline important multi-operator functions. These are collected here to help the new multi-op participant quickly learn how to use N1MM logger+ effectively in this context.
Messaging – “Chat” for Multi-Ops
Frequently, in a multi-op situation, there is a need to communicate to other operators without shouting across the room. For this purpose, N1MM+ has a Talk function, which can send Messages to all stations or only one station. Talk can be invoked several ways:
- Ctrl+E shortcut key, or from Window >Network Status> Actions >Talk. This assumes you want to send a Message to all stations, indicated by the “*” (asterisk) in the bottom panel
- To send a Message to only one station, from within the Network Status window >Stations list, right-click on the destination station name and select >Talk
Typing your mesage: Click in the lower panel of the Talk window, check that there is a space following the “*” (or the destination station name), and type your Message. Press Enter to send.
After pressing Enter, the program automatically returns focus to the N1MM+ Entry Window. By default the Message window remains open, but you can change that behavior by right-clicking and choosing from “Enter moves focus to Entry Window” (the default); or ““Enter moves focus to Entry Window and minimizes Talk.”
Passing
Passing – referring stations you have worked to the operator on one or more other bands – is an essential tool for optimizing multiplier counts and total scores in a multi-op. There are two basic forms that this can take:
- You are running, and you pass someone you work to another band where your station is also running.
- You are running, and you pass someone you work to a specified frequency on another band. This might be useful, for example, if your station’s operator on that band is searching and pouncing.
Some basics – if the station on a given band is in Run mode, then his pass frequency will be his running frequency. If that station is in S&P mode, then he will want to set a pass frequency – perhaps somewhere high in the band he is on. To set a pass frequency, click on the Actions tab of the Network Status window, then click on “Set Your Pass Frequency.” A dialog will open, where you can enter a frequency, or 0 (zero) to clear your pass frequency. If you switch from S&P to Run mode, your pass frequency will change automatically to your current frequency. Don’t leave a zero in your pass frequency while you are in S&P mode, or other stations will not be able to pass to you. If you are not using an interfaced radio, be sure to enter your current frequency in the callsign field of the Entry window.
You can pass the station currently in your Entry window, or the one you worked last, in one of two ways:
- Right click on the station you want to pass to, in the Network Status window, and click on Pass Current/Last QSO.
- Right click on the Band Button in the Entry window corresponding to where you want to pass the station. For example, if you’ve told him, “Please go to [your 20M station’s Run or Pass Frequency]”, then right-click the 20M Band Button.
Either way, a pass message will be sent, in red to get the other operator’s attention, and a message will be entered in black in your Info window confirming that it was sent.
In addition to telling the operator at the other station on the network that you are passing someone, you also need to tell the station you are passing what frequency he should go to on the new band. The {LASTPASSEDFREQ} macro has been created for this purpose.
To use this, you can program a function key with a request to QSY, for example:
F7 Pass, {LOG} TU ! PSE QSY {LASTPASSEDFREQ} *
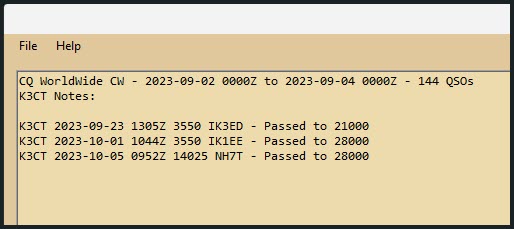
During the QSO, you check the multiplier and worked status of that station on other bands by looking at the colors of the band buttons in the Band Panel in the Entry window. If you decide you want to ask the other station to QSY, then at the end of the QSO, instead of pressing Enter to log the contact, you would first right-click on the band panel button for the band you want to pass the station to, and then press the function key containing the {LASTPASSEDFREQ} macro (F7 in this example). This will log the contact (because of the {LOG} macro) and ask the other station to QSY to the pass frequency on the new band. A message will be sent to the networked station you are passing to, the callsign of the station being passed will appear on his Bandmap at his Pass (or Run) frequency, and a note will be placed in the log to enable you to assess the effectiveness of your passing strategy post-contest, with the help of the View > Notes menu item.
Passing – How-To… Example
Passing NH7T from 20m to 10m:
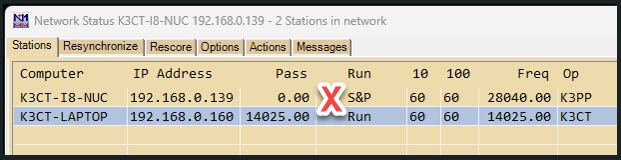
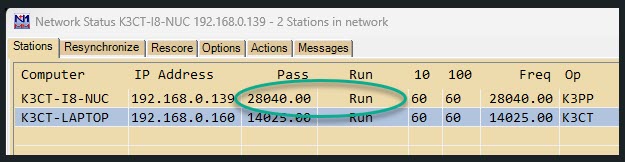
For this to work, the station being passed to (the 10m station in this example) must have set a Pass frequency. If the station is in Run mode, this happens automatically (the Pass frequency is the CQ frequency). If the station is in S&P mode, the operator can use the Alt+Z hotkey to set a Pass frequency to pass stations to.
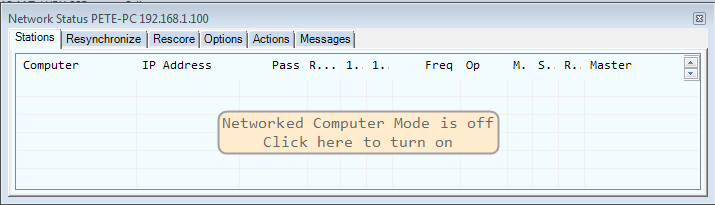
The station doing the passing (the 20m station in this example) can see the other station’s Pass frequency in the Network Status window. If the Pass frequency shows 0.00, the station has not set a Pass frequency and is not ready to have callers passed to them:
Now on the passing (20m) station with the callsign to be passed (NH7T in this example) in the Entry window callsign box (for example, just before logging the contact), first check the Band Panel buttons to see whether the station has already been worked on the new band.
The color of the Band Panel buttons indicates the worked/multiplier/dupe status of the station on each band. No color indicates a Dupe (no points); green is a double-mult; red is single-mult; and blue is just a normal QSO. In the example below, the 10m Band Panel button is green indicating double-mult status. Right-click on the 10m band button to send a message to the 10m operator that you are passing a station to them.
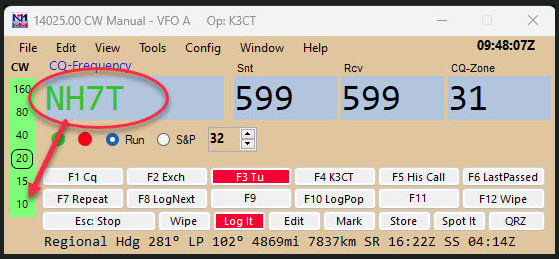
Note that if the left-click option to QSY using band panel buttons has been enabled, a left click will QSY the radio to the new band. You probably do not want that, so to avoid problems caused by inadvertently left-clicking instead of right-clicking, it is a good idea to uncheck the “Band Button Left Click Enabled” option in the Entry window’s right-click menu. Losing the fast band change from the Button Panel is a small price to pay for the ability to pass stations easily and safely.
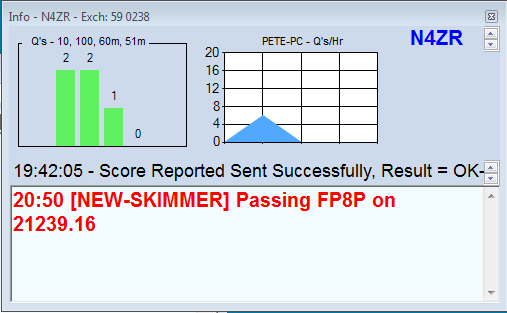
After the right click on the band button, you will see a message in the 20m Info window:
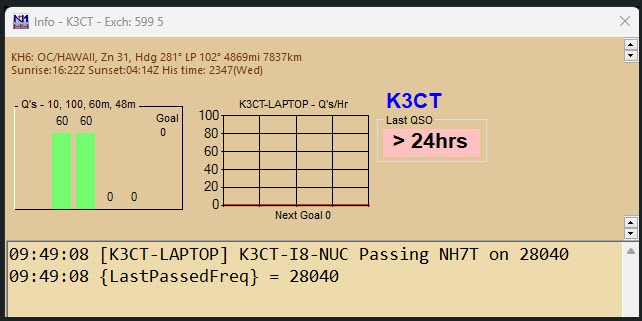
At the same time, the 10m operator will see a message in their Info window “Passing NH7T on 28040”, the Talk window on the 10m station will open with the same message, and the passed callsign will appear in the 10m Bandmap on the CQ-Frequency.
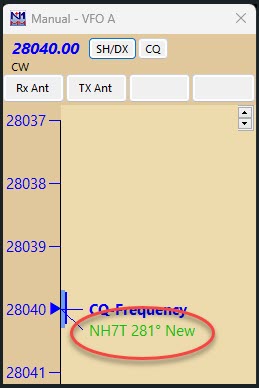
After the right-click, the 20m operator can use the {LastPassedFreq} macro in a function key message in order to ask the target station (NH7T) to QSY to the Pass frequency. The {LastPassedFreq} macro in a function key will be replaced by the most recently-used Pass frequency. In this example, the F6 message is designed to be used instead of the regular F3 (TU) message key to log the contact:
F6 Pass, {Log} Pse QSY {LastPassedFreq}
If the operator doesn’t want to use a function key to send the QSY message, they can always just look at at the Info window for the 10m pass frequency and send it to the target station manually. This method is often used in SSB contests, unless voicing of letters and numbers is being used.
The 10m operator can click on the callsign in the Bandmap to enter it into the Entry window. When the 10m station is running, this would be done if and when the target station is heard responding to a CQ. When the 10m station is S&Ping, they may need to QSY to their designated Pass frequency to try to work the target station. If the target station is not heard or chooses not to accept the invitation to QSY, the 10m operator will simply carry on as before.
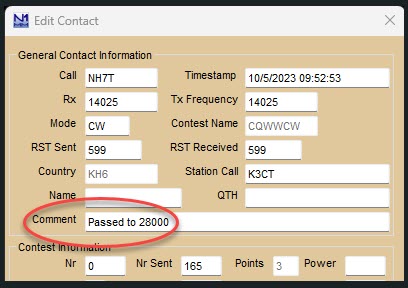
In the log, the QSO comment for the 20m QSO will contain a note indicating that the 20m operator passed the target station to the 10m station.
All Notes can be viewed after the contest with View > Notes. You can see which operators passed stations and check in the log whether the pass was successful.
Partner Mode and Call Stacking
Partner mode is an extension of the single-operator call stacking functionality to allow one or more partners to listen on the run operator’s frequency and stack callsigns for the run operator to work. It is enabled automatically when two or more networked computers are on the same frequency.
Stacked callsigns appear in a small CallStack window that appears immediately above the Entry window the first time a call is stacked. The run operator or partner(s) can add calls to the callstack window with the {STACKANOTHER} macro or by pressing Ctrl+Alt+G.
The Run operator can use a function key message with the {LOGTHENNEXT} or {LOGTHENPOP} macro to log the current contact, pop the next callsign off the stack and send the exchange, or else use the ESM Next key automation to invoke the Next key containing the {LOGTHENPOP} macro when the Enter key is pressed. This is described more fully in the Single-Operator Contesting section.
The following hotkeys and mouse actions can be used in the CallStack window:
- Ctrl+Alt+G adds the callsign in the Entry window in that computer to the callstack on all computers (alternatively, partner operators may use a function key containing the {SOCALLSTACK} macro to push the callsign in the Entry window onto the stack on all computers)
- Alt+G wipes the Entry window and grabs the top callsign from the callstack only on that computer; however, it is recommended that the Run operator should use the automation provided by the {LOGTHENPOP} or {LOGTHENNEXT} macros instead, with or without the Next key feature in ESM, in order to prevent the pileup from starting up again and drowning out the start of the next QSO
- Right-clicking on a callsign in the callstack window deletes the callsign from all callstack windows
- Alt+D deletes the callsign at the top of the stack from all callstack windows
- Left-clicking on a callsign in the callstack window selects the callsign
- Pressing the Delete key deletes the callsign from all callstack windows
- Double-clicking on a callsign in the callstack window moves the callsign to the top of the stack only on that computer
- Clicking on the “C” (Clear) button in the callstack window clears all callsigns from the window only on that computer
If a callsign that exists in the callstack is logged, it is removed on all computers. If a callsign that is a new multiplier is on the stack and the run operator works another station in the same multiplier the color of the calls in the stack will change when that QSO is logged. If a partner attempts to stack a callsign that is a dupe, the callsign will not be stacked. If the callstack window is not open or the callstack contains no calls and the callsign in the Entry Window is a dupe, the {LOGTHENPOP/LOGTHENNEXT} and {SOCALLSTACK} macros do nothing. In ESM if the exchange has not been sent or the received exchange has an error, the {LOGTHENPOP/LOGTHENNEXT} macros are disabled. This prevents logging an incomplete QSO.
Since function key contents and the ESM Next key option are saved by operator, each operator can choose which macros to use and whether or not to use the ESM automation (e.g. one operator could use {LOGTHENPOP} to start the next QSO automatically when Enter is pressed, while another operator could use {LOGTHENNEXT} to retain manual control over the operation).
Managing A Multi-Op Station
A smooth, trouble-free multi-op contest requires a good deal of systematic management. This section attempts to provide checklists for Before, During and After a contest.
Setting Up the Network
- Verify that all of the computers you intend to use are running, and that Windows networking is functional. It is a very good idea to have a “hot spare” on the network, just in case.
- Install the same version of N1MM Logger+ on all of the computers.
- Run N1MM Logger+ on each machine, using the right-click option to Run as Administrator on all machines except the one you will be designating as “master”. This will enable the “master” station to keep all the other computer clocks in sync with Internet time. Alternatively, if all of the computers have Internet access,you can disable the built-in Windows Internet time synchronization (which is not accurate enough for this purpose) and install more accurate time synchronization software (such as the Meinberg NTP client or Dimension 4) on all of the computers in the network to ensure that they are all synchronized.
- Create a new empty database on each machine, set up to use the same station callsign on all machines.
- Start a new log for the contest on each machine, making sure to set the contest, operator category and transmitter category correctly.
- Configure external interfaces at each operating position (radio control, CW, PTT, etc.)
- Set up Function Key Messages on each computer. If using operator-specific wav files for SSB, make sure that each operator has his or her own wav file sub-folder on every computer that he or she will be using.
- Make sure that Master.SCP and wl_cty.dat files are up to date (on the Tools menu) on all computers
- Turn off Windows Sounds (in SSB contests) to prevent transmitting odd noises (Control Panel – Sounds – Scheme: No Sounds)
- Set N1MM+’s Networked Computer mode on – from the Network Status Window on each machine
- At this point you should see the names of all the computers running on the network. Initially, i.e. for the first several seconds or so, they may display various red warning flags .

- This will only persist until the network finishes connecting, at which time the red flags will disappear, unless you have something wrong, such as a mismatch between N1MM+ versions, between the contests on the different computers, or between operator categories or transmitter categories. In this case, the red flag will remain on the Messages tab in the Network Status window, and you will find an explanation there of what needs to be fixed.
Now it’s time to make some test QSOs. Verify that when a given station makes a QSO, the QSO appears on all of the networked computers. Repeat this process with each computer on the network, including the master, even if you do not anticipate making QSOs with it during the actual contest, in order to verify that network communications are working correctly.
just before the contest start, have each operator type WIPELOG in the callsign field and press the Enter key. This will remove all the test QSOs. Then have the starting operator use Ctrl+O to set his or her callsign for the first session.
* You are running the same version of the program on all computers
- You have set up the same station callsign, same contest and same operator and transmitter categories on all computers
- All computers have the same version of wl_cty.dat installed
- All computers have the same time zone and daylight savings offset
- All computers have the same regional settings for numbers, dates, etc, and the same short and long date and time formats
There are some situations in which there may be more than one network active at the same time on the same computer(s). One such situation might be one where the N1MM Logger+ network is a wired network (perhaps because some of the computers on the network do not have wireless adapters), but where there is a wireless network operating at the same location. On any computer where there are two network adapters connected and active, N1MM Logger+ will not be able to reliably detect which adapter you intend to use for the N1MM+ network, and 50% of the time it will guess wrong. A work-around for this is to temporarily disable the other network while you are starting up N1MM+ and connecting to the N1MM+ network, in order to ensure that the N1MM+ network connection uses the correct network adapter. Once the N1MM+ network connection is established, you can re-enable the other network on any computers that need it (for example, if the Internet gateway is on the other network, the Master computer will need to be connected to both networks).
