
Key Assignments – Keyboard Shortcuts
Key Assignments Short List
Key Assignments Short List
Table of Shortcut Keys by Operating Mode (RUN vs S&P)
| Running keys | S&P keys |
| F1 = CQ | Shift+F1 = Call CQ and switch to run |
| ; or insert = Send call and report | Alt+U= Toggle S&P/Run. Set CQ-frequency for pass |
| ‘ = Send TU message and enter in log | Alt+Q = Return to CQ-frequency |
| Alt+R = Enable CQ repeat | Ctrl+Up/Dn arrow = Grab next qso from bandmap |
| Ctrl+R = Set repeat time | Ctrl+Alt+Up/Dn arrow = Grab next mult from bandmap |
| Esc = Stop sending, stop repeat | – |
| General keys | Radio control |
| Ctrl+O = Set operator call (or OPON in Callsign field) | Alt+F10 = Swap VFOs |
| Ctrl+N = Add note to log | Alt+Q = Return to CQ frequency |
| Ctrl+W or Alt+W = Wipe entry fields. Release a reserved serial number. Ctrl+W is irreversible, Alt+W can be reversed by typing it again | Alt+F8 = Return to last frequency |
| SPACE or TAB = Move between logging fields. Space skips past the RST fields, Tab moves through them | Ctrl+PgUp/PgDn = Up/Down a band |
| ENTER = Log it (see ESM mode) | Type CW/USB/LSB/RTTY = Change mode, Type frequency in KHz = Change frequency or band |
| Ctrl+Q/A = Quick edit previous or next call | Ctrl+S = Set radio into split Ctrl+Alt+S – Toggle split mode |
| Ctrl+D = Delete last qso. Asks for confirmation | Ctrl+Enter = Set split frequency |
| Alt+H = Show help | Alt+F7 = Set split frequency or offset to specified frequency |
| Alt+K = Edit message buttons | Alt+’ = Toggle between the wide and narrow filters |
| Ctrl+Alt+Enter = Log a not accepted qso (invalid exchange, usually) | Alt+F12 – Copy frequency and mode to other radio/VFO. Some radio-specific differences. |
| – | Backslash ( \ ) = Change Receive (RX) focus (VFO/Radio) |
| DX Spots and Band Map | ESM Mode |
| Mouse wheel = Zoom in/out bandmap | Ctrl+M = Turn on/off |
| Keypad +/- = Zoom in/out bandmap | Insert or ; = Send call and exchange |
| Alt+D = Remove spot showing in the call frame or call textbox | Enter = Send TU and log it |
| Alt+P = Send spot | Enter = Start CQ again… |
| Ctrl+P = Send spot with comment | Alt+Enter = Log without sending anything |
| Ctrl+Tab = Toggle to/from packet window | Multi-User Mode |
| Alt+O = Store contact in the Bandmap | Alt+Z = Set pass frequency (broadcast to all computers) |
| Alt+Q = Jumps to the CQ frequency on this band | – |
| SO2R | Specific radios / Rotor control |
| Backslash ( \ ) – Two radios = Change Receive (RX) focus | FT-1000MP + FT1000D + some Icom Dual Watch radios Alt+F12= Dual Receive toggle |
| Pause = Swap both Transmit and Receive/Keyboard focus | – |
| Ctrl+Enter = Send next ESM state on alternate radio | TenTec Orion Alt+F12 = Toggle Main/left Sub/Right and Active in both ears. |
| Ctrl+F1 to F12 = Send message on alternate radio | – |
| Ctrl+B = Dueling CQ’s | Rotor control for the callsign in the Entry window |
| ` (Back-quote) = Toggle Stereo/Mono ( LPT pin 5) | Alt+J – Turn rotor to bearing |
| Alt+L – Turn rotor to long path bearing | – |
| – | Ctrl+Alt+J – Stop turning the rotor |
Table of Shortcut Keys by Transmit Mode
| CW | SSB | RTTY | VHF |
| Page Up = speed up | Ctrl+Shift+F1 =Record CQ | Alt+G = Grab call from stack | Alt+minus = Toggle grids |
| Page Down = speed down | Ctrl+Shift+F* =Record F-key message | Alt+T = RX/TX toggle | Ctrl+E = Send message to stations |
| = = send last Fkey again | NB. Same keys again to stop recording | Ctrl+Arrows = Swaps DI | – |
| Shift +Fx = send opposite mode Fx | Same | Same | Same |
| Ctrl+K = toggle CW window | – | Ctrl+K = toggle manual window | Alt+Z = Set pass frequency |
| Esc = Stop sending immediately and close window | – | Esc = Stop sending immediately and close window | – |
Note: The keys below work from all main windows
General Key Assignments
- Space – The spacebar will jump from field to field filling in defaults like the callsign from the call-frame, 59/599, and information from previous contacts with this station. Skips over signal report fields. SPACE IS THE PREFERRED TAB CHARACTER.
- Tab – Jump to the next entry field in the Entry Window, including signal report fields (the “S” digit in signal report fields is highlighted to enable quick overtyping, e.g. to change 599 to 579, etc.)
- Shift+Tab – Jump to the previous entry field in the Entry Window.
- Alt+H – open Internet help. Most windows have contest-specific help accessible from their right-click menus.
- Ctrl+Tab – Toggle between the Entry window and the Packet window.
- Alt+F9 – toggle through all the antennas defined for the current band. The selected antenna will show in the lower-left corner of the status pane.
- Alt+F4 – Quit the program. If two Entry windows (SO2R) the program will not exit. You are being asked if you are sure.
Active Radio/Bandmap Control Key Assignments
Jump to Spots
Note: If you are operating single mode, your mode won’t change when jumping between spots.
- Ctrl+Down Arrow – Get next spot higher in frequency.
- Ctrl+Up Arrow – Get next spot lower in frequency.
- Ctrl+Alt+Down Arrow – Get next spot higher in frequency that is a multiplier.
- Ctrl+Alt+Up Arrow – Get next spot lower in frequency that is a multiplier.
- Shift+Alt+Up Arrow – Get next spot lower in frequency that is self-spotted.
- Shift+Alt+Down Arrow – Get next spot higher in frequency that is self-spotted.
Jump to CQ Frequencies
- Alt+Q – Jumps to the last CQ frequency on this band (active bandmap) and will clear all textboxes in the Entry Window.
- Shift+Alt+Q – Jumps to the last CQ frequency on other band (non-active bandmap).
- Ctrl+Alt+Q – Jumps to your last used CQ frequency on any band and tune active bandmap to that frequency.
- Alt+F8 – Return to your previous frequency (you can use this to “undo” Alt+Q).
Tune the Radio
- Ctrl+Page Up – Go up one band. WARC bands are skipped while logging for a contest.
- Ctrl+Page Down – Go down one band. WARC bands are skipped while logging for a contest.
- Up Arrow – Tune radio down 100 Hz on SSB, 20 Hz on CW (adjustable in the configurer).
- FT-1000MP, FT-890, FT-920, FT-990 and FT-1000 and many other radios
- In S&P – pressing the up/down arrows will turn off RIT and tune your main VFO.
- In Running mode – it will turn on your RIT and tune the RIT.
- FT-1000MP, FT-890, FT-920, FT-990 and FT-1000 and many other radios
- Down Arrow – Tune radio up 100 Hz on SSB, 20 Hz on CW (adjustable).
- See Up Arrow information above
- Mouse wheel – With the mouse in the Entry Window, QSY the radio using the same increment as the Up/Down arrow keys
- Alt+Mouse wheel – With the mouse in the Entry Window, QSY to the next round-number frequency rounded off to 1 kHz
- Ctrl+Mouse wheel – With the mouse in the Entry Window, QSY to the next round-number frequency rounded off to 10 kHz
- Ctrl+Alt+Mouse wheel – With the mouse in the Entry Window, QSY to the next round-number frequency rounded off to 100 kHz
- Alt+F7 – Set split frequency or offset from current frequency for the active radio. When hitting Enter or click OK with nothing on the line split will be cleared. Press ESC or click Cancel to exit. More information about working split can be found in the Single Operator Split Operation chapter.
- Ctrl+Enter – Entering a frequency or offset in the callsign field and entered with Ctrl+Enter will set a split frequency.
- Alt+S – When your rig is in the split mode, Alt+S will reset the RX frequency back to your transmit frequency, but the split mode is preserved. “Reset RX frequency when running split” is associated with Alt+S. When invoked, the program will automatically do an Alt+S as you log each QSO. Operates on VFO-A only!
- Ctrl+S – Set radio to split operation, if not in split mode already.
- Ctrl+Alt+S – Toggle Split mode on the radio. ‘Split’ will be shown in the Entry window.
- Alt+F5 – Swap radio frequency, mode, and callsigns between VFOs (SO2V) or radios (SO2R). In SO2R, the receive focus changes to the non-active radio.
- Alt+F6 – SO2R only command. Identical to Alt+F5 except the receive focus does not change.
- Alt+F8 – Jump to your last frequency.
- Alt+’ (Alt+singlequote) – toggle between the wide and narrow filter for the selected mode (SSB, CW and Digi modes).
- Ctrl+Alt+D – Allows the SO2V user to enable CQ repeat, call CQ on VFOA, and tune the sub-receiver (VFOB) between CQ’s. Currently, this feature is only enabled for the K3, IC756, IC756Pro, IC756Pro2, IC756Pro3, IC7800, and IC7600.
- If “Sub Receiver Always On” is ON and the Sub RX is ON, turn “Sub Receiver Always On” to OFF and leave the Sub RX ON
- If “Sub Receiver Always On” is ON and the Sub RX is OFF, turn “Sub Receiver Always On” to OFF and leave the Sub RX OFF
- If “Sub Receiver Always On” is OFF and the Sub RX is ON, turn “Sub Receiver Always On” to ON and leave the Sub RX ON
- If “Sub Receiver Always On” is OFF and the Sub RX is OFF, turn both ON
Change Keyboard & Radio Focus
- Ctrl+Left arrow – Move both TX and RX/Keyboard focus to VFO A or in SO2R to left radio
- Ctrl+Right arrow – Move both TX and RX/Keyboard focus to VFO B or in SO2R to right radio
- Alt+F10 – Swap between VFOs when using one radio (VFO A-B). On Icom 756 and 7800 toggle between Main and Sub frequencies.
- Command is disabled during SO2R for Icom radios that lack a swap VFO CAT command. This is because the program is unaware of Icom VFO B frequency in SO2R mode.
- Pause – Swap radios and match keyboard to radio.
- Backslash ( \ ) – Move RX focus and launches a second Entry Window if only one Entry window is open (not supported for SO1V).
- SO2V – One radio – 2 VFOs – Moves RX focus between the 2 VFOs on the radio.
- SO2R – Two radios – Moves RX focus between the 2 radios.
Other Nifty Tricks
- Numeric keypad + (plus) – Zoom in the bandmap which has KEYBOARD focus to show fewer stations (less bandwidth).
- You can also zoom in by using the mouse wheel when the mouse is over the Bandmap window
- Numeric keypad – (minus) – Zoom out the bandmap which has KEYBOARD focus to show more stations (more bandwidth).
- You can also zoom out by using the mouse wheel when the mouse is over the Bandmap window
- Ctrl+T – Turn on the radio and send continuous CW (tune). Ctrl+T again or the Escape key ends the transmission.
- Alt+F12 – Most radios use this command to copy frequency and mode to other radio/VFO.
- A few radios use Alt+F12 for specific features and then mostly swaps MAIN and SUB using the CAT radio command
- FT-1000MP + FT1000D + Elecraft K3 + Icom IC-756 series, IC-781 ,IC-775 and IC-7800 only
- Dual Receive toggle. NB. Only turn Dual Receive on/off from the keyboard so it stays in sync with the program.
- TenTec Orion
- Toggle between Main/left Sub/Right and Active in both ears.
- ` (backquote or grave accent)
- SO2R mode,Toggle Stereo/Mono ( LPT pin 5). If MK2R or OTRSP is enabled send stereo commands to the external SO2R controller.
- SO2V mode, some radios containing Dual Rx have specific functions assigned to this key. See the Supported Radios section for the specifics.
- SO1V mode, some radios containing Dual Rx have specific functions assigned to this key – such as enabled the Sub-Receiver. Otherwise this key is disabled in SO1V.
- Backquote (grave accent) can be found on US keyboard as the unshifted tilde ~
- = (equal key) – Will send the last message key (F1-F12) again.
- Alt+F11 – Disable/Enable the switching between RUN and S&P. In a networked environment with more than one RUN station on the same band, the switch to S&P must be disabled. This is also used during DXpeditions to stay in Run mode all the time and not jump inadvertently to S&P mode when you QSY a small amount and don’t call CQ. This behavior can be toggled using the Alt+F11 key and the state will be indicated in the Entry window status bar. Look for “Run/S&P auto-toggle disabled” or “S&P and Run Mode enabled”.
Non-Active Radio/Bandmap Control Key Assignments
Jump Non-Active Radio to Spots
- Ctrl+Shift+Down Arrow – Get next spot higher in frequency and will skip over CQ-Frequency when radios/VFOs are on the same band. Proper keystroke operation is radio dependent. Disabled for SO1V.
- Ctrl+Shift+Up Arrow – Get next spot lower in frequency and will skip over CQ-Frequency when radios/VFOs are on the same band. Proper keystroke operation is radio dependent. Disabled for SO1V.
- Shift+Ctrl+Alt+Down Arrow – Get next spot higher in frequency that is a multiplier. If you are operating single mode, your mode won’t change when jumping between spots. Disabled for SO1V.
- Shift+Ctrl+Alt+Up Arrow – Get next spot lower in frequency that is a multiplier. If you are operating single mode, your mode won’t change when jumping between spots. Disabled for SO1V.
- Shift+Alt+Q – Jumps to your last CQ frequency on the inactive VFO/radio.
Tune the Non-Active Radio
- Ctrl+Shift+Page Up – Go up one band.
- Ctrl+Shift+Page Down – Go down one band.
- Shift + Numeric keypad + (plus) – Zoom in the inactive bandmap
- Shift + Numeric keypad – (minus) – Zoom out the inactive bandmap
Logging Key Assignments
- Enter
- Log contact, when ‘Enter sends message’ is off in config menu.
- Sends message when ‘Enter sends message’ is on in config menu. The send messages depend on the field values i.e. in which field the cursor is in the Entry Window. Check the highlighted keys.
- Space – Preferred character to move sequentially through Entry Window fields .
- Jumps from callsign to Exchange field or vice versa.
- Other fields’ default values will be filled in
- If there is a call on the callsign frame and if the callsign field is empty, the call from the frame will be placed in the callsign textbox.
- Alt+Enter – Send End of QSO message key and log the contact. In ESM it just logs the contact (nothing sent).
- Insert or ; – Sends His Call key followed by the Exchange key.
- ‘ – Send End of QSO message and enter in log .
- Alt+W (reversible) or Ctrl+W (irreversible)
- Wipe Out Entry Fields, clear information about the current contact in this window
- (Alt+W only) If nothing new has been typed in since a previous wipe operation and all of the entry fields are still blank, Alt+W restores the last wiped contact (“unwipe” function), unless the original wipe was done using Ctrl+W (irreversible wipe)
- Serial number contests: Release the previously-reserved serial number
- Ctrl+Shift+W – Wipe out other window’s contact information.
- Ctrl+Alt+Enter – Log a not accepted ‘invalid’ qso (invalid exchange etc.). It will prompt for a comment. Use ‘View | Notes’ to find the QSO for later correction.
- When no comment is entered “Forced QSO” will be added to the comment field.
- Ctrl+Y – Edit last contact.
- Ctrl+D – Delete the last contact.
- Alt+O – Store contact in the bandmap.
- Alt+M – Mark this frequency in the bandmap as being in use.
- Alt+D – Removes the spot from the bandmap which is on the callsign frame or in the callsign field in the Entry window when S&P or CQ-frequency when Running.
- Alt+Shift+D – Removes the spot from the bandmap which is on the callsign frame or in the callsign field in the Entry window and adds it to the blacklisted spots. Note that you must enable the blacklist spot filter for the list to be in effect.
- Ctrl+F – Find the callsign entered in the callsign field in the log. Pressing Ctrl+F again will find the next instance.
- Ctrl+M – Enable/disable ‘Enter sends message’ mode.
- Ctrl+N – Add a note/comment to your last or current contact.
- Ctrl+Q – Quick Edit mode, go back one qso in the log. Enter logs and Escape discards the changes made. No content checking!
- Ctrl+A – Quick Edit mode, go forward one qso in the log. Enter logs and Escape discards the changes made. No content checking!
- Ctrl+U – Increase the number in the exchange field by 1.
- Alt+U – Toggles “Running’ box”. When running is checked, the behavior of Enter Sends Messages mode changes appropriately. Additionally contacts are logged as being part of a run.
- Alt+K – Change the contents of the Packet/CW/SSB/Digital message buttons.
- Alt+Y – Will “yank” the first call from the Check window in the Entry window callsign field.
- Ctl+G – Cut number mode toggle.
- Ctrl+Alt+G – to stack additional callsigns in all modes. Same as the macro {STACKANOTHER}
- Ctrl+Alt+M – Toggle between Run/Mult (Multi-1) or Run1/Run2 (Multi-2)
- Ctrl+Shift+M – Used to set the Autosend threshold. Autosend will start sending the callsign before you have finished copying a full callsign. i.e. starting after a certain number of characters has been typed AFTER the last number in the callsign. The minimum threshold is 1. Zero will turn off the feature. Only when in RUN mode.
- The Autosend rules are:
- Find the first letter in the call
- Find the last number after the first letter
- Find the Nth letter after step 2
- For example: Threshold set to 2
- W4WYP would start sending at Y
- S57AD would start sending at D
- KH6/WA4WYP would start sending at Y (using the “/” rule as well)
- WA4WYP/4 would start at Y (/4 will not be looked at)
- WYP, WWYP and WAWYP do not meet the criteria for autosend to begin.
- Prefixes like KH6/ are ignored and do not themselves trigger the autosend threshold.
- The Autosend rules are:
| Key | Send function key(s) | Action(s) |
| Insert | His Call Key & Exchange Key | Send his call followed by the Exchange. |
| ; | His Call Key & Exchange Key | Send His call followed by the Exchange. |
| Alt+Enter | – | Log the contact. |
| ‘ | End of QSO Key & Log contact | Send the End of QSO message and log the contact. |
Callsign/Exchange Editing Features
- Space Bar – Moves cursor to the last position the cursor was in prior to leaving the Callsign or Exchange fields.
- Ctrl+Space Bar – When the cursor is in the callsign box, pressing Ctrl+Spacebar will cycle the selection among the three part of the callsign – alphanumeric prefix, number, and alphabetic suffix. This makes correcting errors in the callsign easier by allowing you to focus on the part of the callsign that needs correcting.
- Tab – Move to the next field.
- Shift+Tab – Move to the previous field.
- Home – Moves cursor to beginning of the field it’s in.
- End – Moves cursor to end of the field it’s in.
- Question mark (?) – Sends a ?, and will cause the ? to be highlighted when you reenter the field . E.g. N?MM will send what is typed, but automatically highlight the ? so you can replace it. A double ?, as in DL?K?A will highlight all text in between and including the ? marks. The first keystroke entered will replace all three characters.
- Left/Right Arrow – Moves cursor to left or right one position within the field it’s in.
- Backspace – Delete character to the left.
- Delete – Delete character to the right.
- Shift+Home – Will highlight from the cursor insertion point to the home (beginning) of the textbox.
- Shift+End – Will highlight from the cursor insertion point to the end of the textbox.
- Shift+arrow key – Will highlight as you press the keys. When you type the first character, it will delete the highlighted character.
- Ctrl+C/Ctrl+Insert – Copy to clipboard
- Ctrl+V/Shift+Insert – Paste from clipboard
- Ctrl+Home – forces the cursor into the callsign box and selects the text in the callsign box
Note that you can use the above copy/paste tools to facilitate moving stations from band to band. Just highlight the current callsign using Shift+Home/End and copy using Ctl+C. Log the Q, then move to the next band to work the station. Use Ctl+V to insert his callsign into the callsign textbox. If you then move him to a third band, you can skip the copy step, as the callsign is already in your paste buffer.
Message Key Assignments
There are two sets of messages stored for F1 through F12, one for Running mode and one for Search and Pounce mode. However, you can send the message from the opposite mode by pressing Shift+Fx. The assignments below apply to both modes.
Below is a table of the function keys with their associated default messages. Note that the CQ key always switches the program to Running mode regardless of which mode it was in at the time. All of the keys named in the table are used by ESM. The His Call key, Exchange key and End of QSO key are called up by logging key shortcuts (Insert or ; key and’ key) regardless of whether the Enter Sends Messages (ESM) feature is used or not. The function keys can be remapped to others on the Function Keys tab in the Configurer, but be very careful in doing so, because if you do, you may disrupt the functioning of the Enter Sends Messages (ESM) feature.Default Function Keys
| F1 | CQ key | F2 | Exchange key | F3 | End of QSO key | F4 | My Call key |
| F5 | His Call Key | F6 | QSO B4 Key | F7 | – | F8 | Again Key |
| F9 | – | F10 | – | F11 | – | F12 | – |
- Esc – Stop sending CW or wav. file.
- Ctrl+R – Set CQ repeat time in seconds or milliseconds (Example: 1.8 or 1800)
- Alt+R – Toggles repeat mode. Hit Esc or begin entering a callsign to stop repeat temporarily
- Shift+Fx – Sends the contents of the function key definition for the opposite mode. If you are in Run mode and press Shift+Fx, the program sends S&P Fx. The reverse is also true.
- Ctrl+Shift+Fx – Record SSB message for the selected function key. Pressing Ctrl+Shift+Fx again stops the recording. Fx can be F1 to F12 in either the Run or S&P lists of function key definitions. Make sure that the program is in the correct mode (either Run or S&P), and that you have filled in filenames in rows Filenames must be entered in at least the first 12 function key slots (right-click on the message buttons in the Entry window to edit); if names are only in the first 12, then the program will play those messages when the corresponding function keys are pressed, regardless of whether you are in Run or S&P mode.
- Ctrl+Alt+Fx – Record external DVK memories 1 to 4, only on the W9XT card or other DVKs that emulate it
CW Key Assignments
- PgUp/PgDn – Adjust CW speed Up/Down active radio using Primary CW Speed Step (Other tab in Configurer).
- Shift+PgUp/PgDn – Adjust CW speed Up/Down active radio/VFO using Secondary CW Speed Step (Other tab in Configurer) in SO2R/SO2V mode.
- Alt+PgUp/PgDn – Adjust CW speed Up/Down inactive radio/VFO using Primary CW Speed Step (Other tab in Configurer) in SO2R/SO2V mode. Note: The active radio is the Entry window with the red dot.
- Ctrl+K – This will open the CW window to send manual CW. Pressing Ctrl+K again will close the window
- Pressing Ctrl+K or Enter within the CW window closes the CW window and any remaining characters in the buffer will be sent
- Pressing Escape closes the CW window and stops sending immediately. No remaining characters in the buffer will be sent
- Ctrl+Alt+R – Toggle CW Reverse/No Reverse.
Enter Sends Message Mode (ESM)
- Ctrl+M – Toggle ‘Enter Sends Message’ mode
- Alt+Enter – Log without sending anything
- Ctrl+Alt+Enter – Log even if exchange is invalid or missing
Note: ESM is affected by two options in the Configurer under the Function Keys tab:
- the “ESM sends your call once in S&P, then ready to copy received exchange” check box (sometimes called the “Big Gun” option)
- the “Work dupes when running” check box (recommended)
ESM Mode Enter Key Actions
| Callsign field | Exchange field | In Run, Enter sends | Is S&P, Enter sends |
| Empty | Empty | CQ (F1) | My Call (F4) |
| New Call (1st time) | Empty or invalid | His Call + Exch(F5 + F2) | My Call (F4) |
| New Call (repeat) | Empty or invalid | Again? (F8) | My Call (F4) |
| New Call (repeat) – ESM sends call once… checked | Empty or invalid | Again? (F8) | Again? (F8) |
| New Call (before sending exchange) | Valid | His Call + Exch(F5 + F2) | Exchange + Log(F2 + Log It) |
| New Call (after sending exchange) | Valid | End QSO + Log(F3 + Log It) | Log(Log It) |
| Duplicate Call | Empty or invalid | QSO B4 (F6) | do nothing |
| Duplicate Call (before sending exchange) | Valid | His Call + Exch(F5 + F2) | Exchange + Log(F2 + Log It) |
| Duplicate Call (after sending exchange) | Valid | End QSO + Log(F3 + Log It) | Log(Log It) |
| Dupe (1st time) – Work Dupes checked | Empty or invalid | His Call + Exch(F5 + F2) | do nothing |
| Dupe (repeat) – Work Dupes checked | Empty or invalid | Again? (F8) | do nothing |
| Dupe (before sending exchange) – Work Dupes checked | Valid | His Call + Exch (F5 + F2) | Exchange + Log(F2 + Log It) |
| Dupe (after sending exchange) – Work Dupes checked | Valid | End QSO + Log (F3 + Log It) | Log(Log It) |
Telnet Key Assignments
- Alt+P – Spot the callsign of the last station logged or the one currently in the callsign textbox in the format DX CALL Frequency, without comment unless one has been specified on the Spot Comment tab of the Telnet window.
- Ctrl+P – Spot the callsign of the last station logged or the one currently in the callsign textbox. You will be prompted for a comment. Hit ESC,click “Cancel” or click the red X to exit the comment window without spotting. If you do not enter a comment, and one has been specified on the Spot Comment tab, it will be sent when you click OK. If you specify a comment, it will be sent along with the one specified on the Spot Comment tab.
- Left-click – Tune the active radio to the frequency of the spot.
- Shift+Left-click – Tune the inactive radio to the frequency of the spot.
- SH/DX – Entered in Entry window Callsign field will be passed through to active Packet window for processing.
Available Window Key Assignments
- Left-click – Mostly tunes the active radio to the frequency of the spot. Behavior depends on SO1V, SO2V or SO2R and on options in the right-click menu in the Available window.
- Shift+Left-click – Mostly tunes the inactive radio to the frequency of the spot. Behavior depends on SO1V, SO2V or SO2R and on Available window right-click options.
- Double click – Go to the frequency with the active VFO.
- Alt+A – Starting with the top row of the window’s lower pane or the currently-selected row, grabs the callsign there, QSYs to the frequency of the spot and transfers the callsign to the call-frame of the entry window. Repeating steps down through the spots one at a time and transfers the next one to the call-frame. Color of the transferred spot changes to black.
- Shift+Alt+A – Same, except that it starts with the current row, and repeated keypresses step up through the spots.
- Alt+B, Shift+Alt+B (SO2R/SO2V only)- Similar to Alt+A & Shift+Alt+A, but for the second Available window.
SO2R Key Assignments
- Ctrl+Enter – Send next ESM state on alternate radio (assuming ESM turned on).
- Ctrl+F1 to F12 – Send Fn message on alternate radio.
- Ctrl+Left Arrow – In SO2R move both Transmit and Receive/Keyboard focus to left radio, or in SO2V move both TX and RX/Keyboard focus to VFO A.
- Ctrl+Right Arrow – In SO2R move both Transmit and Receive/Keyboard focus to right radio, or in SO2V move both TX and RX/Keyboard focus to VFO B.
- Pause – Move both TX and RX Keyboard focus to other radio (or other VFO in SO2V). If TX and RX focus are split when you hit pause, TX focus will move to where the RX focus is.
- Ctrl+B – Dueling CQ’s will send CQ (without delay) alternately on each radio. If Dueling CQ’s is turned on, both radios become run radios. Dueling SSB and CW CQ’s are supported too.
- Grave accent, backquote, or unshifted tilde key (~) Toggle STEREO mode on/off, or toggle Auto/PTT modes with modified DXD . Notes: On US keyboards, the key we are talking about is the key just to the left of the number 1 key.
- Ctrl+I – Toggle SO2R Mode (Soundcard). Toggle through the SO2R modes supported by the program. Only operative in ‘$5SO2R’ when N1MM logger controls the audio, not when using an external SO2R controller.
- Ctrl+PgUp/Down – When changing band using Ctrl+PgUp/Down will skip the other radio’s band.
- THIS IS NOT A SUBSTITUTE FOR HARDWARE LOCKOUT!!
- Ctrl+Shift+K – FocusOther, Another method of automated focus control. Forces entry focus to non-transmitting radio, with entry focus returning to the transmitting radio as soon as it reverts to receive. Disabled in SO1V mode.
- Ctrl+Shift+L – Toggle CTRLFx Macro. This macro allows the user to send on the other radio (RTTY and CW only).
RTTY Key Assignments
- Alt+T – Toggle TX – RX
- Alt+G – Grab callsign
- Ctrl+K – Toggle TX/RX, and displays the CW/Digital Keyboard window to send manual information using the keyboard
- Ctrl+Arrows – Swaps from one active DI to the other DI. DI1 will follow entry window 1. DI2 will follow entry window 2
- Esc – Stop sending
Gridsquare Key Assignments (VHF and up)
- Alt+equal (=) – Search entered info from both the Callsign field and the Gridsquare field in the call history table.
- The results will be shown in the Check window.
- Alt+minus (-) – Toggle between the two call history grid squares in the grid square call history field.
- When no grids are found in the call history there is nothing to toggle.
Rotator Key Assignments
- Alt+J – Turn rotor to bearing for the callsign in the Entry window or to the callsign in the callframe (when callsign field is empty).
- Alt+L – Turn rotator to long path bearing for the callsign in the Entry window.
- Ctrl+Alt+J – Stop turning the rotator when turning and no bearing in callsign field in Entry window.
Window Key Assignments
- Ctrl+Tab – Toggles between the Entry window and Packet window.
- Ctrl+K – Display the CW/Digital Keyboard window to send manual information using the keyboard.
- Ctrl+L – Display the Log window (toggles between open and minimized).
Lookup Table Edit
- Ctrl+D – to delete a row in the table or use the right click menu
- Scroll Lock – the Scroll Lock key selects the current row for editing
QTC Keys (for WAE contests)
- Ctrl+Z – in CW/SSB, enters or leaves QTC mode; in RTTY, cycles through Send, Receive and QTC Off
- If Ctrl+Z is pressed before the QSO with the station has been logged, logs the QSO
- Enter – logs the next QTC (receiving), or sends the next QTC in the batch (sending)
- F3 (End of QSO Key) – sends the TU message and exits QTC mode
- Alt+W – wipes the current row
- Esc – terminates sending (CW or RTTY), or if the program is not currently sending, exists the QTC window (same as the Cancel button)
- Alt+Enter, Keypad + (plus) key (sending QTCs only) – re-sends the last sent string
- Alt+Enter, Alt+Tab, Alt+Space (receiving QTCs only) – force-logs the current QTC; overrides error-checking
- Ctrl+A (receiving QTCs only) – removes the last blank line of received QTCs and reduces the count in the QTC header
- Used, for example, when the number in the header was copied incorrectly and fewer QTCs are received than expected
- Alt+A (receiving QTCs only) – adds a new QTC line (if fewer than 10) and increases the count in the QTC header
- As above, when more QTCs are received than expected
- 1, 2, 3 (sending QTCs only) – if pressed while the Agn button is highlighted, resends the time(1), call(2) or serial number(3) from the previous QTC
- Shift+1, Shift+2, Shift+3 (receiving QTCs only) – asks for a repeat of the time(1), call(2) or serial number(3)
Key Mapping
N1MM+ has the ability to map keystrokes to one or more other keystrokes and actions. This capability is accessed from the Entry Window via the Tools > Keyboard Key Remapper menu item. When selected, this menu item will open a Key Remapper window that allows one to choose a key to remap and the keystrokes/actions to be performed in response to pressing that key.
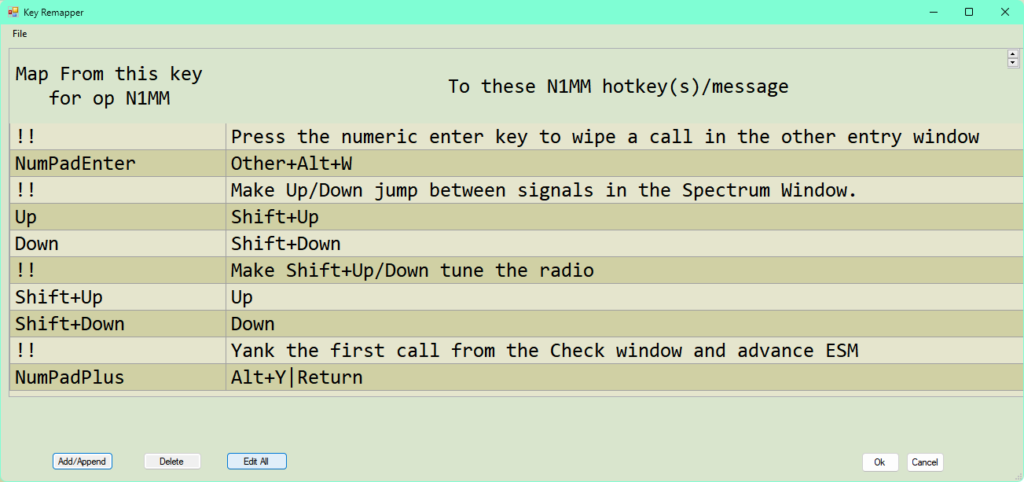
The screen shot above is the key mapper user interface. You may enter mappings here, or you can edit them with Notepad. Note that the user interface saves the updated set of mappings to [opcall].map after editing, on op change, and at program completion, so be careful that you don’t overlay changes or have your edited changes overlaid. Creating and editing map files in Notepad as well as copying maps from one operator call to another are best done while the N1MM+ program is not running, in order to avoid problems with overlaid changes.
To add a new key mapping in this window, click on the Add/Append button, then press the key (including Shift, Ctrl or Alt modifier(s)) that you want to use. In the bottom of the window, a listbox will appear together with three checkboxes for Shift, Ctrl and Alt. You can use these to choose a target key in the listbox in combination with the selected checkbox(es) to be executed. Alternatively, you can simply type the desired key, key combination or text to be sent directly into the listbox.
- Notes on creating key maps:
- Simple, one-to-one maps can be created by selecting the key to be mapped followed by choosing the name of the key to map to. Specify the modifiers – Alt, Ctl or Shift that corresponds to the N1MM+ hotkey that you want to substitute for with the new key
- You can map a single hotkey to a sequence of target keystrokes. Multiple key mappings for a key are separated by the Pipe symbol: “|”, as in the NumPadPlus example in the screenshot above, which will send Alt+Y followed by the Return key.
- Text and/or program macros may be entered instead of key combinations. Use the same format as in function key messages, e.g.
- {Wipe} will wipe the entry window fields
- PREC? will send ‘prec?’ in CW mode
- assist.wav will play the assist.wav file in SSB
- {CAT1HEX FEFE94E0271001FD} will turn on the scope on an Icom IC7300
- “/P” will insert the characters ‘/P’ at the insertion point (cursor) in whichever textbox currently has focus
- “https://www.wm7d.net/” will open the web page wm7d.net
- “notepad.exe C:\contestnotes.txt” will open the file C:\contestnotes.txt using Notepad
- Quoted strings, as in the last three bullets above, can be used wherever macros can be used. Depending on the contents of the quoted string, it may: insert text at the Windows text cursor; open the default browser on a specified web page; or execute a .bat or .exe command. See the description of Quoted Strings on the Function Keys, Messages and Macros page.
- Note that when entering text to be sent in CW, text that is identical to a key name cannot be used. If you want to define a key mapping to send the single character R, you will need to add a space (or a half-space character ~) either before or after the R.
- The map will be built by the Remapper using some syntax rules. There are four modifiers, Alt+, Ctl+, Shift+ and Other+. The first three refer to the keys used to modify a keystroke. The Other+ modifier indicates to the remapper that this command is to be executed by the Other Entry Window (SO2R or SO2V).
- All hotkeys “mapped to” are processed by the Entry Window where the user types the key to be remapped. If you press a mapped key while the 2nd Entry Window has focus, it will be processed by that window. The Other+ modifier is used when you want to cause the other Entry Window to process the action.
- Two wait macros are provided. These are used where delays are required. The keyboards are unlocked during these macros, so if you type something else while a map is waiting, you may disturb the map you are running.
- {Wait} will wait until sending is stopped. In SO2R/SO2V it checks for sending on either radio.
- {Wait nnn} will wait for nnn milliseconds to execute the next action in the map.
- It is possible to manually edit the key maps. A menu item & button are provided for this purpose. Note that you can add comment lines to your maps by prefixing a line with something that is not a key name. “!!” is the suggested comment marker, as in the above screenshot.
- Focus is normally returned to the EW from which the keystroke was received. In SO2R and SO2V, if Pause is used in a mapping focus will switch to the other EW (assuming, of course, that there are no additional keystrokes that change focus, like Ctrl+RightArrow or Ctrl+LeftArrow).
- Bandmap button hotkeys have been difficult to use because they require a four-key combination to invoke. You can specify a bandmap button as the target by checking all three checkboxes (Shift, Ctrl and Alt) and choosing the digit or letter corresponding to the desired button (0 for the first button, 1 for the second, …, 9 for the tenth button, A for the 11th button, …, Z for the 36th bandmap button). Note that in SO2R and SO2V, there are separate sets of buttons for each bandmap window. You will need to use the Other+ modifier to invoke a bandmap button from the non-active radio’s or VFO’s bandmap window.
