
Learning Your Way Around
Take a few minutes to learn your way around the four windows that you need to make your first contest QSOs with N1MM Logger+. Additional information about each window will be found in the window-specific pages linked to HERE.
The Entry Window
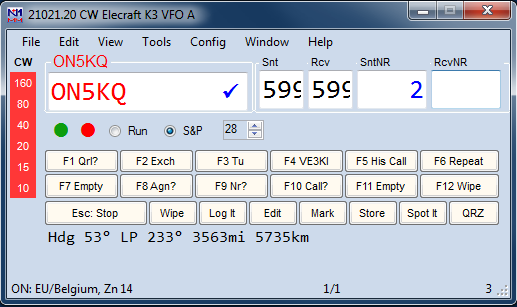
Let’s get a little terminology out of the way first. The top blue part of this (or any) window is called the Title Bar. Each of the places where you can type information is called a textbox. The Title Bar displays the current frequency, mode (if one has been selected), and which radio it is (nominally, Radio A). You will have to enter a mode before you begin to operate, and a band and/or mode each time you change either. Simply type a frequency in KHz (3500, 7000, etc.) in the Call-Sign textbox (to the far left) and hit Enter; then type a mode (CW, USB, LSB) there, hit Enter again, and you’re set.
The Entry Window is your main starting place for everything you do with N1MM Logger+. The first row is a standard Windows-style menu, and we’ll be using it in a minute. Take a moment and explore the various drop down menu choices, but don’t change anything right now.
Below the menu is a set of entry textboxes. This row is where you log your contest QSOs. The left-most textbox is the Call-Sign textbox. You always enter the call-sign of the station you are working into this textbox.
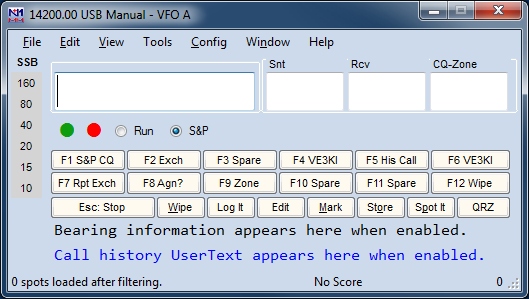
The rest of the data entry textboxes are titled above them – depending on how you have resized the window, the titles may not line up perfectly with the entry textboxes, but they are always in the same sequence as those textboxes. Depending upon the specific contest and the required contest exchange, the number of textboxes and the titles may be different from what you see here. The example Entry Window shown above would be used during the CQ WW Contest. This contest requires that a call sign, sent and received signal reports and the CQ Zone be logged for each contact
For now, you can ignore the ‘Run’ and ‘S&P’ buttons, as well as the colored dots alongside them. These control one of the most important features of N1MM Logger+ – it distinguishes between Run and Search and Pounce modes, providing different features for each. However, these aren’t really relevant until you get into sending stored CW and phone messages, which are covered later. The rest of the buttons in the Entry Window are related to this and to other advanced capabilities.
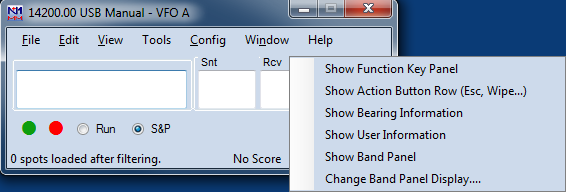
If you want to save space on your screen, you can reduce the size of the Entry Window, like this. Right-click in an empty part of the window and uncheck the options for items you do not wish to have displayed.
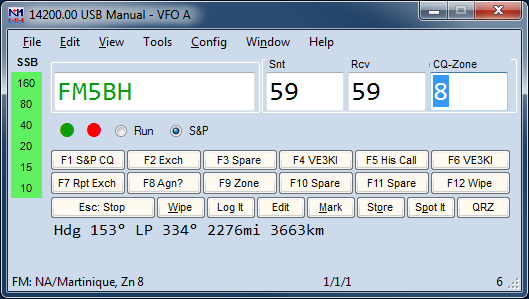
There are two more useful features of the Entry Window. The box in the lower left corner, called the Status Line, provides a lot of useful program status information. For example, if you enter a call sign, the Status Line will tell you what country it represents. If you have chosen to show bearing information in the right-click menu, it will also show you the distance and bearing above the status line, like this.
To the right of the Status Line is the progress box, where you can keep track of your QSOs and multipliers without having another window open, and to its right is a running score.
If you press the backslash “\” key (and the program is in SO2V or SO2R mode), the program opens a second, almost-identical entry window. The only difference is that it will have a “B” instead of the “A” in the title bar of the first entry window, and it may well have a different frequency and/or mode as well. But if you pop up the second Entry Window by mistake, and want to get rid of it, you simply close it by clicking the big red X.
When you first open the program, it will be in SO2V (Single Operator Two VFOs) mode. The idea is this – most modern transceivers have two VFOs, or a main VFO and a sub-VFO. There will be circumstances – during a contest on 40 meter SSB, for example – when you will want to receive on one frequency and transmit on another, widely-separated one.
For the moment, you should probably change to SO1V (Single Operator One VFO) mode. Select the Config menu, and under the dropdown menu, select Configure Ports, Telnet Address, Other and then click on the SO1V button. This will prevent the second Entry Window from opening.
The Entry Window is the nerve center of N1MM Logger+. The program returns focus to this window automatically in many situations.
Program Menu Descriptions
The manual contains detailed information about the Entry Window’s menu choices:
The Check Window
OK, another important window – the Check window. You open it by clicking on Check in the Entry window’s Windows menu.
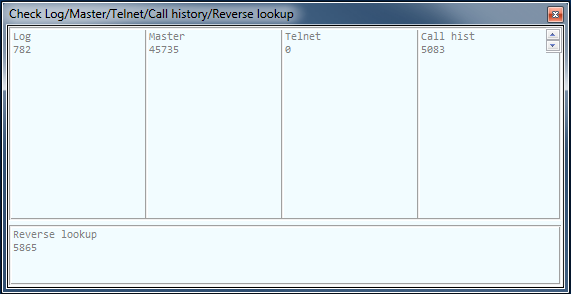
This window is used to display the results of checking a call sign against any or all of the following: your log; a master list of calls, variously called the master.scp or Super Check Partial file; call signs that have been spotted and received in the Telnet window; and call signs in a user-defined file called the Call History file. A Super Check Partial file is provided when you install the program, and the process of updating is covered in the Tools Menu section of the manual page on the Entry window.
First things first, though. When you type a call sign in the Entry Window, the Check window displays whether a match was found or not in the various selected sources. Call signs that differ from the one you have typed in by only one letter have the different letter highlighted in red, while similar call signs that are longer than the one you have typed in have the additional characters highlighted in green:
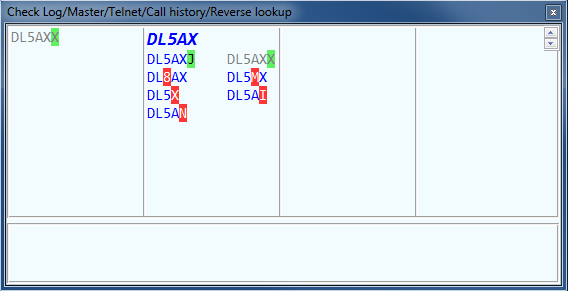
In this example, all four possible sources have been selected. You are in the process of typing DL5AXX into the Entry Window, and so far you have typed DL5AX. This exact call sign (DL5AX) was found in the master.scp file, and therefore it is displayed in bold-face italic font at the top of the master.scp pane. It is blue, indicating that you have not worked this call sign and it would be a valid QSO in the contest. Note in the left (log) pane that DL5AXX already appears in your log. A number of other call signs that differ from DL5AX in only one character were also found in the master.scp file.
If you keep on typing until the entire call sign has been entered, you will see:
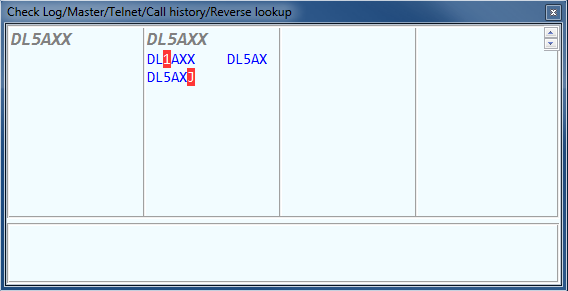
Now the station’s call appears in grey, meaning that it would be a dupe.There is much more on the Check window here.
The Log Window
To begin with, click on Log in the Entry window’s Windows menu. That will open a Log window on the screen, like this:
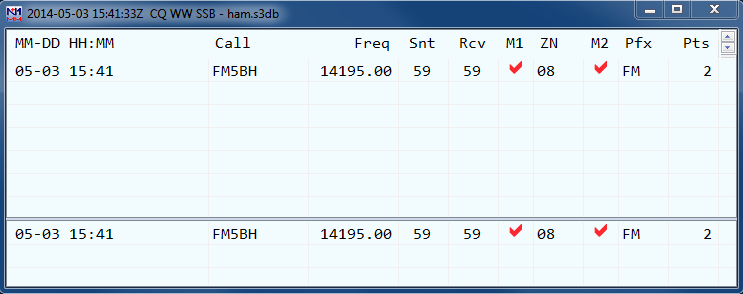
First, you should notice that the title bar of the Log Window gives the current date and exact time, the name of the contest, and the database in use. As you log QSOs, they will appear in the log. One is logged one above just to indicate how it looks. You’ll note that each column has a fixed label – these labels change between contests. CQWW is a 2-multiplier contest, so the log shows columns for two multipliers: M1, which is the CQ zone, and M2, which is the country. The check mark in each multiplier column simply means that it is the first station for that multiplier on that band.
If you click on any column heading, the entire log is sorted by that attribute – for example, if you click on the “Call” heading, the log will be sorted by call sign. Click on the MM-DD HH:MM heading to switch back to the normal chronological order.
A further nice touch – if you click a second time on the column heading, for example the “Call”, the sort order switches from Ascending to Descending, so that all your “Z” QSOs come first, and your “As” last. Same goes for the date/time heading – normally, you’ll want to leave the Log Window in ascending chronological order, so that each QSO you log appears immediately at the bottom of the list.
The Log window has two “panes”; the one above the grey bar is the normal log, while the one below the line is to show you previous QSOs with a station each time you type its call into the Entry Window. This makes it very easy to see quickly all the information about previous QSOs with a station, e.g. for that special someone who drops by and asks, “What was the serial number you gave me yesterday?”
Check out this section of the manual for more details.
Like all windows in N1MM Logger+, the Log window is resizable, as are the individual log columns – to resize the whole window, use your mouse to drag the lower right corner, and to resize a column grab the between-column divider and drag it right or left. You can move any window around the screen by dragging its title bar. Also, you can change the font size in the Log window by clicking on the font sizer buttons at the top right.
The Bandmap
With an interfaced radio, you will find it useful to open a Bandmap window. Click Window, then select Bandmap, and the Bandmap corresponding to your entry window will be displayed.
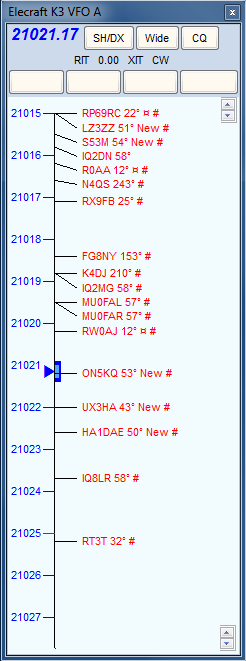
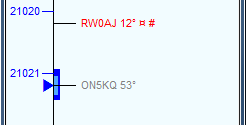
In the example at left, I have filled the Bandmap with spots from a packet cluster, just to illustrate how spots are displayed. The stuff in the top bar is pretty self-explanatory. The SH/DX button, when mouse-clicked, sends that request to the cluster (which you don’t know how to set up yet). The button labelled Wide toggles filters in your radio, though you may have to set it up first (the process is explained in the manual). In any case, clicking on it switches TO the filter mode shown. The button labelled CQ will QSY the radio to your last CQ frequency, if there is one on this band. The RIT, XIT and CW are clickable. Clicking on RIT will turn RIT on and the label will turn red; ditto for XIT. The number between RIT and XIT is the RIT/XIT offset. The CW indicates the radio’s mode; you can click on it to change modes on the radio. The four buttons below those are user-programmable buttons, typically used to control radio functions such as filters, noise blanker settings, AGC settings and so on.
The color-coding of spots in the Bandmap is the same as in the Entry Window, so each of those red calls represents a new multiplier in the contest. Spots that came from a CW Skimmer on the Reverse Beacon Network are marked with a #. If a spot was newly spotted within the last two minutes, the word “New” will appear beside it. You can change the font size in the Bandmap window using the font sizer up/down arrows at the top right of the bandmap.
If you want, you can mouse over a spot, and the program will tell you more about it in a “tooltip” (unless tooltips have been disabled in the “Skins, Colors and Fonts” window).
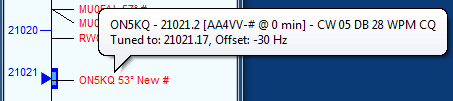
The information about the spot includes the frequency, who spotted it, how long ago the spot was posted, and spot comments (the comments on this spot came from a CW Skimmer). The second line in the tooltip, telling you how closely you are tuned to the spot, only appears if the radio is tuned to a frequency close to the spot.
In a busy contest, certain parts of the band can get pretty crowded with spots. Pressing the numeric keypad “+” key will zoom the Bandmap in and spread the spots out, like this:
Pressing the numeric keypad “-” key will have the opposite effect. You can also zoom the Bandmap using the up and down arrow buttons in the lower right corner of the Bandmap window.
Another useful thing about the Bandmap: If you single-click on a spot, your radio will automatically be sent to that spot. If, instead, you click on the frequency scale (anywhere within the width of the frequency hash marks), the radio will go to that frequency. There are also keyboard shortcuts that will move your radio from spot to spot up and down the band. More on this later.
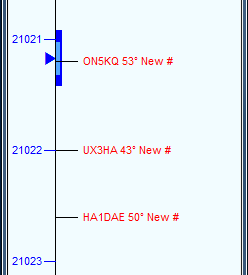
When you single-click on a spot, something else useful happens – the call-sign of that station is copied to the Call-Frame of the Entry window, like this. This is done this way so that if you discover that the station on that frequency isn’t ON5KQ after all, you can just type in the correct call. This does happen now and then with packet spots.
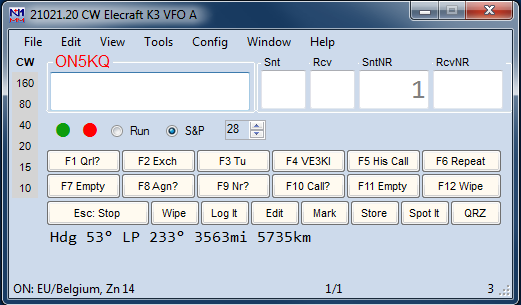
However, let’s assume it’s correct. In that case, all you have to do is call the station, get him to answer you, and hit [space]. Here’s what happens – the call sign is pulled down into the Call-sign field, and the QSO is all set for logging, once you complete the exchange.
Another good thing can happen on the band-map when you complete a QSO and tune off the frequency – the spot’s color code turns to grey, so that you know at a glance that you have worked the station already, and won’t waste time when you come back to that frequency again.
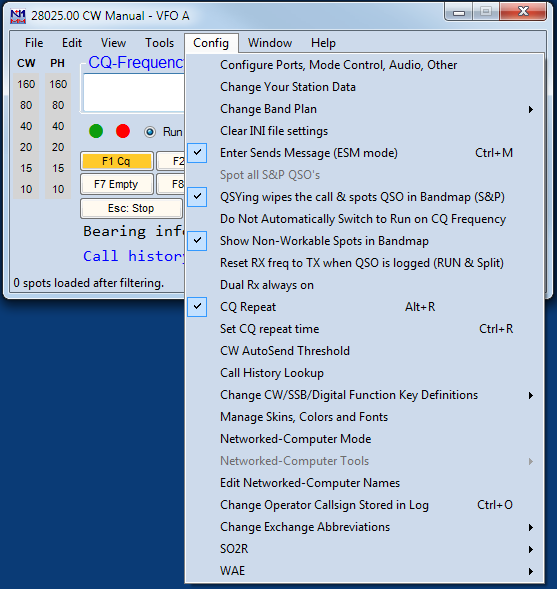
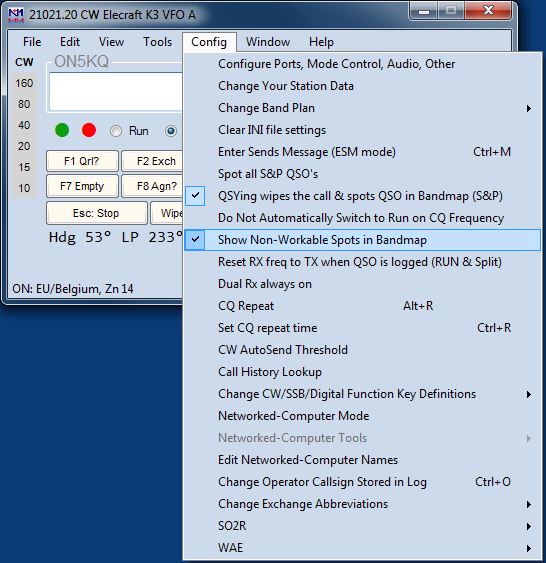
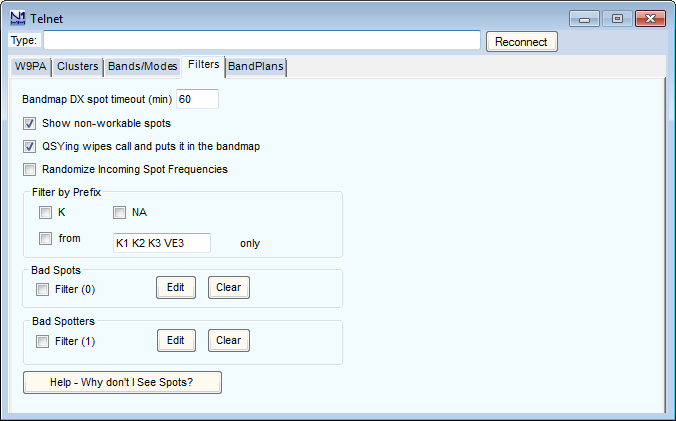
To turn on this feature, click Config, and then, in the dropdown menu, click on the two items checked called “QSYing wipes the call & Spots QSO in Bandmap (S&P)” and “Show Non-Workable Spots in Bandmap” (see below). You need them both because grey spots are regarded as non-workable, and they will disappear unless Show non-workable spots is checked. If you hear a station and type in his call sign, but you don’t work him and tune off his frequency, his call sign will appear in the appropriate color to denote whether he’s a new multiplier or simply a valid QSO; either way you know to go back and work him later, if he’s still there.
By the way, even if you never plan to use packet spots, the Bandmap is a very useful window. As you S&P your way up and down the band, each station you’ve worked will be marked with a grey self-spot, so you can skip by them the next time even if you have no packet spots.
You may be wondering how to move quickly up and down the Bandmap, hitting only the workable spots, or those that represent multipliers. This might be a good time to introduce another very useful section of the Manual. N1MM Logger+ makes extensive use of “hot-keys” to largely or entirely eliminate the use of the mouse during contest operations. There is a very useful section in the manual titled Key Assignments (Keyboard Shortcuts) which explains each and every such key combination. For example, under “Active Radio/Bandmap Key Assignments” it lists:
Jump to Spots Note: If you are operating single mode, your mode won’t change when jumping between spots.
- Ctrl+Down Arrow – Get next spot higher in frequency.
- Ctrl+Up Arrow – Get next spot lower in frequency.
- Alt+Ctrl+Down Arrow – Get next spot higher in frequency that is a multiplier.
- Alt+Ctrl+Up Arrow – Get next spot lower in frequency that is a multiplier
Try these and see – with a full Bandmap and these keystrokes, it is easy to work 100+ search and pounce QSOs per hour, something that used to be regarded as impossible.
As we’re finishing up this introduction to the Bandmap, it might be a good idea to offer another general hint when you’re exploring the program. Be sure to right-click on each new window (other than the Entry Window), to see what options involving that window might be available to you. Each of these options is explained in the section of the manual dealing with that window.
If you do this with the Bandmap, you’ll see this right-click menu:
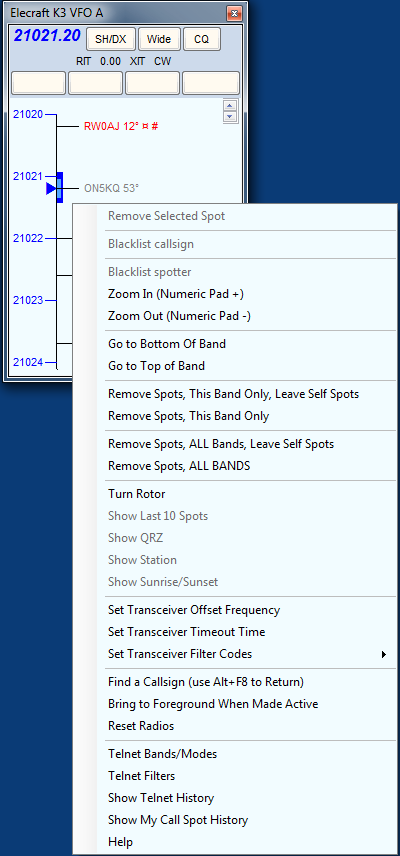
Of the choices here, Telnet Filters is perhaps the most useful. Click there and set the timeout interval in minutes – both self-spots and spots from packet will disappear after however many minutes you choose. Note that you can also set the two Config options mentioned above from this window as well.
The Reset Radios command in the right-click menu is also useful in case you lose control of your radio for some reason. Click it, and the program resets the connection.Check here for much more.
Logging Essentials
This listing pulls together a dozen (or so) keyboard commands that are essential in N1MM Logger. It was originally prepared to help a club planning first-time use of the program on Field Day
General
- Esc : stop, exit, abort, back out of whatever you are doing
Logging
- Spacebar or Tab : move between exchange elements
- Enter : log a completed valid QSO
- Ctrl+Alt+Enter : log an incomplete/invalid QSO with a note in the log
- Ctrl+N : add a note to the log
- Ctrl+O : to enter the operator’s name or call sign (or type OPON in call sign field) – optional, use to keep track of who was operating when
- Alt+W : wipe whatever is entered so far (Alt+W again to undo the wipe)
Changing logged contacts
- Ctrl+D : delete last QSO from log
- Ctrl+Q : Quick Edit last QSO
- while in Quick Edit (blue background), use Ctrl+Q to go to earlier QSO in log, or Ctrl+A to go to later one
- Enter to accept changes, Esc to abort and return to logging
Changing current frequency & mode
- To change modes, type CW or SSB or RTTY or PSK into Entry window, hit Enter – or, if your radio is interfaced for radio control, just change modes on the radio
- To change frequency, type the frequency in kHz into the Entry window, hit Enter – or, if your radio is interfaced for radio control, change frequency on the radio
CW/SSB/Digital (needs CW keying interface/voice keyer/Digital interface respectively)
- Alt+U : switch between Run & S&P mode and messages
- F1 : send CQ message and switch to Run mode
- F4 : send your own call sign (S&P)
- ; key or Ins : send his call sign + exchange message (F5 + F2)
- ‘ key : send TU and log QSO (F3 + Enter)
- = key : re-send last function-key message
- Alt+K : edit current function-key message buttons
- Ctrl+K : ad lib keyboard CW/digital text (use Enter or Esc or Ctrl+K to end)
- PgUp/PgDn : CW speed up/down
