
The Check Window
Key Features
The N1MM Logger+ Check window is the latest evolution of the Super Check Partial idea originated by K1EA in the CT logging program. It combines up to four separate sources for checking the validity of an entered or spotted call-sign. Its system of color-coding helps the operator determine if the call-sign as copied is correct, and, if not, where the error probably lies.
When first opened, before a partial or complete callsign is visible in either the callframe or the call-sign textbox of the Entry window, the default Check window looks like this:
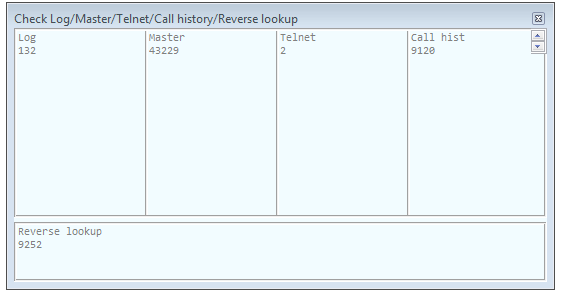
The four upper panes, left to right, will contain results derived from comparison with your current log; with a Master.scp data file downloaded on the Tools menu of the Entry window; with Telnet spots received by the program, and with a Call History file, if one has been loaded. The numbers immediately below the grey pane titles reflect the size of the files under comparison, at the moment the check window was opened. The log and Telnet totals will continue to grow for as long as the underlying database tables continue to grow, but will not be seen again until you re-start the program.
The bottom pane is for Reverse Call History Lookup, discussed below.
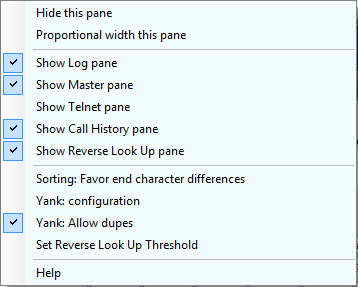
You do not have to display results from all these sources, or from the reverse lookup window. A right-click menu lets you uncheck any panes you do not wish to see:
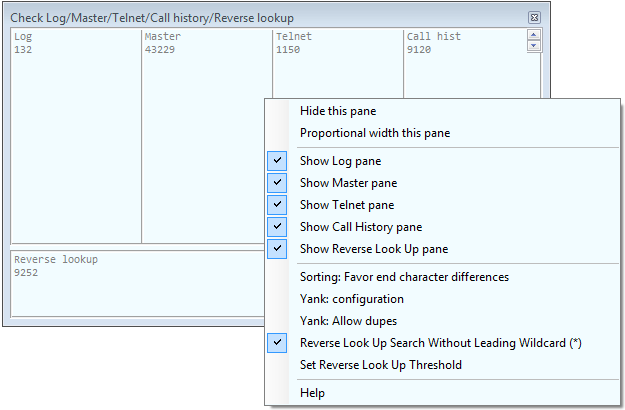
The other choices on this menu will be discussed below.
- When you enter a call-sign in the Entry window’s call-sign textbox, beginning with the third character, or a call-sign is transferred into the call-frame from the Bandmap, the Check window will begin trying to check it against the selected sources of information. The check results are displayed as below, using “YT1” as an example:
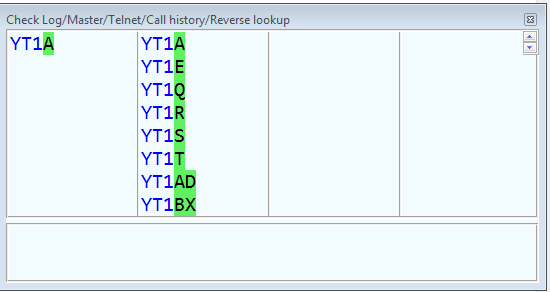
Note the green highlights – given the first 3 characters, the Check window is telling you that there are matches with those characters, and that any of the callsigns with one or two green-highlighted characters could be correct, based on what has been found in the various call-sign files.
Now enter another character, making the possible call-sign YT1E. The Check window changes:
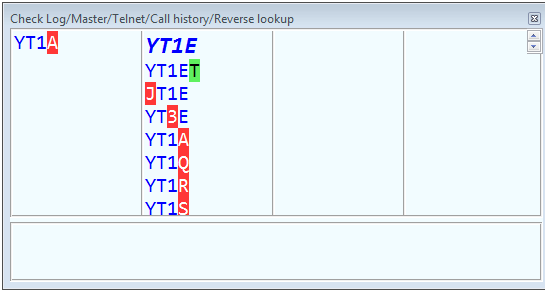
In the first row, the bold and italicized callsign reflects a perfect match in the master file. “YT1A” with the “A” highlighted in red means that an imperfect match was found in the current log – you may actually have heard YT1A rather than YT1E, since the station has already been logged once in the contest.
There is another list of suggested call-signs in the master file pane. The first, with the green highlight, means that “YT1E” matched a call in the master file, but only in part. The full call found in that file is YT1ET, so the “T” is highlighted in green. But there are other possibilities, if you miscopied one of the characters. Each of the characters that would have to be changed is highlighted in red.
Special Telnet Features
Because of uncertainty about the quality of Telnet spots, a spot will only appear in the Telnet section if:
- It has been spotted at least 3 times or
- It has been spotted with a Q or V spot-quality tag on AR Cluster version 6.
- If the Save Spots checkbox on the Filters tab of the Telnet window is checked, this check of Telnet spots will be retrospective to the beginning of the current contest. If it is not checked, the retrospective check is limited to the Packet Spot Timeout interval set either on the Filters tab or on the Bandmap’s right-click menu.
Reverse Call History Lookup
In contests where this feature is supported you may enter a sought-for multiplier (for example, a rare county in a QSO party) in the Exchange textbox of the Entry window. The call-signs of any stations with that multiplier in either the current log or the Call History file will then be displayed in the bottom pane of the Check window. A full description of the Reverse Call History Lookup feature may be found here.
Right-Click Menu
The right-click menu contains user-selected options for the Check window, along with some actions that can be taken “on the fly.” It is opened by clicking in the text area of the Check window (not in the header).
- Hide this pane – used to get rid of a pane in the Check window quickly. Right-click in the target pane and click this option to hide it.
- Proportional width this pane – This feature can be used to make one section of the Check window larger than others. Right-click in the pane you want to enlarge, select this option, and enter a number in the pop-up dialog that appears. Panes are all the same width by default, so entering “2” will make the target pane twice as wide as the others, “3” will make it three times as wide, and so on. This choice remains in effect until the Check window is closed and reopened.
- The next five checkable options determine which panes appear in the Check window. If you are not running Assisted, for example, there is no reason to display the Telnet pane; if you have not loaded a Call History file, you can hide that pane, and so on.
- Sorting: Favor end-character differences – Used to determine how much weight to give the last character in an entered call sign. This will help determine how high up the listing of possible calls a call sign with a /P, for example, might appear.
- Yank: configuration – The hot-key Alt+Y can be used to “yank” a call sign from the Check window into the call sign textbox of the Entry window, replacing what is currently there. Clicking this option on the right-click menu opens a sub-menu:
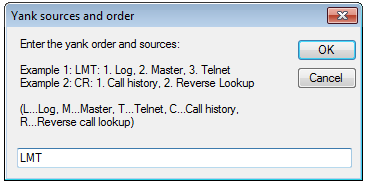
This sub-menu determines the panes in which call signs will be selected for yanking and the order in which those panes are selected with consecutive yanks. In this example, with LMT entered as the Yank order, the Log, Master and Telnet panes will supply the call signs to be yanked. The first Alt+Y will yank the first call in the top row in the Log pane. Subsequent Alt+Ys will step through the calls in the top row in that pane, and then do the same in the Master file pane, and then in the Telnet pane. After the first row in all the panes has been exhausted, the next Alt+Y will yank the first call in the second row in the Log pane and proceed through the second row in the three panes in the order specified, and so on.
The Mouse and the Check Window
- Yank: allow dupes– As the name suggests, checking this option will allow you to yank call signs which are in your log and reported as dupes.
- Set Reverse Lookup Threshold – opens a sub-menu where you can select how many characters must be entered in the Exchange field before the Reverse Lookup occurs. When using a very large Call History file or operating in a QSO party such as 7QP where the first two letters of each multiplier only denote the state, increasing the threshold above the default “2” may help to speed up delivery of meaningful results.
The Mouse and the Check Window
Many contesters prefer not to use the mouse, and for them Alt+Y is the solution. For those who prefer to use the mouse, though, all they need to do is click anywhere in a callsign in the Check window, and the callsign will be pasted into the Callsign Textbox of the Entry Window.
