
VHF and Up Contesting
N1MM logger has some features which will be appreciated especially by VHF and up contesters. The program supports bands up to the SHF bands 10, 24, 47, 76, 142 and 241 GHz
VHF Options
Frequency display
The frequency is shown in the Bandmap and in the Entry window. When the frequency is above 1 GHz the band will be shown in cm, not the exact frequency in the Entry window. When entering QSOs it’s easy this way to recognize the band in which you log.
Multiplier by Band Window
The Multiplier by Band window includes a Grid Square option. Start the program, open a VHF contest, use the Window > Multipliers > Grid Square Map menu item. You’ll see the following display, centered on your grid square – the one entered on your Station Data window.
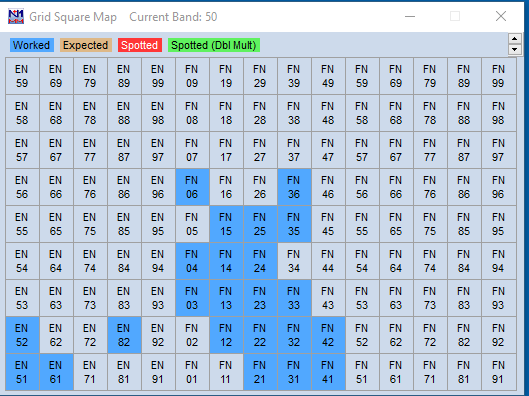
The Grid Square display has a few additional features, in a right-click menu. Click somewhere in the grid array and the following menu appears:
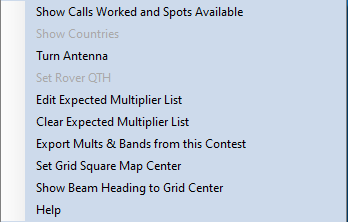
- Show Calls Worked and Spots Available – Grid squares you have already worked are colored blue, and grid squares that have been spotted but not yet worked are colored red.
- Turn Antenna – Right-click on a grid square, left click on this option, and if you have a rotator interfaced with the program, the antenna will be turned to the correct bearing.
- Set Rover QTH – If your station category is Rover, you can right-click on a grid square, select this option to set this grid square as your new RoverQTH
- Edit Expected Multipliers List – Use this menu item to edit a list of expected multipliers which will be marked in brown on the grid square map until they have been worked
- Clear Expected Multiplier List
- Export Mults & Bands from this Contest – use this option to export a list of grid squares worked on each band to a text file. By default, the file will be stored in the GoalFiles folder in your N1MM Logger+ user files area.
- Set Grid Square Map Center – Right-click on the grid square you wish to place in the center of the display, and then left-click on this option
- Show Beam Heading to Grid Center – Right-click on a grid square, left-click on this option, and a window will open displaying the bearing and distance from your QTH to the center of the square.
- Help – display the Help page for the Multipliers window
In addition to the Grid Square Map window described here, there is also a simpler Grid Squares multiplier window, available from the Windows > Multi[pliers menu, which simply shows a list of grid squares worked by band.
Gridsquare Key Assignments (VHF and up)
- Alt+equal (=) – Search entered info from both the Callsign field and the Gridsquare field in the call history table
- The results will be shown in the Check window
- Alt+minus (-) – Toggle through call history and entered grid squares (max 3) in the grid square entry field
- When no grids are found in the call history there is nothing to toggle
Call History Lookup
More information about this can be found here.
This feature is very useful in VHF contests. Lookup examples are lookups for names (Friends file in RTTY contests), gridsquares for VHF contests, ages in All Asian DX contests etc. With the importing and exporting options the call history table can be updated.
Call history lookup is enabled with the option >Config >Call History Lookup. If enabled, it will look up in VHF contests: Grid Square (max 2) and Name.
Updating the Call History File
There is a function to export the log file to (update) the call history table under >Tools >Update Call History with current log’. This function will fill the call history table with the contents of the currently selected log.
Transverter Support
N1MM logger has transverter support in the form that per band an offset frequency can be set. Right click on the Bandmap window and select >Set Transceiver Offset Frequency. The offset value is saved by the program so after a restart the offset is still there.
- Band (kHz) – enter the transmit frequency of the transverter
- IF Freq (kHz) – the frequency used between the radio and the transverter
An offset can also be added to adjust the transverter or radio to the exact frequency (like when the oscillator is a bit off).
See the 432000.12 example where a correction is being made of 120 Hz. Great to have to be right on the packet cluster spots!
Bandup/Banddown
If you have a radio that has 160-2m, and you want to use bandup/banddown, you’ll need to put entries in for bands that you do not have transverters for, if there are gaps in bands that the radio/transverters cover. You would really have to put a lot of transverters offsets in if you want the frequencies to “wrap”.
If the next band is not defined as offset to a frequency that my radio can handle and bandup/down is used, it goes to an HF frequency (without offset).
- It does not work if your radio does not accept the calculated frequency. For example, set up for Band: 144000 and IF freq: 28000 and you put in 146100 and your radio can’t go to 30100, you will get strange results
- Remember to enter the frequency of the transceiver and not that of the transverter when going into split mode (Alt+F7).
VHF Beacons
N1MM logger is capable to show beacons in the bandmaps for a defined period of time. Normally every spot in the bandmaps will disappear after the ‘Packet Spot Timeout’ which is valid for every spot in the bandmap. The same for beacons coming in as spots. So an extra import option has been added for beacons with where the spot timeout can be set to a much higher value (like days or even weeks).
Importing beacons and showing them in the bandmaps for the bands can be done by importing a text file in a specific format. Enter the text BEACONS in the Entry window callsign field and a file selection dialog will open where a .txt file (with beacons in the correct format) can be imported. An example beacons text file can be found in the N1MM logger program directory (called Beacons.txt). In the beacons text file lines with a # are remarks, the first line in the text is the timeout for all beacons in hours. Every line with a beacon must contain callsign, frequency (in kHz) and grid locator (4 or 6 digit). The frequency may be in either US (50000.25) or European (50000,25) format. A comment per beacon is optional. Note the ; as separator (don’t forget one or it won’t import). Below an example beacons.txt file.
# Hours to stay in bandmap (mostly > 24 or > 48)
60
# Call beacon;Frequency;Grid;Comments
OZ7IGY/B;144471,1;JO55WM;
PI7CIS/B;144416,2;JO22DC;Should always be heard
DL0PR/B;144486,3;JO44JH;Switches power!
GB3VHF/B;144430.4;JO01DH;QRG with a .
ON0VHF/B;144418,5;JO20;4 digit grid
A file with beacons in the correct format for Europe (Region I) can be found on the N1MM website under ‘Other Files’ in the ‘Download’ menu.
No need to add the NCDXF/IARU Beacon Network on 14.100, 18.110, 21.150, 24.930 and 28.200. They are already incorporated in the program and the beacon transmitting at that time (when your PC clock is correct) will be shown in the Entry window statusbar when you are listening on one of these frequencies.
Example Contest Setup
Additions are welcome!
Create (Days Before the Contest)
- New master.scp file
- Use the Tools > Download and Install Latest Check Partial File (master.scp) menu item
- Create ‘N1MM logger.ini’ to use during the contest
- Set up all the program settings and place the windows as you like them during the contest (on the computer to use)
- Don’t forget the tab ‘Mode Control’ in the Configurer.
- After closing the program it has created a file called ‘N1MM logger.ini ‘with all the settings
- Copy ‘N1MM logger.ini’ (not .init) to ‘ VHFsettings.ini’.
- Text file with contents Function keys for SSB/CW
- As a start:
- ‘File | Export | Export Function Keys to file… | SSB Function Keys’
- Give a name like: VHFssbfunctionkeys.mc
- ‘File | Export | Export Function Keys to file… | CWFunction Keys’
- Update these text files if needed
- ‘File | Export | Export Function Keys to file… | SSB Function Keys’
- Check possible macros in the Macros chapter
- As a start:
- Packet/Telnet button text file
- As a start: >File >Export >Export Packet/Telnet Buttons to file…’
- Update this text file if needed
- Give a name like: VHFpacketbuttons.txt
- Check possible macros in the Macros chapter like {GRIDSQUARE}
- Lookup database text file for the VHF contests to use
- Create a text file with callsign, name, locators etc.
- Give a name like: VHFlookup.txt
- See info about CallHist file
- SSB: Wav files for CQ, rst, exchange etc.
- Create wav files for all operators
- See {OPERATOR} macro in the Macros chapter
- Download up to date country file (cty.dat)
- mostly a country file is not used for VHF and up contesting but the program gives information in the Info window about the logged callsign so download the latest version
- Check if the selected contest is still ok, make some test QSOs
- This should be done weeks before the contest!
- ….
Before Starting the Program
- Copy the created master.dta file in the N1MM logger program directory
- Copy the wav files from all operators in the WAV directory
- Turn off Windows sounds if using WAV files
- Windows >Control Panel >Sounds – Scheme: No Sounds
- Rename ‘ VHFsettings.ini’. to ‘N1MM logger.ini’ and copy it into the program directory
- The program will start using the settings as set up days before the contest
After Starting the Program
- Select/Check if correct database is used
- >File >Open Log in Database, select VHF database’.
- Import
- This has to be done only once if every time the same database is used!
- Each database can handle many contests and thousands of QSOs, don’t use a database for every contest!
- Updated files (like the lookup file) have to be imported before every contest.
- The function keys macros (SSB/CW)
- >File >Import >Import Function Keys to file… >SSB Function Keys. Use file created above (Example: VHFssbfunctionkeys.mc)
- >File >Import >Import Function Keys to file… >CW Function Keys. Use file created above (Example: VHFcwfunctionkeys.mc)
- The packet/telnet buttons
- >File >Import >Import Packet/Telnet Buttons from file… Use file created above (Example: VHFpacketbuttons.txt)
- Lookup file
- >File >Import >Import Call History File. Use file created above (Example: VHFlookup.txt)
- Country file
- >Tools >Import country list from downloaded file. Use file downloaded/updated above
- The function keys macros (SSB/CW)
- Check Station dialog (>Config >Change your Station Data)
- The locator from this dialog is used for distance calculation so needs to be entered!
- Check contest ( >File >Choose Which Contest to Log)
- Check if entered information is correct.
- Enter Sent Exchange (this is contest specific, see Setup Contests chapter)
- Setup configuration (Rig control, PTT, CW)
- Check Configurer >Mode Control tab
- When using a transverter, enter offset for bandmap A and bandmap B
- ….
Have fun during the contest!
