
Call History and Reverse Call History Lookup
Call History
Call History Lookup is a feature that can be used to pre-fill the exchange during a contest to save typing, or to display user comments or notes for specific call-signs. The sources of Call History data can be files from other sources, previous contest logs, or hand-generated data files of your own. Your club may generate Call history files for Sweepstakes, for example, or you may choose to generate your own from last year’s log. You might choose to harvest names and call-signs from your general log, so that you can recognize people by name on the air.
Before using the Call History Lookup feature, Call History Lookup must be enabled on the Entry Window’s Config menu (exception: the UserText field – see below), and the user must import a text file or files containing comma-or semicolon-separated data.
A fairly large number of contest-specific Call History text files may be found in the Call history Files section of the Files menu on this web site. For many of us, these will be the preferred source of data for the Call History Lookup function.
You can also build a Call History text file from your previous year’s log. Simply open the old log, optionally click > Tools > Clear Call History to empty the Call History database table, then click Update with Current Log. To save the Call History text file, use the Export >Export Call History option on the Entry window’s Files menu, and give the exported file an easy-to-find filename.
And, of course, you can always load Call history text files into the database directly from the Call History Files user directory.
If you want to draw on multiple logs for the same contest, or indeed combine multiple Call History files into a single database table, you can do so simply by going to File >Import >Import Call History and holding down the Ctrl key while you click multiple text files.
The Call History data is not stored in the same database as the QSO data. The Call History table remains until it is replaced with another set of data. A Call History text file (or multiple files) can be imported manually, or associated with a specific contest on the Associated Files tab of the Contest Setup dialog. As you can imagine, it is easy to forget that you have the wrong call history table in the database, left over from last weekend. We recommend that users add the contest name to the Call History data files as explained in the “Identifying the Call History Lookup Data Contests” section below.
When a callsign is typed into the Entry window and the focus is moved into the Exchange box, either by pressing the Space bar, or if Enter Sends Messages (ESM) mode is enabled, by pressing Enter, the Call History database table is searched. If the callsign is found, the associated Call History data is displayed on the “beam heading” line in the Entry window. If the contest exchange fields are blank, the data retrieved from the database are also used to pre-fill any relevant exchange field(s) in the Entry window.
The event that triggers the Call History lookup is the movement of the cursor from the call sign box to the exchange box in the Entry window. In ESM mode, there are some situations in which pressing Enter does not cause the cursor to move to the exchange box, and in those cases a Call History lookup will not be invoked by pressing Enter. In particular, in S&P mode if the “ESM sends your call once in S&P …” option is not selected, pressing Enter to send the F4 message will leave the cursor still in the callsign box, so a Call History lookup will not be performed; pressing the Space bar will move the cursor into the exchange box and cause a Call History lookup.
If “Show User Information” is checked on the Entry window’s right-click menu, data from the Call History table is displayed on the User Data line. Even if Call history Lookup is not enabled, data from the User Text field of the table is still displayed on the User Data line, below the Bearing line.
Here are some Entry window examples. The first shows the Entry window with both the exchange data and user data (his QTH, in this case) displayed.
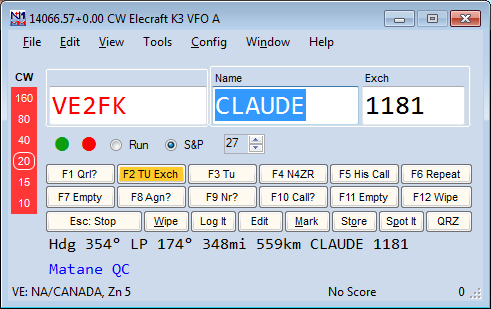
In VHF contests, the grid square from the Call History table is used to calculate the beam heading reported in the Bandmap.
The Call History Text File
This section describes the layout of the default Call history text file and the database table into which the Call history is imported.
The Call History Text File can be created by any text editor – Notepad is fine. The file is comma- or semicolon-delimited, which means that the items of data are in specific locations. The default structure, also reflected in the database table, is:
Call, Name, Loc1, Loc2, Sect, State, CK, BirthDate, Exch1, Misc, Power, CqZone, ITUZone, UserText, LastUpdateNote. This order is fixed, and if you use the default order, then you must include a comma in each record in the input text file for each field, even if the field is empty. Here’s an example:
N9RV,,,,06,,-1,1900-01-01,,,,Log update edit fields
As you can see, the file has a number of empty fields before we come to “06”, which is the ITU zone number, and is put in the Sect field, because this contest draws from the Sect field to prefill the station’s zone.
Downloading Call History Text Files
Pre-assembled Call History text files are available on the website. Look in >Downloads >Category Menu >Call History Files. Download the file to the CallHistoryFiles subfolder in your N1MM+ user files directory (the one pointed to by the Help > Open Explorer on User Files Directory menu item)..
Call History Import Directives
You can move or exclude columns of data, map ARRL section to State, map State to ARRL section, or truncate a six character grid square to four characters. This is accomplished with the use of import directive commands, which are surrounded with “!!” , to tell the program that they are instructions, not data. When an import directive command is read, the import routine follows that instruction until another import directive command is read or all data is imported. Import directive commands can be repeated if the data structure or field order changes in the data.
Here is a list of the import directive commands that can be used in a Call History text file:
!!Order!! – defines the order of the comma separated input data that follow
!!MapStateToSect!! – populate empty Sect field from the State information
!!FourCharGridSq!! – truncates 6 character grid squares to 4 character grid squares
!!AppendUserText!! – append additional user text into the UserText field (default)
!!NoAppendUserText!! – do not append user text into the UserText field, new data replaces prior
!!Validate50State!! – ignore all state data that isn’t one of the 50 states
!!NoLoc2AltGrid!! – do not move the existing Loc1 grid into Loc2 for an alternate grid location
!!MapOnSection!! – map GTE, ONN, ONE, ONS to ON section
!!ValidateArrlSection!! – remove any section that is not an ARRL section (includes VI, PR) Can be used to remove ON
Every exported Call History text file lists the import directives, the field names, and the maximum size. Here are the Call History field names along with the maximum size. The import routine will truncate any field that exceeds the maximum, discard any CK value that is not a number, and discard any Birthdate that is not a date. If an !!Order!! input directive is not read during file import, the routine expects the data to be in this comma separated order:
Call(15), Name(20), Loc1(6), Loc2(6), Sect(8), State(8), CK(#), Birthdate(date), Exch1(12), Misc(15), Power(8), CqZone(#), ITUZone(#), UserText(60)
Here’s an example of Call History data that will import without an import directive:
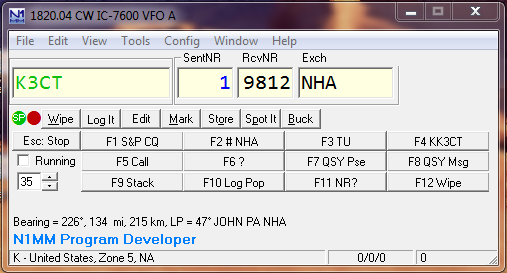
K3CT, JOHN , , , ,PA , , ,NHA, , N1MM Program Developer
As you can see, each comma denotes a field. Successive commas mean empty fields. Spaces can be added to make it easier to count the number of commas. If this single line file was imported into the Call History database and the Call History Look Up option is enabled, the Entry window for the PA QSO Party would appear like this when the callsign K3CT was entered and spacebar pressed (or if ESM mode is enabled, when Enter is pressed):
As you can imagine, making sure you have the right number of commas between actual data in the text file can be a problem. Fortunately, the !!Order!! command offers a simple solution. For example, you create a text file that looks like this:
!!Order!!, Call, Name, CK, Sect
N4ZR, Pete ,54 ,WV
N3OC, Brian, 67, MDC
When you load it into the Call History database, the data will be put in their proper places in the Call History table, and when you operate in Sweepstakes, for example, with Call History Lookup enabled, the program will pre-fill the check and section in the Exchange field, and will display the name and all the other data in the Bearing line of the Exchange Window. This redundancy is deliberate, because if you set out to edit the Exchange and then realize that the pre-filled data were correct, they are there for ready reference.
What this change has done is to make it much easier to generate Call History text files for importing into the Call History database. For example, you could generate a file that contains calls, names, checks and sections for everyone you worked last year in Sweepstakes, and by writing the correct !!Order!! line, like this:
!!Order!!,Call,Name,CK,Sect
The !!Order!! import directive can also be used to ignore columns of data. For instance, if the data file contains additional columns as shown below:
DD3JN, 70 23, GERD, JO42AI,JO31OE
PA1M, 144 70, Carel, JO33FE, JO33II
The second column can be ignored with the import directive prior to the data.
!!Order!!, Call,, Name, Loc1, Loc2
DD3JN, 70 23, GERD, JO42AI,JO31OE
PA1M, 144 70, Carel, JO33FE, JO33II
Alternately, the second column of data can be placed in the UserText field with the following import directive:
!!Order!!,Call,UserText,Name,Loc1,Loc2
DD3JN, 70 23, GERD, JO42AI,JO31OE
PA1M, 144 70, Carel, JO33FE, JO33II
The Supported Contests section of this manual may include the Call History field(s) used for exchange information. If the field information is not listed in this section follow this procedure to determine which Call History field to populate.
- Open a new contest log.
- Log some dummy QSO’s that contain the exchanges of interest.
- Click Tools, Clear Call History then Update with Current Log.
- Export the Call History (File, Export, Export Call History) and examine the exported QSO text.
- Place the exchange data in the populated call history field. The coding of some contests is complex. It is not unusual to find that contests that store information in fields for points calculation, determining multipliers, or exporting Cabrillo. Therefore, it may not be necessary to populate all of the Call History fields.
If your Call History file import doesn’t function correctly, review the import directive(s) to make sure they match the field names. For example, you must use Sect, not sec or Sec, and Ck, not Check. Field name case is not important. All of these field names will import data into the Sect field: Sect, SECT, sect, sEcT, SeCt. If problems continue, post a message on the N1MM Logger email reflector asking the other users for help.
Associating Call History File with a Contest
If you want to have a specific Call History Lookup file loaded and enabled whenever you start that contest, add the filename to the Associated Files tab for the contest log. From that point forward, whenever this contest is opened in any database, the specified Call History Lookup file will be imported.
When you click on the Change button for the Call History Filename, if your computer is connected to the Internet the program will look up the Call History files for that contest on the N1MM Logger+ web site and offer to update the current file with the latest one from the website. If you do not accept the offer to update the file, the program will then open a standard Open File dialog to the CallHistoryFiles folder in your N1MM+ user files area so as to allow you to choose your own Call History file instead of using a downloaded one.
Identifying the Call History Lookup Data Contests
If you add the short contest name (the one in the Contest Setup dialog) to the Call History text file as a comment (preceded by a “#”) the program will automatically enable or disable Call History Lookup when the contest log is opened or Call History data is imported. When the Call History Lookup options has been changed a short message will appear in the Entry Window indicating the action.
The loaded Call History Lookup data can be identified for use in more than one contest by adding multiple contest name comments as shown in the example below (omit the quotation marks):
“#NAQPCW”
“# naqpssb”
For QSO parties, the state abbreviation is required after the contest name. Notice the space before the state. Example:
“# QSOParty PA”
– The “#” must be the first character on the line. Adding one or more spaces after the “#” is allowed.
– Only one contest name per line is allowed.
– Duplicate contest associations are ignored.
– The contest name may be upper, lower, or mixed case.
– The contest names are validated. If the validation fails, the contest association is ignored.
– The user can turn Call History lookup On or Off manually. The association is not checked at program start.
– The contest association identifiers are exported with a Call History file export.
Related Menu Options
- >Config >Enable Call History Lookup
- Check to enable Call History Lookup.
- >File >Import >Import Call History
- Select the file(s) to be imported. All information in the Call History table in the Admin database is erased, and the imported information from the file is substituted.
- >Tools >Update Call History with Current Log
- Update the call history table in memory and the Admin database with the QSOs from the current log. Contacts will be added when new or updated when already in the call history table. For the 2 grid fields the behavior is a bit different. When both grid fields are filled and a new third grid has been logged, the second grid (oldest) will be removed, and replaced by the contents of the first field. The new grid will be added to the first position. The same change in position will happen when only the first grid is filled and a new grid has to be added from the log. A 4 digit grid will be overwritten by a 6 digit grid when the first 4 characters are the same. Changes made with this option are only temporary; to store a permanent copy of the call history table including the changes, you need to use the File > Export > Export Call History menu item described below.
- > Tools > Clear Call History then Update with Current Log
- As above, except clears the call history table before adding contacts from the current log. Can be used to start a new Call History table.
- >File >Export >Export Call History
- Exports the information in the Call History table. It is very important, particularly if you have changed the Call History table, to re-export the data as a Call History text file. Otherwise, any changes will be lost. You are given the opportunity to rename the text file so that, for example, a 2008 SS file can be renamed 2009 SS, to indicate that it has been updated.
You can import any Call History file that you formerly used without an !!Order!! directive. When you export a Call History text file, the program fills in the commas that are necessary to fit the default order, as well as -1 for each empty CK and 1900-01-01 for each empty Birthdate. This is necessary to ensure compatibility with your old Call History files.
Reverse Call History Lookup
In addition to the regular Call History lookup, where you type a call sign into the Entry window and the program pre-fills the exchange based on the data in the Call History file, there is also a Reverse Call History lookup feature, where you can enter an exchange into the Entry window and the program will search the log and the Call History file for callsigns that correspond with that exchange. This does not work in all contests (for example, it makes no sense for serial numbers and it doesn’t work for Sweepstakes because of the complicated exchange). If the Call History lookup option is selected, the Reverse lookup feature will search the Call History file as well as the log.
The Reverse lookup feature is enabled using a pop-up (right-click) menu item in the Check window. If the Reverse lookup feature is not available for that contest, the menu item will be greyed out. Once the Reverse lookup feature has been enabled, you can type an exchange, or a partial exchange, in the exchange box in the Entry window, and if the number of characters typed in is equal to or greater than the threshold (which you can set with another pop-up menu item), the program will search in the log and the Call History table for callsigns whose exchange matches the typed-in exchange. Up to 100 matching callsigns will be displayed in the Check window. Once you have determined which of the matching callsigns is the correct one, you can click on it in the Check window and the callsign and exchange will be transferred into the Entry window.
If there was a full or partial call sign entered into the callsign box in the Entry window before entering the exchange, only call signs from the log or Call History file that match the partial call sign in the Entry window will be displayed in the Check window, and they will appear below the regular matching callsigns that were filled in from the log and the SCP file.
You can also control whether the matches for the partial exchange can be found anywhere in the exchange field in the log and Call History file, or if the match must begin with the first character (that is, whether BC will match all of AABCD, ABC, BC, BCDE, etc. or whether it will only match BC, BCDE, etc.). Limiting the match to the first characters and/or increasing the threshold for the number of characters matched will result in faster lookups and smaller numbers of matching callsigns found.
Both for prefilling the exchange and for reverse lookup, the name of the field in which the data is stored in the Call History file must match the name of the field that is used in that particular contest. For example, if the state/province is part of the exchange, depending on the contest that part of the exchange might match the State, Sect or Exch1 field in the Call History file. You can use the !!Order!! directive to ensure that data in the Call History file is associated with the appropriate field name for the contest.
For example, if you have a Call History file for the NAQP that looks like this:
!!Order!!,Call,Name,State
K3CT,John,PA
then to use this same data file in a state QSO Party, you might have to change the first line of the file to!!Order!!,Call,Name,Exch1while leaving the rest of the data unchanged.You can determine which fields are used in a given contest type by creating a dummy instance of the contest, entering some typical fake contacts, using the Tools > Clear Call History then Update with Current Log menu item, exporting the Call History file to a temporary text file, and then examining that file with a text editor to see which field names are used for which exchange fields in that contest type. For some contest types, you may find the same exchange data in two fields in the Call History file. In such cases you may have to experiment to determine which of the fields is/are used for reverse lookup.
