
Installing and Upgrading N1MM Logger+
First-Time Installation Instructions
Please Note – These instructions apply both for first-time users and for experienced users of N1MM Logger Classic starting out with N1MM Logger+. Note that you can leave N1MM Logger Classic on your PC, and even continue to run it alternatively with N1MM Logger+. Just don’t try to run the two simultaneously.
Installing
N1MM Logger+ has adopted the Windows convention for file locations, so you should be able to install program files in the default locations provided by the Installer. N1MM Logger+ is a 32-bit application which works equally well on either 32-bit or 64-bit versions of Windows. In 32-bit systems, the program files are installed at C:\Program Files\N1MM Logger+. In 64-bit versions of Windows, N1MM Logger+ program files are installed at C:\Program Files (x86)\N1MM Logger+. In both types of systems, all user and data files used by the program will be installed elsewhere, i.e. not in the same location as the program files.
The user/data files must not be in the C:\Program Files or C:\Program Files (x86) path. By default, if you are not using a cloud backup system like OneDrive the user data files location will be on your hard drive in your Documents folder, in a sub-folder titled N1MM Logger+. Unless you are using a cloud backup system like OneDrive, we recommend accepting the default locations, and installing for a single Windows logon. If you have to have more than one, your options are here.
If you are using a cloud backup system like OneDrive, the user data files location must not be in the cloud or in a location that is automatically backed up to the cloud. In this situation the installation instructions must be modified; see the section below titled “N1MM Logger+ and OneDrive”.
When the installer first creates the user data files area, it also creates a number of sub-folders where the program expects to find data files for various purposes. Here are the contents of the user data/user files folder when it is first created:
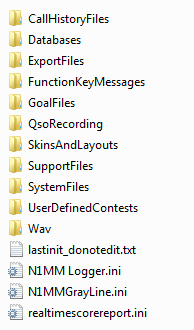
This folder is important, because the program looks in these sub-folders for support files that it needs – things like your stored message files, call history files, and so on. When created or modified by N1MM Logger+, files are placed in their correct folders, but if you want to move files from your N1MM Classic installation, you need to move them to the appropriate Document folder. Any .wav files used for SSB contests should be stored in the Wav folder; if you use the {OPERATOR} macro for wave files in individual operators’ voices, those wave files should be stored under sub-folders within the Wav folder titled with the operator’s callsign.
Be sure not to delete the four files below the folders.
During a Full Install, the installer downloads so-called “prerequisite” files from the Internet. For this reason, please be sure you are connected to the Internet when doing a Full Install. Also, make sure that other programs that might be using system components that are part of the install (such as digital mode programs) are not running when you do the Full Install.
N1MM Logger+ and OneDrive
If you use OneDrive or a similar cloud backup system, the installation instructions must be modified to avoid corruption of database files that can result if an automated cloud backup operation takes place while the program is running. If you are installing N1MM Logger+ on a computer that has already been configured to use OneDrive (or Google Drive or Dropbox) to backup the Documents folder contents, the installer may refuse to set up your user data files area within the OneDrive (or equivalent) directory path. Whether it does so or not, at the point in the installation where the user files area is being set up you must choose a location on your hard drive that is not within the OneDrive path, and that is also not protected by the operating system (i.e. is not within the Program Files or Program Files (x86) paths). We suggest that you choose a location such as C:\N1MM Logger+, or C:\HamRadio\N1MM Logger+ as the location for your user data files.
Does this mean that you cannot backup your N1MM Logger+ data files? Not at all, in fact we recommend that you use some kind of backup strategy for these files, but unfortunately an automated backup system may not be suitable. Whatever strategy you choose, you must ensure that it never attempts to backup the user files area while the N1MM Logger+ program is running, as this can cause corruption of the database files. The N1MM Logger+ program must be shut down before backing up the user files, whether the backup is to the cloud, to another disk drive or other storage medium, or to another networked computer. You can even use the OneDrive cloud storage to store backups in if you wish; just make sure not to let OneDrive do the backups automatically, because sooner or later one of those automated backups will happen while the Logger is running and corrupt your log database.
Even after you have successfully installed N1MM Logger+ with the user files area in your Documents folder on your hard drive, and perhaps have even been using it successfully for some time, OneDrive can still impact your installation. This is because of Microsoft’s strategy of aggressively moving user storage into OneDrive. If the user account that you use to log in to your computer is a Microsoft account, Windows Update may quietly move all of your Documents, Photos and similar file areas into OneDrive, possibly including your N1MM Logger+ user files area. The first time N1MM Logger+ is started after the update, you may see an error message indicating that the program was unable to open your log database. If this happens to you, your best recourse is to reinstall N1MM Logger+ with a new user data files area that is outside OneDrive, as follows:
- Download the latest Full Installer and the latest program update installer from the N1MM Logger+ web site.
- Run the Full Installer. It will install the program files into C:\Program Files\N1MM Logger+ or C:\Program Files (x86)\N1MM Logger+; this is fine, OneDrive does not affect this part of the installation.
- When the Full Installer asks you where to install the user files area, choose some place that is outside the OneDrive path and also outside the Program Files path; for example, C:\N1MM Logger+ .
- Once the Full Installer has completed, do not run the program yet. Before attempting to start N1MM Logger+, first find where Windows Update has moved your previous user files. The path may be similar to the path that you originally set up during your earlier installation, except that OneDrive may appear as part of the pathname. Once you have found that location, copy the entire contents of the old N1MM Logger+ folder, including subfolders, into the new folder that was just created by the Full Installer. Then rename the old user file folder, for example from N1MM Logger+ to Old N1MM Logger+. This will serve as a reminder to you that the old folder is not the correct place to download new files to (UDC files, Call History files, function key message files, etc.). Once you have been successfully using the program with the new location for a while, and if you are sure that all the files you might want in future (including old database files and old logs) are safely stored in the new user files folder or elsewhere, you can delete the Old N1MM Logger+ folder and its subfolders to reduce the chances of confusion.
- Now run the updater program for the latest update to bring your installation up to date. You should now be back in business.
- The file paths used by the program are relative to the main user files area. If there is any doubt about the location of the main user files area, you can use the Help > Open Explorer on User Files Directory menu item in the program to find the folder that the program uses (along with its subfolders) for all of its data and user files.
- Copying the entire user files area en masse should preserve all of the relative file links in the program. One exception might be entries in the recently opened log list at the bottom of the File menu if those recently open logs were in database files other than the currently open database file. If there are any such links in your File menu, you may be forced to use the File > Open Database and File > Open Log in Database menu items instead of jumping directly to that log from the bottom part of the File menu. This problem will quickly right itself as new entries are added to the list with updated path information, displacing the old ones with outdated path information.
- If you are using the program from more than one Windows user account, then the above procedure will only move the user files area for the first user account. To move the user files area for other user accounts away from the Documents file areas for those accounts, you will need to add a UserDir= command-line argument to the shortcuts from which the program is run, designating the new user file area location.
Avoiding Security Problems During Installation
Security settings in Windows or in anti-malware software on your computer may interfere with the ability to download and run installation programs such as the N1MM+ Full Installer and Latest Update installers. If Windows refuses to download an installer, check the Windows Settings > Update & Security > Windows Security > App & browser control > Reputation-based protection settings. If Reputation-based protection is turned on, your browser might refuse to download installer files, or it might download them but block them from being run. If your browser refuses to download the installer file, turn Reputation-based protection off and try again.
If the installer file downloads successfully but a Windows Defender SmartScreen window labeled “Windows protected your PC” appears when you try to run it, look for a “Run anyway” button on that screen. You may need to click on a “More info” link to make this button appear. If there is no “Run anyway” button, or more generally if the installer program simply does not run when you try to execute it (with or without a SmartScreen window), you can right-click on the installer file in Explorer (probably in your Downloads folder) and look for a button called “Unblock” near the lower right corner under the General tab, with an explanation that reads “This file came from another computer and might be blocked to help protect this computer.” Click on the “Unblock” button to unblock the file and enable it to be run.
N1MM Logger+ uses a number of .dll and .ocx files – for example, inpout32.dll is used as its interface to LPT ports, and n1mmv5wav.ocx powers the audio recording and playback functions. Various security provisions in Windows, as well as various after-market security software, can prevent the installation or registration of these files.
A few simple steps can work around these problems. First, download the Full Installer and Latest Update installers to a regular (non-temporary) directory on your hard drive. Then when you run the Full Install, right-click on the filename and select “Run as Administrator”. This may be necessary even if your User account has Administrator privileges.
Once you run the Full and Latest Update installers as an Administrator, the needed .dll and .ocx files should all be properly registered. If you are using the parallel (LPT) port for CW, PTT or antenna selection, you will also need to run the program itself for the first time by right-clicking and selecting “Run as Administrator”, so that some internal file-shuffling can take place. This should not be necessary thereafter – just run as usual from a desktop icon or shortcut.
Windows Settings that may affect program operation
There are some default settings in Windows that can affect the way the program operates. To avoid problems, it is suggested that you change these settings. Note that these changes are in Windows, not in N1MM Logger+.
The first has to do with USB hubs (ports). The Windows default behavior for USB hubs is to shut them down to save power after a period of inactivity. Unfortunately, the only activity Windows appears to be aware of is keyboard or mouse activity. A USB port that is being used for something else, such as a USB-to-serial adapter, looks to Windows as if it is inactive, and Windows can shut that USB hub down after a few minutes. This will cause the port to stop working, and if you go into the Configurer to make changes, the program will be unable to open the port when you exit the Configurer.
The solution to this comes in two steps, but first, be sure that the USB device you’re having trouble with is connected to its port. Now open Device Manager, expand the section on Universal Serial Bus controllers, and then open each entry labelled either “Generic USB Hub”, “USB Root Hub” or “USB 3.0 eXtensible Host Controller” (or something similar), open its Properties dialog, select the Power Management tab, and uncheck the check box called “Allow the computer to turn off this device to save power”.
The second involves Power Options on the Control Panel. You will not necessarily find all of these settings on every system, but every system running N1MM Logger+ or any other real-time logging software should be set to minimize Windows “power saving”.
Open the Control Panel and select Power Options. One of the “Plans” will be “High Performance” – select it. Then click “Change plan settings” and set “put the computer to sleep” to “never”. If found, also select “Change advanced power settings” and set “Sleep | “Hibernate after” to “Never” and “Allow hybrid sleep” to “Off”. In “USB Settings” set “USB selective suspend setting” to “Disabled” and under “PCI Express” set “Link State Power Management” to “Off”. Also set “Wireless adapter Settings” to “Maximum Performance”.
These settings should prevent the computer from going to sleep, shutting down USB ports and disabling the network interface when it is plugged in – when you want to keep background tasks running.
There is a third setting that may require attention in Windows 10 and 11. In the Windows Settings app, select Privacy, and then among the functions on the left side of the window, select Microphone. An option should appear called “Let apps use my microphone”. Set this option to On. Starting with the Spring 2018 update of Windows 10, Windows interprets this option to apply to all sound card inputs, not just to the microphone input on the default sound card. If this option is set to Off, neither N1MM Logger+ nor any of the other programs it uses to decode digital modes, etc. will be allowed access to any sound card inputs.
Connecting or disconnecting a sound card device while another sound card device is in active use can cause the active sound card to stop working and/or to change its position in the list of sound card devices in programs like MMTTY. Correcting this may require going into the setup for the program that uses the sound card and re-configuring the sound card(s) in that program.
If you have a monitor that includes a sound card device connected to the computer via an HDMI cable, when the monitor goes into screen saver mode the sound card may also be disabled. Even if you are not using that particular sound card, other sound cards connected to that computer may suddenly stop working or become unavailable. If this happens to you, to prevent it from happening again you can either disable screen saver mode on that monitor, or disable the monitor’s built-in sound card device.
Here is another tip that has nothing to do with power management or sound cards, and does not actually affect program operation, but may have an impact on your ability to find some of the N1MM Logger+ files. In Windows Explorer, under the Tools option, select Folder Options. Click on the View tab, and look down the list for a check box called “Hide extensions for known file types”. The default for this option is checked, requiring you to identify file types by their icons alone. If you leave it at the default, you may have trouble finding files referred to either in the documentation or by people giving help instructions on the user group. If there are files with similar file names except for different extensions, you may have trouble telling which is which. Unchecking this option will make the full file names visible in Windows Explorer, which will make debugging problems much easier.
Regarding Windows time settings, you do not have to set your computer to UTC in order to get UTC times in your log, though you can of course do so. If you set your computer to your correct time zone including the correct DST setting, set the computer’s time to match your local time, Windows and N1MM Logger+ between them will take care of the rest.
You can even operate straight through the daylight savings time switch in March or November (e.g. during Sweepstakes CW) and while you will see your computer’s time display change by an hour at 2 am if you look closely, N1MM Logger+ will not skip a beat; it will log all of your contacts with the correct UTC time.
Beginning the Installation
These instructions are specifically for the first installation on a computer. See the section below on Installing the Latest Update for instructions on subsequent updates.
Download the Full Install from the Files area on the n1mmplus website.
The full installer will be a file with a name in the form N1MM Logger+ FullInstaller x.yy.zzzz.exe . While you are in the Downloads area of the web site, also take a look at the Latest Updates here. If there is an update file with a zzzz version number that is higher than the zzzz number on the full installer file, download that file as well. As soon as the full installer has completed, you will want to run the update installer to bring the installed program up to the currently supported version.
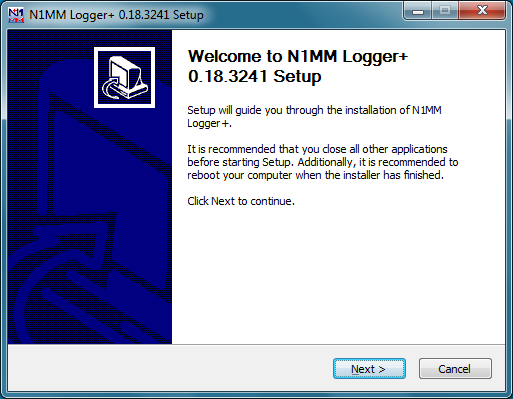
Before starting the install process, if you are running other programs that use the same system components (including digital-mode programs like 2Tone and WinWarbler), shut those programs down. Now run the full installer program. Windows will give you the standard installation prompt asking whether you want to allow the program to make changes – answer “Yes”. You should then see the following welcome dialog:
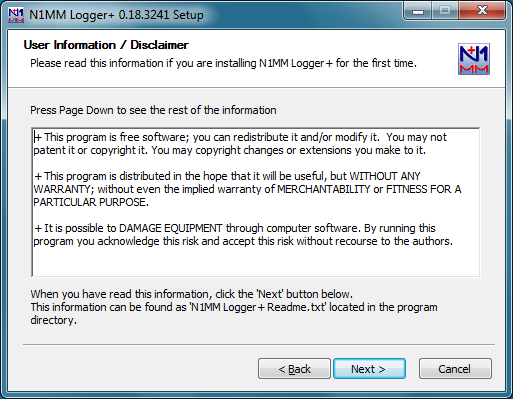
Click on Next. You will be asked to agree to a straightforward freeware license:
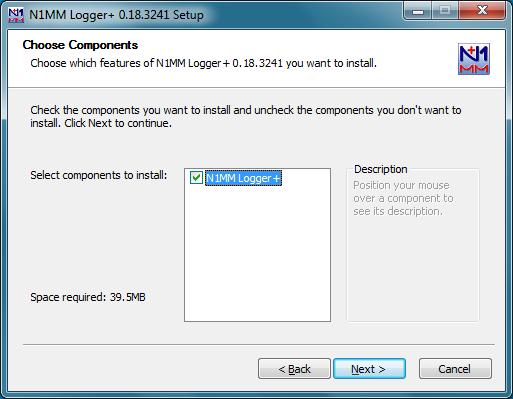
Click on Next. You will be given a choice of files to install. At the time of initial release, there is only one option, but at some future date other optional components may be added, and this dialog will be where you choose the options to be installed:
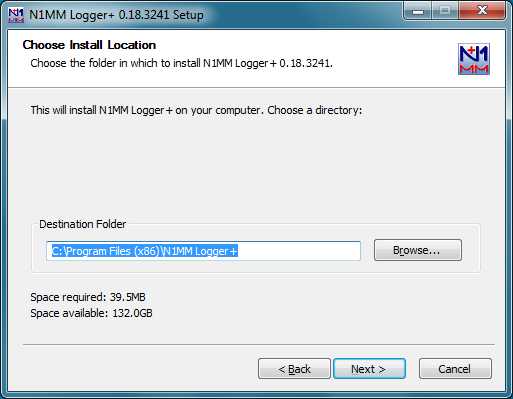
N1MM Logger+ requires two separate installation locations. One is for the program itself, plus support files that are never changed except by the update installer. The other location is for all files that may be written to either by the program during operation or by the user, to store user-defined preferences and support information; these include the databases, ini files, error logs, function key message files, call history files, country files, super check partial files, wav files, qso recordings, user-defined contest (UDC) files, and so on and so on.
The first location, for the program itself, defaults to C:\Program Files\N1MM Logger+ on 32-bit systems, or C:\Program Files(x86)\N1MM Logger+ on 64-bit systems. For almost all users, this default location is suitable and should not be changed. The dialog window in which this location is specified looks like this:
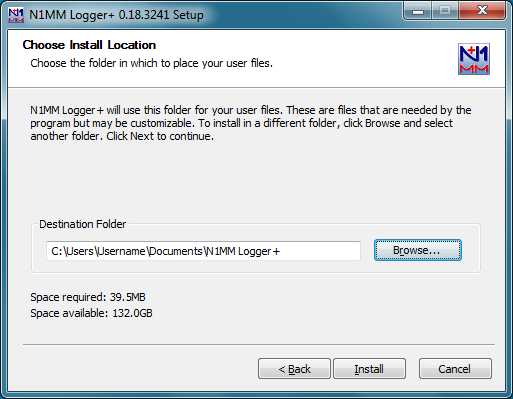
The second location, for user-modifiable or program-modifiable files, defaults to a location inside your Documents folder. In Windows Vista, Windows 7 and newer systems, this is at C:\Users\[Your Windows Username]\Documents\N1MM Logger+ (in Windows XP SP3, this would be C:\Documents and Settings\[Your Windows Username]\My Documents\N1MM Logger+). For a typical single-user system, this default is appropriate, and even on multiple-user systems it is suggested that you accept the default for the initial install.
If you are using some kind of cloud backup, such as DropBox, Google Drive or OneDrive in Windows 10 or 11, you should not install the user files area in the cloud, nor even in a location that is synced to the cloud, because the syncing operation has been observed to corrupt the program’s database files. Make sure that the location where the installer places the user files area is on your local drive (there should not be a OneDrive, GoogleDrive or Dropbox anywhere in the path name), but do not use a location inside the Program Files or Program Files (x86) path. If necessary, you can create a new folder at the top level of the directory tree (e.g. C:\HamRadio) into which you can direct the installer to place the user files area.
When you click Install, the Full Installer will
- Install all needed files on your computer to run N1MM Logger+
- Update your system files where needed
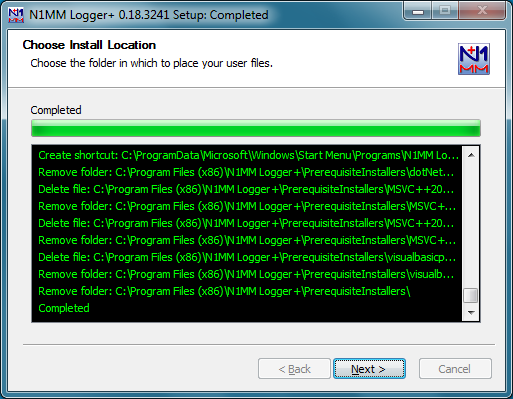
You will find that certain parts of the Full Installer installation routine take quite a long time. The installation program has not failed, so just let it run to completion. Subsequent updates are much faster. Once the installation has completed, you should see the following window:
Do Not Overwrite Newer System Files
When running the Full Installer your computer may report that certain system files are already installed on your system and are newer than the ones you are trying to install. If it asks if you want to replace a newer, existing file with an older file in the Full Install, select ‘No’. You do not want to overwrite newer system files.
After you click on the Next button, you will see the following window:
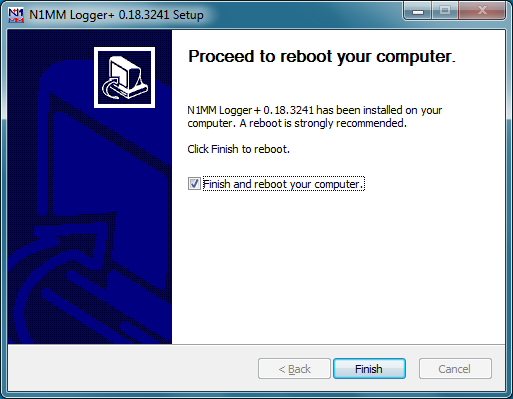
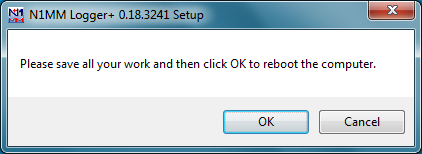
The installation process requires that the computer be rebooted in order to finalize the installation of some system files (you should be familiar with this from Windows Update and from other program installation processes). This only happens with the Full Installer, not on incremental updates. Leave the “Finish and reboot the computer” check box checked and click on Finish. You will be prompted one more time to confirm:
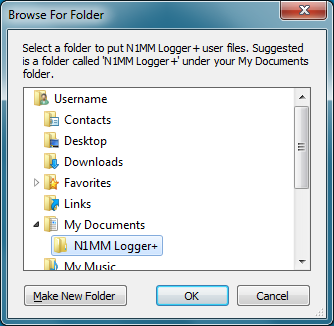
After the computer reboots, if this is the first time N1MM Logger+ has been installed on your computer, the installer will ask you to set up an initial empty database and enter your station information into that database. If the installer asks you to browse for the folder in which user files will be placed, make sure that this is the same folder that was specified as the User Files folder earlier in the installation process:
The next dialog will ask you to create a new database. You will notice that this dialog also offers the option of converting an existing N1MM Logger Classic mdb database. Because there is a possibility that an existing database may have minor problems that don’t stop it from working in Classic but may cause the conversion routines to stumble, it is strongly suggested that at this point you create a new database. There is a menu option in Logger+ to convert Classic databases to Plus which you can use later, but on the initial install it is safest to ensure that you have a known-good new empty database to work from.
If this is a new install, you may see a warning message that suggests that your ini file may be corrupted and you should copy from a .bak file, but if you do see such a message on a new full install, just ignore it and select the option to create a new database.
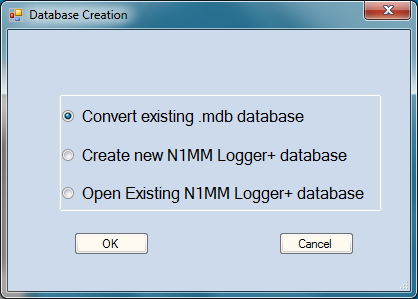
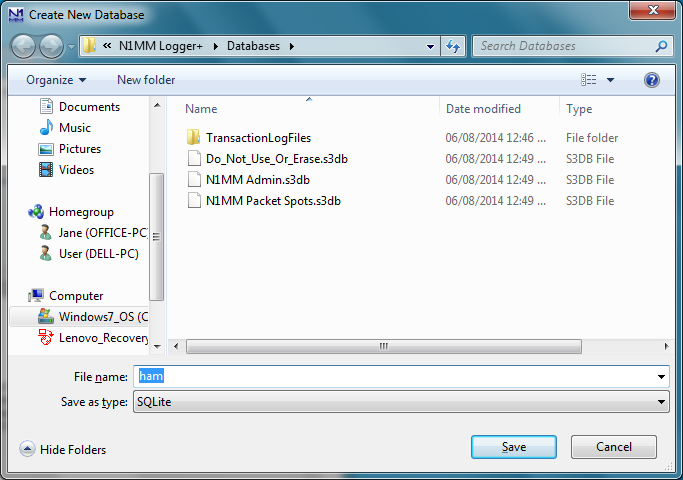
Choose the “Create new N1MM Logger+ database” option and click on OK. You will be presented with a new file dialog in which you can specify the name of the new database; the default file name is ham.s3db . You can change the “ham” to something else, but do not change the filename extension. Do not delete any of the three files that were placed there by the Installer; the program needs these files in addition to the new database you are creating.
Finally, the program will present you with the Edit Station Information dialog:
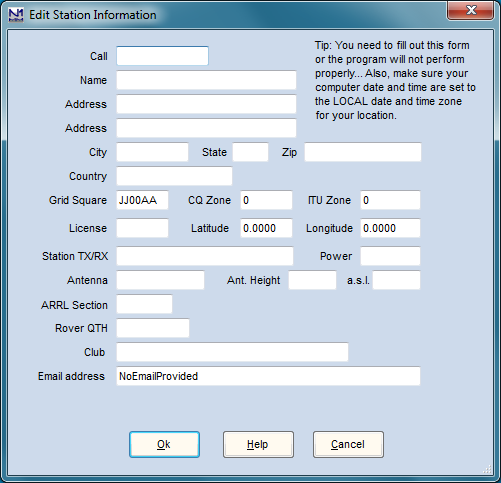
Fill in the information in this dialog. At an absolute minimum, you will need to fill in the Call box and the ARRL Section box.
The Call box contains the station callsign that will be used for all contest logs in this database; this is the callsign that is output in every QSO line in exported Cabrillo files. It is also the callsign that is inserted into function key messages using the {MYCALL} and * macros.
The ARRL Section box contains the ARRL/RAC section for stations in the US, US possessions and Canada; all other stations must fill in this box with the letters DX . This box is used in many contests, not just ARRL contests, so even if you don’t plan to enter any ARRL contests you should fill it in.
If you want the program to display correct beam headings to stations you work, you should also fill in the Grid Square box with the correct grid square for the location you are operating from. Doing so will automatically fill in your Latitude and Longitude; alternatively you can fill in the Lat and Long and the program will compute your Grid Square.
The name and address boxes are output in the header of Cabrillo files, so it is recommended that these be filled in as well. Note that this is your mailing address, not necessarily the address from which you operate.
The Club box denotes the club towards which your scores will be counted in club competitions in those contests that support this.
Once your station information has been entered and stored in the database, the initial installation process is complete.
Installing the Latest Update
After you have completed the initial install, you should go back to the n1mmplus web site and find the update file for the latest version you find there. The updated version installer will have a file name in the form N1MM Logger+ Update x.yy.zzzz.exe . If the version number zzzz is different from (higher than) the version number of the full (or your most recent) install, you should download this file, start it, and follow its simple steps (essentially the same as the first few steps of the full install process) to get fully up to date. The update will take a much shorter time to install than the full install did.
Note that updates are cumulative; you do not need to install all of the updates you find on the web site, just the latest one. During the initial beta testing phase, new update installers will be uploaded frequently (probably daily, at least initially). Always make sure you have the latest update installed before reporting bugs or problems.
There may also be new full installer versions uploaded frequently during beta testing. If there is a new full installer with a newer version number than the one you originally installed, but the first part of the version number (the x.yy part) is the same as before, you do NOT need to download or run this newer full installer. Just download the update with the new version number and run it. The only time you need to run a new full installer after the first time is when the first part of the version number (x.yy) changes.
The version number for N1MM Logger+ releases contains three components x.yy.zzzz (as in 0.18.3241). The first component, x, denotes major program revisions or status changes (e.g. “production” vs. “beta”) and is not expected to change often. The second component, yy, denotes a major update level. When you are doing updates, the “yy” in the update installer must agree with the “yy” in the already-installed version. If yy has been changed, you will have to go through the Full Installation process again with a new Full Installer before you can install updates with the new yy version number. The third number, zzzz, is the minor update number. This number may change as often as several times in a single day as members of the development team make changes. There will not be a new update installer created every time this number changes, so don’t be surprised if the numbers on consecutive updates differ by more than 1. Changes at this level are always cumulative, i.e. you don’t need to worry about intermediate updates, just download and install the latest update (highest minor update number) over the existing program, as long as the major update level is the same.
Using the Program the First Time
Edit Station Information
The first thing to do after starting the program is to enter your station information if you have not already done so. This dialog will open automatically with your first launch of N1MM Logger+. For subsequent changes, select Change Your Station Data from the Config menu in the Entry window.
Your Station Data dialog will be similar to this one. Note: a “dialog” is simply a window in which you can enter information. The term is often used interchangeably with “window”.
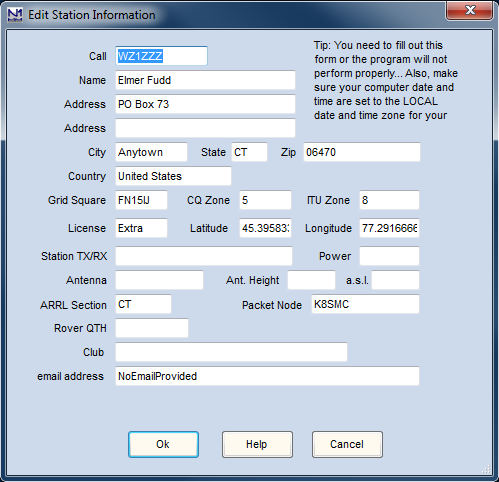
The information in this dialog is self-explanatory, but it is very important that it be accurate. The ARRL Section is used to distinguish between in-state and out-of-state status for QSO parties, and between W/VE and DX in a number of ARRL contests. CQ and ITU zones are essential for some contests. Your full mailing address is inserted in the Cabrillo file header, and tells contest organizers where to send your certificate. In order for the program to calculate accurate beam headings, you will need to put your longitude and latitude into the appropriate textboxes; you can do this simply by entering your grid square into the grid square box.
Also make sure that you enter your call as the station call sign, as this will be the call sign that appears in every QSO line in your Cabrillo files. Don’t leave any example entries that may be in these fields at start-up.
Many of the textboxes in this dialog are used when creating contests or during contests.
- ARRL Section and State textboxes are used in some contests and QSO parties to determine if you are in or outside a state or province. US and Canadian stations should enter their ARRL/RAC section abbreviation here. Non-US/VE stations should enter “DX” here.
- Latitude and Longitude are used to calculate the distance and bearing to another station/country (for HF contests)
- For VHF contests (those with VHF in the contest name) the Grid Square textbox (4 or 6 digit) in the Station dialog is used to determine bearings, rather than latitude and longitude.
- Contents of the Latitude and Longitude textboxes update when the Grid Square textbox is changed and vice versa.
- Club normally has to be spelled out completely in order for it to be accepted by contest organizers in contests with a club competition, so for example enter Yankee Clipper Contest Club rather than YCCC.
Adding N1MM Users
This seemingly innocuous title actually addresses an area in which there are fairly significant changes from N1MM Logger Classic, in particular because of the adoption of Windows user file storage standards, described above. Because user files are linked to the log-on username currently in use, User A’s files – not just databases, but all the types of files stored in the user files folder – will not be seen when User B logs onto the computer under a different Windows user name, or by using the Windows “Switch User” command. There are a number of ways of dealing with this:
- RECOMMENDED METHOD: Use one Windows logon identity for all operators, and use the OPON (Ctrl+O) function to identify the operator for any given operation. This way all of the user files will be shared, except for the .wav files used for stored phone messages, which will follow the operator’s callsign. Operators can set up individual Window layouts with the Tools > Save Window Positions and Restore Window Positions functions. If desired, operators can also set up their own databases and switch manually from the File menu. This is the method that will be most familiar to users of N1MM Logger Classic.
- Use individual Windows logon identities for each operator. When the new operator runs N1MM Logger+ for the first time, it will create a new user files area for the Logger in that user’s Documents folder. During the process, it will ask the user to create a new database and enter the station data. Once this has been done, each operator is free to edit anything in their personal user files area to suit. This “individual login” method will result in different station callsigns, different databases, different contests, different Function Keys, different …everythings – except for the N1MM+ program itself. The individual operator will not have access to any of the databases created by other operators under separate logons. In effect, each user will have their own independent copy of the Logger, except that all of them will always have the same version of the program.
- Use a shared document folder for user files for all logon identities. This method can be combined with the previous one. You can do this by creating a copy of the initial user file area in the first user’s Documents folder in a publicly-accessible location. In Windows 7, 8 and 8.1, one possible location to do this would be a folder in a location outside all user file areas, such as at C:\HamRadio\N1MM Logger+. Another possible location could be in the Public files area (if it has been enabled) at C:\Users\Public\Documents\N1MMLogger+. In Windows XP, the equivalent would be C:\Documents and Settings\All Users\N1MMLogger+. Once this user file area has been created, all users on that computer will have access to it. Each user can then set up a second desktop icon for the program that uses a command-line option to allow the program to use a user file area that is different from the initial user-specific area. With a setup like this, users can choose either to use their own individual file areas or to use the shared user file area simply by choosing which desktop icon to run the program from. This is described in more detail in this part of the manual.
Subsequent Installation of the Latest Update of the Software
Update philosophy
Many of us are used to always being “one version behind” in the software we use, in order to avoid bugs that may have been introduced in the latest version. But because N1MM Logger+ is updated frequently, the opposite is true. You are always encouraged to use the latest version — in general, bug reports and feature requests should only be made after checking to make sure the latest version does not already include the bug fix or feature that you want, and also after checking the user group to see whether the request has already been made by someone else (please refrain from “me too” posts and requests).
When it is started, the Logger checks the web site for new versions. If a new version has been released since the last time the program was run, the program will offer to download and install the newer version. It is not necessary to accept the offer, although it is recommended that you do so. This check will only be done once per new version, i.e. if you do not accept the offer to download and install a new version, you will not be informed again about that version. The next offer to update will be displayed only after an even newer version has been made available.
An e-mail will also be sent out periodically to announce new versions (updates) of the program to the groups.io reflector members. If you wish to do an update manually, download only the Latest Update installer. Use the link contained in the announcement e-mail to the group, or open THIS WEB PAGE and select the update you want. If you have not updated for a while, you do not need to install any of the intermediate versions – just go right to the latest. The only exception might be updates that are marked as “Experimental” or otherwise explicitly marked as not for general use. These are very rare.
The Latest Update installer contains the latest .exes and other necessary files. Run this installer and it will quickly overwrite any old versions in the program directory.
Note that it is usually not necessary to run a new Full Installer. The only time this is necessary is when the major version number (the x.yy part of the x.yy.zzzz version number) changes. If the only change in version numbers is in the minor version number (the zzzz part), simply runnning the latest Update installer is all you need to do to upgrade to the latest version.
If you attempt to run an update installer whose major revision number is different from the previously-installed version on your computer (e.g. if the installed version number on your computer is 0.18.zzzz and the version number of the new update installer is 0.19.zzzz), you will see a message similar to the following:
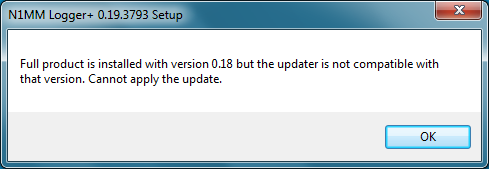
If you see this message, download the latest Full installer and install it. You do not need to uninstall the previous version; the new full installer will overwrite any old versions that need to be updated. After the full installer has run, you will be asked to restart your computer in order to complete the process of updating system files; this only happens with the full installer, not with normal updates using the latest Update installer. After the full install has completed and your computer has been restarted, you may proceed to install the latest update if its minor revision number is different from the minor revision number of the full installer you just ran.
Manually Installing a Latest Update
If you encounter an error when attempting to automatically install a Latest Update, you will need to get the file the old-fashioned way. To update manually:
- Go to the website
- Navigate to >Downloads >Program Files >Latest Update Files
- Right-click and Download the most recent “Latest Update” exe file
- Execute that EXE file locally from Windows File Explorer
Thereafter the Updates will resume automatic notifications.
Moving N1MM Logger+ to a New Computer
The easiest and best approach is simply to run the Full Installer and Latest Update to install the program on the new computer. Now copy your N1MM Logger+ user files folder and subfolders from the old machine to the user files location on the new one. Overwrite any “starter” versions of files and folders that are already there. (Note: on each computer, the user files folder can be found by running N1MM+ and using the Help > Open Explorer on User Files Directory menu item.)
We recommend deleting or renaming your old N1MMLogger.ini file, so that the program will create a new one. You can try keeping the old .ini file, but you will probably find that your old .ini file won’t work properly, because port numbers, port addresses, sound card numbers and other hardware-related items in the .ini file will probably be different on the new machine. It is a lot easier to make those changes in the Configurer than using Notepad and editing the old.ini file.
Moving Data from an N1MM Logger Classic Installation to N1MM Logger+
As mentioned above, N1MM Logger+ stores all user-created data, including databases, Function key message files, .wav files, Call History files, and User Defined Contest files in the N1MM Logger+ user files folder. You will need to copy each type of file to the appropriate folder from wherever you were storing them in N1MM Logger Classic.
Since N1MM Logger+ uses an entirely different database scheme, there is an option on the File menu in the Entry window to import and convert databases for use with N1MM Logger+. Click on Convert N1MM database to N1MM Logger+, select your old database, and a converted version will be placed in the right folder, ready for use. This only applies to databases, though – configuration information that was stored in N1MM Logger.ini cannot be converted automatically. You will have to configure these items using the N1MM Logger+ Configurer. Some other supporting files, such as function key message (.mc) files, User Defined Contest (.udc) files, Call History files, etc. will work directly; you can simply copy them from our N1MM Logger Classic program folder and copy them into the appropriate subfolder in the N1MM Logger+ user files area.
Converting Old N1MM Logger Classic Databases
There have been various changes to the N1MM Logger Classic database structure over the years. N1MM Logger Classic contained code to update its databases automatically if an older database was opened with a newer version of the code. This automatic upgrading code was not incorporated in the database conversion routines in N1MM Logger+. The only database format supported in the conversion routines is that used in N1MM Logger Classic version 14.0.0 (and newer). Therefore, if you wish to convert a database that was created in an older version of N1MM Logger Classic and that has never been opened by a program version 14.0.0 or newer, you need to perform the conversion in two steps: 1. Open the database in N1MM Logger Classic version 14.0.0 or newer and then close N1MM Logger Classic (this will automatically update the database structure); and 2. Use the N1MM Logger+ File menu option mentioned above to convert the updated database to the .s3db format used by N1MM Logger+.
Another common situation – you have more than one database in Classic, and you want to save them all together in one N1MM+ database. This detailed explanation from Rich, VE3KI:
For safety, first shut down N1MM+ and make a backup copy of your existing N1MM+ database. It’s in the Databases subfolder of your N1MM+ user files folder, with the name you gave it when you converted it. The file extension will be s3db – for example, ham.s3db or Contests2014.s3db, or whatever you called it.s3db. There will also be some other s3db files in the same folder – just leave them alone.
Start up N1MM Classic. Open the Classic database you want to convert. Do the following steps for each contest in that database: Open the contest and do an export to ADIF. Do not try to short cut by exporting all the contests at once. Each contest has to be exported separately so that it will have the correct Contest_ID in its ADIF file, and so it can be imported separately into its own contest instance in the N1MM+ database.
Now close Classic and open N1MM+. Create a new contest in your database for the first one you exported from Classic. The contest type must be the same as it was in Classic. Set the start date and time correctly for that contest so you can tell contests of the same type apart in the new database. Once the contest is set up correctly, do a File > Import from the ADIF file. Use Tools > Rescore Current Contest to update the score for that contest. Repeat these steps for each of the other contests you exported. All of your contests should now be in the one N1MM+ database.
Uninstalling the Program
If you are thinking of uninstalling and reinstalling the program in order to fix a problem you have encountered, you should know that this is rarely the solution. The majority of problems encountered by users are configuration problems that are not resolved by uninstalling and reinstalling. If the problem is a configuration problem, uninstalling and reinstalling in the same location will not fix it. Instead, LOOK HERE for suggestions for other, less drastic methods.
However … if you really want to uninstall N1MM Logger+ entirely, including any registry entries, the best way is to navigate to the program directory and find the program cleverly titled Uninstall.exe. with the N1MM Logger+ icon. Run the uninstaller and follow any prompts you see. Note that this will not remove your user files in the N1MM Logger+ user files folder. If you want to remove all traces of the program, you will need to remove this folder manually using Windows Explorer and the [Delete] button.
