
Setting up for a Contest
Preparing for a Particular Contest
Now that you have set up the hardware interfaces to your radio, including radio control (often called CAT), PTT, CW, etc., let’s move on to setting up for a particular contest.
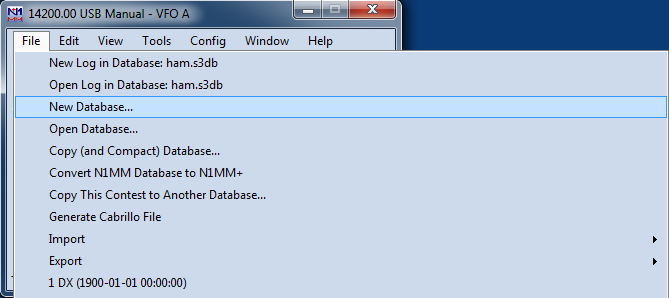
Note that the first database the program creates is named ham.s3db by default – you can have as many databases as you want, and name them what you want. Some people prefer to create a database for every contest, while others create one for a period of time, like every year. If you want to create a new database, for example “2020.s3db”, just click Files to drop down the menu, and then click on “New Database”.
That will open a standard file creation dialog in your N1MM Logger+ databases directory (inside the User files area):
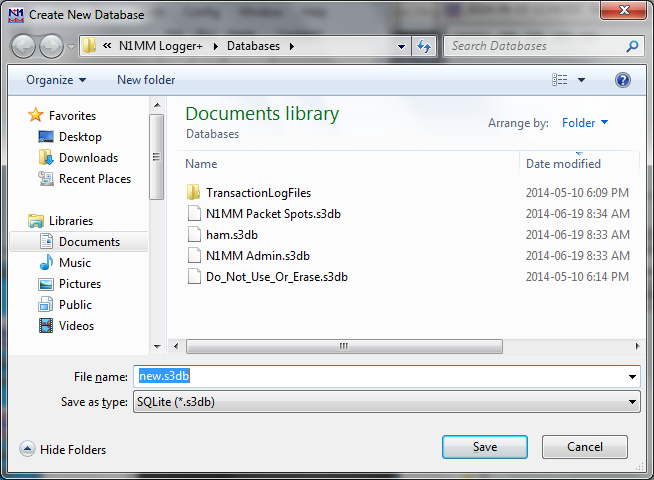
Name your new database and click Save. You’ll be switched to the new database and ready to go.
Back to the Files menu again. This time click “New Log in Database: XXXXXX” A new dialog opens, called the Contest Setup Dialog.
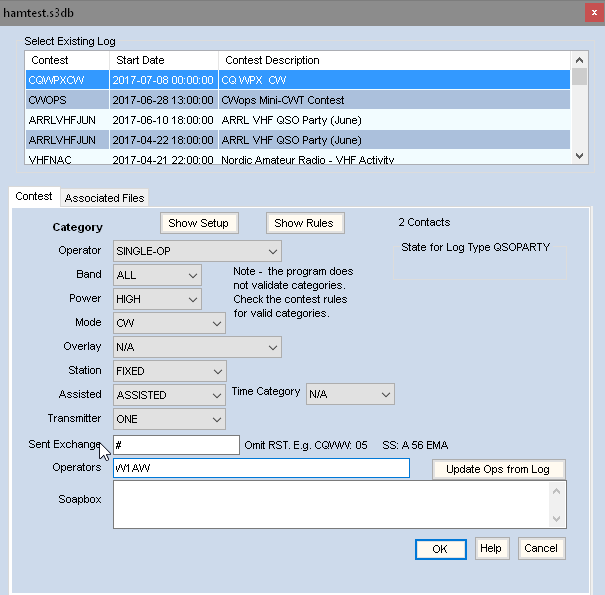
This dialog has two important aids to completing it properly, the buttons labeled “Show Rules” and “Show Setup”. Show Rules takes you (via Internet) to the sponsor’s web page, while Show Setup takes you (again via Internet) to the N1MM website’s Contest Setup page, located in this section of the manual. Typically, the latter will give you what you need to fill in the Contest Setup dialog.
The first thing to do is to click on the downward-pointing arrow in the Log Type field. That will open a list of abbreviated contest names. You can use your mouse to scroll through the list, or type the first letter of the contest to jump to the right general area. Once you have found the contest you want and highlighted it, click back in the original field and the drop-down list will close.
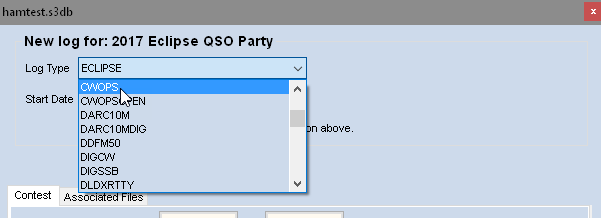
When you set up a new contest, the Start Date defaults to the Saturday (usually) following the current date. This can be useful if you have several versions of a given contest in your database. Year to year, dates of contests change, but the day of the week usually remains the same. For this reason, the program assumes that the contest will actually start on the correct day of the week (and time of day) following the date when the new contest was set up. For example, if you set up a new contest on Wednesday, and that contest normally starts at 0000Z on Saturday, the program assumes that 0000Z on the following Saturday will be the actual start time, for purposes of computing time on or off the air, and for displaying any goals you have set in the Info window.
To avoid confusion, it is best to set up the log you will actually use within a week before the start of the contest. You can always use a practice version earlier. So long as it is in the same database, you’ll be able to set goals, set up your function keys and other associated files, and all of this will be available for use when you set up the “real” log. Just create a new log for that contest with the correct starting date and time and you’re ready to go. You can delete the practice log or not, as you prefer.
Next, fill in the information in the next few fields, denoting the class and category you intend to enter in the contest. In each case, you have drop-down lists available. “Overlay category” refers to contests like WPX, which have both regular classes and categories like Rookie or “Tri-bander plus wires”. In most cases, “N”, for not applicable, is the answer you want there.
Beginning in 2011, some contests adopted the Cabrillo 3.0 standard for their log submissions, while others continued to require Cabrillo 2.0. The new standard (embraced by the ARRL, IARU and some others) required a different breakdown of information in the Contest Setup dialog. The one shown above is for Cabrillo 3.0. Both dialogs are self-explanatory, but you can find more information on the Contest Setup dialog for Cabrillo 3.0 here.
Next comes the most important part of this dialog, the Sent Exchange field. This field specifies what will be entered in your Cabrillo file as your sent exchange and what is inserted in the {EXCH} macro in your function key definitions:

For many contests, the program guesses what you will want, based on the contest type and the contents of your Station Information dialog. For example, in this case, since the CQWW contest uses CQ zones as the exchange, it has already entered the zone, based on the zone already entered in my Station Information. Of course, this can be overridden if it is incorrect. Note the “Omit RST” warning – do not include 59 or 599 in the sent exchange. If the contest you choose has serial numbers, like WPX or the NA Sprint, then you need to put “001” at the start of the Sent Exchange field, separated from what follows by a single space if there is more to the exchange. Hence, for WPX, the Sent Exchange would read 001. An important exception is the ARRL Sweepstakes. The serial number is assumed for this contest only, so for example N4ZR’s Sent Exchange for SS would read B 54 WV. More information on the Sent Exchange for individual contests is in the Supported Contests section of the manual.
Once you have filled in the Sent Exchange, you’re done for now. Just Click OK and hit Enter.
Trying It Out
So really, that’s all you need to operate contests with N1MM Logger controlling your radio – the Entry Window, the Check Window, the Log Window and the Bandmap.
For the purpose of this guide, we’ll assume that you’re operating in the CQWW SSB contest. In that case, the Entry window will look like this:
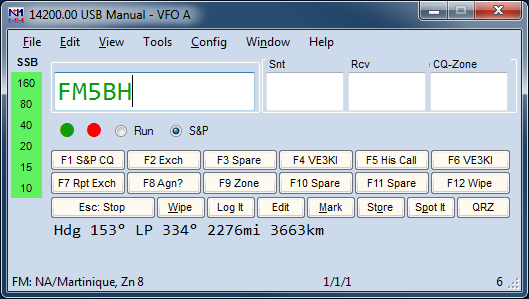
I’m assuming that you’re going to operate phone to start, so I have typed in USB in the call-sign field, and hit [Enter] I have left the default frequency (20M phone) in place, but if I wanted to show another band, I need only type a frequency (in KHz) in that band (like 21200, for example) in the call-sign field and hit [Enter] to change bands.
When I’ve done these things, I then type a call-sign in the call-sign field. Even before I look at the Check window, I see that the call sign is color-coded green. This means that it is both a new contact and a double multiplier (in this case, both the new country of Martinique and the new Zone 8). If I had already worked Zone 8 on this band, then the call sign would be color-coded red, signifying just a new country. If both the country and zone had been worked before, but the station has not, then the color code would be blue. If it is a dupe, the call sign will be coded grey, and the warning “Dupe!” appears to the right of the entry fields. There is also a column of band buttons to the left, all of which are also colored green in this example, indicating that this station would also be a double multiplier on each of the other bands. The beam heading is displayed below, as are the country, its zone and continent (which affects points per QSO).
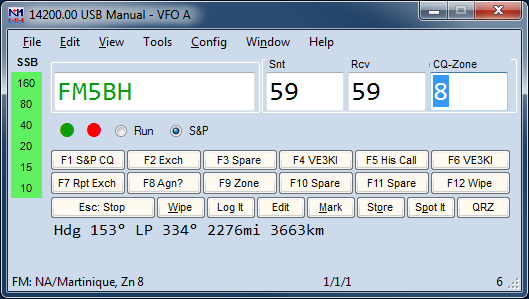
So, you call him, and he answers. At this point, just hit [Space] to fill in the expected signal reports and move the cursor to the Zone field. N1MM Logger uses the [Space] bar as a “smart tab.” The idea is that it will skip fields you are unlikely to want to change and move immediately to the one you may need to. Note, too, that the zone is highlighted. This means that if you need to change it … for example, if FM5BH really was in Zone 9 (he isn’t) – you would just type “9” and the “8” would be replaced.
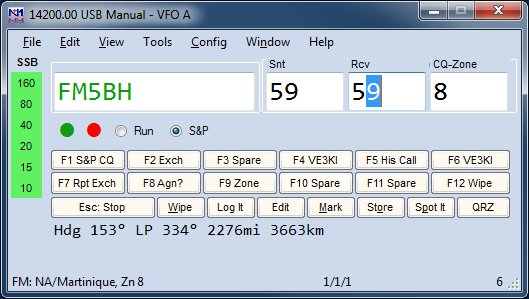
Ok, but suppose he gives you a “57” report instead of “59”. No problem – you just use the [Tab] key twice, and the cursor will be on the second digit of the received signal report, ready for you to type over. The [Tab] and Shift+Tab work just as you’d expect in Windows, moving forward or backward one field. Here’s how it looks:
If you need to correct the call-sign, use the [Space] bar to get you quickly there and edit as necessary. Then, once everything is as you want it (and the QSO is done), all you do is hit [Enter] , and the QSO will be logged.
One thing that trips everyone up at least once is that the program checks to make sure that you have entered everything, and that everything is correctly formatted. For example, if you accidentally fat-finger the zone number, like “89”, the program won’t let you enter the QSO. This can be disconcerting at first – you get an error message in the status line, like this:

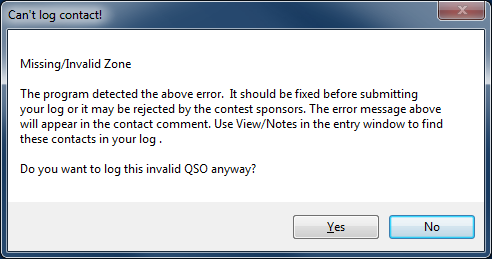
If the program has blocked you from logging the QSO, just use the [Space] bar to move to the appropriate field, correct it, and hit Enter to log. If you absolutely can’t figure out what the correction should be (for instance, with an ARRL section in Sweepstakes), you can hit Ctrl+Alt+Enter to bypass the exchange checking and log the QSO “as is”. or you can just press Enter again, which will give you the following warning dialog and allow you to log the contact despite the error:
Just in case you want to put a note in the log, when you use Ctrl+Alt+Enter to log an invalid contact, a note window opens. Type whatever note you want and Hit Enter, or just hit Enter to skip it and get back to the contest.
Suppose you miscopied a call sign, or he didn’t really come back to your call, so you now have a mistake in your log. If you need to delete the QSO altogether, just hit Ctrl+D. The program will ask you if you really want to move the QSO to a Deleted QSOs file. Just hit [Enter] to do so, or type N for No.
If you need to edit the QSO, hit Ctrl+Q, and put the program in QuickEdit mode:
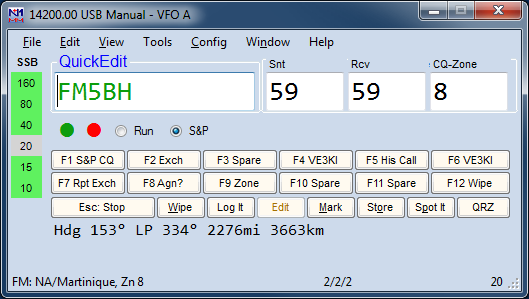
You’ll notice the words QuickEdit above the call-sign field. You can move through the fields as before and make your corrections. Then hit Enter and the QSO will be corrected in the log, or else hit [Esc] to get back to normal logging mode and cancel any changes. Be careful not to leave the program in QuickEdit mode for your next QSO, or you’ll screw up two QSOs at once!
As you log more QSOs, you’ll note that the call-sign of your last previous QSO will appear in the space right above the call-sign field. This area, called the Call-Frame, will be very important once you have interfaced the program with your radio, but for the moment it is just a reminder of who that last guy was.
Remember, unless you have interfaced your radio, each time you change bands, you need to enter the frequency of that band in the call-sign field, and, if you change modes, enter that there too. For example, if you switch to 40M CW, you would need to enter 7000 and then enter CW (separately) before you begin logging QSOs on that band.
