
Single Operator Contesting
SO2V and SO2R Operation
Many of the features of N1MM Logger+ work identically for SO2V and SO2R. Features common to both SO2V and SO2R are discussed in this section; unless specifically indicated, they will work in both SO2V and SO2R.
Single Operator 2 Radio (aka SO2R) is an operating technique that when done properly, can add many extra QSOs and multipliers to your log. This is accomplished by increasing your efficiency during slow times, for example, when you are CQing on one radio, but getting few answers. Efficiency is increased by listening on a 2nd radio while you are transmitting on the 1st radio. On the 2nd radio you are scanning the bands for needed QSOs and multipliers. If you find a new station to work on the 2nd radio, you leave it staged on the 2nd Entry Window until you get a free moment to work this station. Even adding a few QSOs an hour will greatly boost your score.
The philosophy for SO2R development is to allow any two radios to be used; they do not have to be identical. In its most simple form, two transceivers feed two separate antennas on two different bands. With sufficient attention to antenna separation and filtering, it is possible to do this without interference from a transmitting radio to a receiving radio. Many serious SO2R operators use identical radios to reduce the confusion factor, but having identical radios isn’t necessary.
The receiver on one band is used to locate new contacts during the time that the transmitter on the other band is active. This can mean that you tune the 2nd radio while N1MM Logger sends CQ on the 1st radio. The most critical requirement for SO2R is automated transmission — if you have to speak into a microphone or squeeze a paddle while you tune the receiver you will not make the most of the second radio. It’s easy to reach a level of mental fatigue while operating SO2R that results in an overall score reduction rather than helping your score.
If your radio is not supported by N1MM Logger, or it’s an older radio with no computer interface, the radio can still be used, but you just don’t get many of the advantages automated radio control offered by N1MM Logger.
N1MM Logger also supports “Single Operator 2 VFOs”, or SO2V. If your radio simply has 2 VFOs, VFO A/B will be assigned to each of the two Entry Windows. If you have a radio with a sub-receiver, each of the receivers gets assigned to each of the Entry Windows.
N1MM Logger’s SO2V interface is essentially identical to the SO2R interface, but with SO2V you are using a single radio. Two windows can be displayed in SO2V, one for VFO A & B. SO2V makes better use of the 2nd receiver now present in most high-end radios. With the 2nd receiver, you can be tuning the band while you are listening for a response to your CQ. Since you cannot listen on the sub-receiver while transmitting, SO2V is not as efficient as SO2R.
When operating SO2V or SO2R, you also need to change your LPT or Winkeyer keying from Radio 1 (default) to BOTH. Otherwise, you will not get any keying on VFO B or Radio 2.
A maximum of two radios are supported with N1MM Logger using a single computer. There is a workaround for 2-computer 2-radio SO2R, explained below.
For the new SO2R operator, we have 3 words for you: practice, practice, practice! SO2R is definitely a learned skill that takes time to learn, and even longer to master.
Intuitive User Interface
As you will quickly see, N1MM Logger’s SO2R implementation is more intuitive than most other SO2R implementations:
- Entry Windows can be arranged to reflect equipment layout
- Entry Windows can be used for any function (not dedicated functions like others)
- You always know what each VFO or radio is going to send next (when in ESM mode)
- Visual cues identifying transmit focus, Run vs. S&P, and more!
Supported Features
N1MM Logger supports all of the features you would expect from any world-class SO2R software. In addition, there are a lot of unique features:
- Two Entry windows are displayed that are fully interchangeable in functionality (windows are not dedicated to a specific task)
- Running and S&P modes are maintained for each SO2R Entry window, such that the 2 windows can be used for
- Running / S&P
- S&P / Running
- S&P / S&P
- Running / Running
- Entry windows can be arranged on screen as desired: typically left/right, or top/bottom, to represent physical station layout
- Each Entry Window has a frequency readout in the top pane
- ‘LEDs’ identify which radio has focus. The sending radio has a red LED indicating TX Focus, a green LED identifies the radio that has RX and Keyboard focus (combined)
- Background colors of the entry field change color depending on whether that radio is running or S&P: white = run; canary = S&P
- Ability to change frequency of inactive radio from the active radio. Use the / before entering the frequency in the callsign field to enter frequency for other radio/VFO
- Supports Enter Sends Messages Mode (ESM) on both windows
- Typing a call in inactive radio Entry window does not abort sending on the active radio
- Hitting Escape stops sending on either VFO or radio, but does not change keyboard focus
- Changing transmit focus (for any function) stops sending before switching and sending on alternate radio
- Ctrl+function keys and Ctrl+Enter sends messages on alternate radio (Concept is Ctrl = Alternate radio control)
- “Hotkey’s” for specific tasks and sending on alternate radio
- All Key Assignments work on both radios (unless otherwise specified)
- Supports Top Ten DX Doubler, WX0B Station Master, Microham MK2R, YCCC SO2R, and other SO2R controllers.
- Support SO2R without interfaced radios.
- Dueling CQ’s will send CQ alternately on each radio (Ctrl+B)
- If dueling CQ’s is enabled, and CQ sent then both radios become Run radios
- Ctrl+F1 or Ctrl+Enter will not start Dueling CQ
- Dueling SSB and CW CQ’s (different modes in each Entry window) are supported
- When you disable Dueling CQs, the pre-existing SO2R options are restored
- A SO2R software radio lockout for preventing both radios from operating on the same band is implemented
- CQ-repeat is terminated when a message is sent on the other radio
- The macro {JUMPRX} changes the receive focus to the other input window
- Supports 2 radios – No support for 3 or more radios
- Support SO2R with zero, one or two sound cards (5$ SO2R)
- When changing band using Ctrl+PgUp/Down key will skip the other radio’s band
- THIS IS NOT A SUBSTITUTE FOR HARDWARE LOCKOUT!!
- The sent CW will echo in the status bar of the Entry Window (only when in SO2R)
- During VOX operation, in “$5 SO2R” operation the TX audio should will track the TX focus all the time
Entry Windows
Entry windows can be placed anywhere on the screen. Typically people will position them similar to their equipment layout i.e. if the radios are positioned left/right, the windows are arranged reflect that. For those who stack their equipment top/bottom, you can position the screens so they logically mirror that radio setup too.
Screen real estate is in short supply. To minimize screen real estate, you can shrink the Entry Windows compared to the default layout. Below is an example of the default Entry Window and a minimized version. Also the use of two monitors more screen real estate.
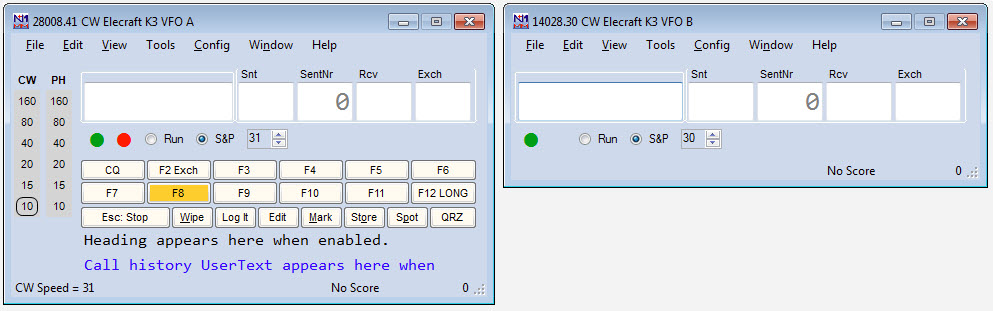
To launch the 2nd Entry Window, hit the \ button.
Most people who are comfortable with N1MM Logger+ tend to use the reduced size Entry Windows for the second radio or VFO.
All of the central features that are available to the single radio operator also work in SO2R/SO2V. For example, when tuning the band with the S&P VFO, spots that are in the bandmap are automatically inserted into each call frame (above the callsign in the Entry window) when you tune across the frequency of the spot. Hitting the Space bar will pull the callsign from the call frame into the callsign field. If a station calls you on the run radio, toggling back and forth between Entry Windows with the \ key or Ctrl Left/Right arrows will maintain the all of the information in each Entry Window until the respective stations are logged, wiped clean via Alt+W or Ctrl+W, or you QSY and the callsign is entered into the bandmap (if “QSYing wipes the call && spots QSO in bandmap” is implemented).
The SO2R/SO2V Dots (LEDs)
On the Entry Window a green and/or a red dot (LED) will be shown. The LEDs are visual aids that help you easily identify what is happening on each radio. This is part of N1MM’s continuing philosophy of letting the operator easily know what’s happening at any give time.
The green LED indicates that the VFO or radio has receive/entry focus and the red LED indicates that VFO has transmit (TX) focus. In addition, the red TX LED changes between dark red (not transmitting) and yellow (VFO/radio is transmitting).
Dot/LED Colors Used:
Green dot/LED – This VFO/Radio has receive (RX) and entry focus. RX and entry focus are always together.
- Receive focus can be toggled between the VFOs/radios by
- using a mouse to click on the background of one of the two Entry windows (SO2R only)
- pressing the \ key (backslash)
- To move both Transmit and Receive focus
- Press Pause or Ctrl+Left-Arrow / Ctrl+Right-Arrow to move both foci between the left and right radios.
Red dot/LED – This VFO/Radio has transmit (TX) focus. This means that the radio or VFO either is transmitting (a lighter orange-red color) or was the last to transmit and will be the one that transmits if you transmit by means other than pressing a function key (darker red color). When the other window has entry focus and you press a function key to send a stored message, the transmit focus shifts to that radio as soon as the function key is executed.
- Pressing Pause or Ctrl+Left-Arrow / Ctrl+Right-Arrow will move both foci between radios. If the foci are split, the first press of Pause moves the Transmit focus to the radio with the receive focus; thereafter, both foci will move together each time it is pressed.
- When transmitting the TX focus can not be changed.
Key Assignments for SO2R and SO2V
- Backslash ( \ ) – Launches a second Entry Window if only one Entry window is open
- One radio – Moves RX focus between the 2 VFOs on the radio
- Two radios – Moves RX focus between the 2 radios
- Ctrl+Enter – Send next ESM state on alternate radio or VFO (assuming ESM turned on)
- Ctrl+F1 to F8 – Send Fn message on alternate radio or VFO.
- Ctrl+Left Arrow – In SO2R move both Transmit and Receive/Keyboard focus to left radio, or in SO2V move both TX and RX/Keyboard focus to VFO A
- Ctrl+Right Arrow – In SO2R move both Transmit and Receive/Keyboard focus to right radio, or in SO2V move both TX and RX/Keyboard focus to VFO B
- Pause – Move both TX and RX Keyboard focus to other radio (or other VFO in SO2V). If TX and RX focus are split when you hit pause, TX focus will move to where the RX focus is
- Alt+F5 – Swap radio frequency, mode, and callsigns between VFOs (SO2V) or radios (SO2R). In SO2R, the receive focus changes to the non-active radio.
- Alt+F6 – Identical to Alt+F5 except the receive focus does not change. No effect in SO2V
- Ctrl+B (SO2R only) – Toggles dueling CQs on and off. Dueling CQ’s will send CQ alternately on each radio or VFO, with the RX focus moving to the Entry window that is not transmitting. If Dueling CQ’s is turned on, both radios become run radios. A delay can be inserted between each CQ by setting the “Set Dueling CQ Repeat Time” under the SO2R menu. Dueling SSB and CW CQ’s are supported too. An icon denoting Dueling CQs appears in the entry windows when dueling CQs are actually being transmitted.
The practice of alternating CQs on two frequencies in the same band is undesirable and is outlawed in many contests, because spectrum space is already scarce enough without multiple stations each taking up two Run frequencies. If your radio(s) can do it, reserve use of this feature for CQing on two different bands.
- Backquote (grave accent or unshifted tilde key (~) – Toggle STEREO mode on/off, or toggle Auto/PTT modes with modified DXD . Notes: On US keyboards, the key we are talking about is the key just to the left of the number 1 key.
- Ctrl+PgUp/Down – When changing band using Ctrl+PgUp/Down will skip the other radio’s band
- THIS IS NOT A SUBSTITUTE FOR HARDWARE LOCKOUT!
- Ctrl+Shift+K (SO2R only) – FocusOther, Another method of focus control (Focus on Other Radio), preferred by many contesters. When FocusOther is active, the RX focus is automatically shifted between the “Run” radio and the “S&P” radio, depending on whether the Run radio is transmitting. When the Run radio is transmitting, RX focus is shifted to the S&P radio. When the Run radio stops transmitting, RX focus shifts back to the Run radio, unless an unworked callsign has been entered in the S&P entry window. This allows a callsign to be entered in the S&P radio Entry Window while CQ is being sent on the Run radio.
- Ctrl+Shift+L (SO2R only) – This enables/disables the use of {CTRLFx} in function key macros. {CTRLFx} is a convenient way to automatically send a function key on the alternate radio. For example, by programming your S&P F4 key to “* {CTRLF1}”, your call will be sent on the S&P radio, immediately followed by your CQ message on the Run radio.
Bandmap Features
- Shift+Click on frequency – Jump to that frequency on the inactive radio, without changing TX or RX focus. This allows you to be active and sending on one radio and change the frequency on the other radio without making it the active radio.
- Shift+Click on bandmap callsign – Send the frequency to the inactive radio and place the callsign on the other radio’s callsign frame, without making it the active radio.
Single Operator Two VFO Operation (SO2V)
A number of N1MM users are interested in using the advanced VFO and/or subreceiver capabilities of modern transceivers to improve their scores by approximating SO2R techniques, but with a single radio. This has led to the definition of an operating mode called SO2V (Single Operator Two VFOs). This section will deal with the features of N1MM Logger that are designed for use in this mode.
Advanced SO2V for Radios with Separate Sub-Receivers
Additional SO2V features are available for radios that have dual receivers or Main/Sub receive. The list of such radios includes: IC-756/Pro/Pro2/Pro3,IC-7600/7610, IC7800/7850/7851, IC-781, Orion/2, K3/K3S, KX3, K4, TS-990, FTdx9000, FTdx5000, FT2000, FTDX101, FT1000/D/MP/MKV/MPSteppIr, and the Flex Radios.
In SO2V mode, the \ key changes the RX focus to the Sub receiver and enables the Sub audio if necessary (Orion). To use this feature set the CQ repeat time a little longer than normal and start a repeating CQ using VFOA (Main). If nobody answers, press the \ key to enable the Sub receiver and tune the band. Pressing \ again will change the RX focus back to VFOA and turn off the Sub RX if Config > Sub Receiver Always On is not checked. With Icom radios that only have one VFO knob, pressing the \ key also changes the knob association to the Sub VFO.
If you do not find someone to call before the CQ timer expires, the program will call CQ again on VFOA. With RX focus on VFOB (Sub) Entry window, typing a letter will cancel the repeating CQ running on VFOA.
Pressing a function key to call someone or send an exchange will automatically switch the TX focus to the proper VFO prior to transmitting. Some radios will impose a detectable delay during switching, other radios may switch faster because they require fewer configuration commands. If the RX focus is on then VFOB (Sub) Entry window and the CQ repeat needs to start again on VFOA, simply press the CTRL+CQ-Key. The program default for the CQ-key is F1 and this is set in Configurer > Function Keys tab.
If someone answers your CQ while the RX focus is on VFOB (Sub), press the \ key to change the RX focus prior to entering the callsign. If you want to change the TX and RX focus together press the PAUSE key.
There is special functionality associated with the Ctrl+Alt+D and Grave accent keystrokes for the SO2V radios. See the appropriate radio model in the Supported Radios section.
Approximating the Capability with Radios that do not have a Sub-Receiver
Some basic SO2V functionality has been implemented for all VFOA/B radios (those without a sub-receiver).
You may find the CTRL+Shift+Up/Dn command useful. It programs VFOB with the next spot Up or Dn in the Bandmap. When you have time to listen or call the station, press the PAUSE (or Ctrl+RightArrow) key. To return to your Run frequency, press the PAUSE (or LeftArrow) key, it won’t change your RUN frequency. Instead, the program will let you know that split is necessary with a status message at the bottom of the Entry window.
See the Supported Radios section of the manual for radio specific information regarding general and SO2V operation.
Some advice on using SO2V
SO2V is a kind of halfway point between SO2R (single-op two radios) and SO1V (standard single-receiver operation). The most efficient of the three is SO2R. The main advantage of SO2R over traditional one-radio one-VFO operation (SO1V) is that you can be listening in one QSO while you are transmitting in a different QSO. Ideally, you could be doing two QSOs at once on different bands even though you never have more than one transmitted signal at a time, interleaving between the two and doubling your overall speed (at least when things are going very well). This is simply not possible with only one radio, even if it has two receivers, but SO2V is an attempt to make use of the second receiver to gain at least some of the advantages of SO2R.
In SO2V, you are deaf whenever you are transmitting, so the key advantage of SO2V over SO1V is to be able to receive two signals in parallel. You don’t conduct two QSOs at once, but you can at least determine whether there is someone worth working on either of two frequencies at once. That would seem to require two receivers, one receiver in each ear, not just two VFOs. You need to be able to tell which signal is coming from which receiver (e.g. stereo headphones).
I am by no means all that proficient, but the main way I use SO2V is CQing on one frequency while S&Ping elsewhere (in the same band, or if they radio supports cross-band split, in another band). Again, more to get this out of the way than to describe SO2V, note that if it’s a good run, people are coming back to you right away and you don’t have time for SO2V techniques. In fact, what you may need is LOGTHENPOP to cope with multiple callers, and when you are doing this in CW or SSB you don’t need the distraction of a second receiver. Instead, you would leave the second receiver turned off while things are going this well.
However, if things slow down, as they often do late at night or late in the contest, then while you are CQing on VFO A and find you have to send CQ several times before anyone shows up calling you back, you can turn your second receiver on and start using it to S&P up and down the band while you keep on CQing.
After your transmitter stops at the end of the CQ message, in SO2V you have two receivers both active. One is on your transmit frequency, listening for someone calling you back. The other one is somewhere else, looking for a station CQing that you can call.
Suppose: (1) no-one answers your CQ (IMHO your first duty is always to answer someone who answers your CQ); and (2) you find someone on VFO B that you haven’t worked yet, and they are calling CQ or just about at the end of a QSO. In that case, what you can do is switch to the VFO B entry window (with the mouse if you are mousing, e.g. in RTTY, or with the \ key if you are keyboarding) and have (or try to have) a QSO on the VFO B frequency. Once that QSO is completed (or as soon as the other guy comes back to someone else instead of you), you switch back to VFO A, hope that someone hasn’t taken over your run frequency while you were away, and send a CQ again to repeat the whole process.
In SO2R, you can keep listening to the other station on the S&P VFO even while you are transmitting on your CQ frequency in between transmissions on the S&P radio, but in SO2V you have to stay on the S&P frequency for the entire duration of the S&P QSO, which means you run a significant risk of losing your run frequency. You have to weigh the risk of this happening against the benefit of picking up the S&P QSO during a dead period on your run frequency.
You might want to turn autoCQ off while you are doing this. If I leave autoCQ on, inevitably I find that the transmitter fires up at exactly the wrong time, just before the other station sends his call sign, or when his QSO is ending and it’s time to drop in my call sign on the VFO B frequency.
You can also use SO2V to S&P with two receivers at once. Tune one up the band and the other down the band at the same time, and simply decide which one to use based on where you hear a new station to work first. You can use the \ key to jump back and forth between the two entry windows.
SO2V is more productive if you are in the Assisted class. You can use spots from the cluster or RBN to guide where you tune with VFO B, instead of just tuning up and down the band. Instead of turning the VFO B tuning knob to find the next station to work, you can jump VFO B to the next workable spotted station using Ctrl+Shift+Up/Down arrows. This greatly increases the odds of quickly finding someone to work on VFO B versus just randomly tuning and screening out the ones you have previously worked.
You can also use the cluster this way in SO1V with only one receiver, but with a significant disadvantage. Once you tune away from your run frequency after listening for someone calling you back, you then often have to wait some more listening on the second frequency until the caller is at the right point for you to call him. With two receivers, you can time your CQs on VFO A so that you don’t have to waste time listening first on VFO A and then on VFO B; you can listen to both at the same time and line up the times so you either respond to a caller on VFO A if one is there, or else send your call to a CQer on VFO B, in this way minimizing the time you are away from your run frequency.
To set up for SO2V with a dual-receiver radio, you select the SO2V button in the Configurer, and in the Config menu you check the “Sub Receiver Always On” menu item. In RTTY, you can set up the two DI windows with two separate interfaces listening on different channels of the sound card and just leave both receivers on all the time. In CW/SSB, you will probably want to learn how to use the ` and Ctrl+Alt+D keys (see the documentation on Supported Radios) to turn the second receiver on and off.
I am probably missing some important things, but this is how I use SO2V with my dual-receiver K3.
SO2V RTTY with MMTTY
Instructions for setting up two copies of MMTTY for use in SO2V (Note: there are more detailed instructions on setting up for digital modes in the Digital Modes section – this section focuses on the SO2V aspects):
- Create two separate folders for the two copies of MMTTY. This allows each copy to have its own configuration. These folders must be outside the C:\Program Files and C:\Program Files(x86) paths
- Copy the MMTTY.exe, MMTTY.ini and UserPara.ini files (plus extfsk.dll if you use EXTFSK, or extfsk64.fsk if you use EXTFSK64) from the main MMTTY program folder into each of the two folders you will use for SO2V
- Start N1MM Logger and open the Configurer (Config > Configure Ports, Audio, Mode Control, Other)
- Select the Hardware tab
- Select the SO2V option
- This next step is optional for most users, but mandatory for some. If you are using serial ports for PTT and/or FSK from MMTTY, and you also use the same serial port(s) for CW or PTT keying from N1MM Logger+ in CW or SSB modes, then you may need to check the Digital check box beside the ports that are shared the two copies of MMTTY (for RTTY) and the Logger (for CW and SSB). If the only place you use a port is from MMTTY, you should skip this step, don’t mention the port at all in the Configurer, and perform all of the setup for this port within MMTTY
- Note that you must use either two serial ports, one for each copy of MMTTY, or no serial ports (AFSK; PTT controlled either by the main N1MM Logger program or in hardware, e.g. PTT via radio command or by VOX). If you are using two serial ports, their FSK keying outputs must both be connected to the radio’s FSK input (e.g. by wire-ORing the keying outputs)
- Click on the Set button for the port you will use with VFO A and set the Radio Nr and the Dig Wnd Nr both to 1
- Click on the Set button for the port you will use with VFO B and set the Radio Nr to 1 and the Dig Wnd Nr to 2
- Select the Digital Modes tab
- Under Digital Interface 1, TU Type, select Soundcard. Similarly for Digital Interface 2
- Under DI-1 MMTTY Setup, select AFSK or FSK as appropriate for your setup and set the MMTTY Path to point to the copy of MMTTY.exe in the first folder
- Under DI-2 MMTTY Setup, select AFSK or FSK as appropriate and set the MMTTY Path to point to the copy of MMTTY.exe in the second folder (this must be a different copy from the one in the DI-1 MMTTY Setup path)
- Close the Configurer
- Open the Digital Interface 1 Window (Window > Digital Interface menu item in the main VFO A Entry window). Make sure the program is in RTTY mode (if necessary, type RTTY into the Entry Window callsign box and press Enter)
- If an MMTTY window does not appear (e.g. if you see an MMVARI window instead), then in the DI-1 Window select the Interface > MMTTY menu item to open the MMTTY window
- Select the Setup > Settings menu item in the DI-1 window
- Under Preferred RTTY Interface, select MMTTY
- Under Alignment Frequency, enter your Mark audio frequency (e.g. 2125)
- Under MMTTY Window Settings, select either Normal or Control Menus, in order to have easy access to the MMTTY setup window
- Click on Save Configuration
- In the MMTTY window for the first copy of MMTTY (the title bar reads RTTY Engine 1), select the Option(O) > Setup(O) menu item
- Select the TX tab and set the PTT & FSK port you will be using for the VFO A copy of MMTTY (this is the port with Dig Wnd Nr = 1 in the Configurer). If you are using AFSK and doing PTT from the main N1MM Logger program, set this port to None
- Select the SoundCard tab (MMTTY version 1.66 or newer) and select the Reception sound card you will use with VFO A. If you are using AFSK, you must also select the Transmission sound card
- Under the Misc tab, select the channel (left or right) under Source (usually the left channel for VFO A )
- Close the MMTTY Setup window
- Check the Config > Sub Receiver Always On option in the main Entry Window to ensure that both receivers will be on
- If the second Entry window is not open, open it by pressing the Pause key, the backslash (\) key or Ctrl+Right Arrow
- Open the Digital Interface 2 Window (Window > Digital Interface menu item in the VFO B Entry window). Make sure the program is in RTTY mode for VFO B (if necessary, type RTTY into the VFO B Entry Window callsign box and press Enter)
- If an MMTTY window does not appear (e.g. if you see an MMVARI window instead), then in the DI-2 Window select the Interface > MMTTY menu item to open the MMTTY window
- In the MMTTY window for the second copy of MMTTY (the title bar reads RTTY Engine 2), select the Option(O) > Setup(O) menu item
- Select the TX tab and set the PTT & FSK port you will be using for the VFO B copy of MMTTY (the port with Dig Wnd Nr = 2 in the Configurer); this must be a different COM port from the one that is used for VFO A. If you are using AFSK and doing PTT from the main N1MM Logger program, set this port to None
- Select the SoundCard tab (MMTTY version 1.66 or newer) and select the Reception sound card you will use with VFO B. If you are using AFSK, you must also select the Transmission sound card (in SO2V this will likely be the same as the Transmission sound card used for VFO A)
- Under the Misc tab, select the channel (left or right) under Source (usually the right channel for VFO B )
- Close the MMTTY Setup window
SO2R – Single Operator Two Radio Operation
Using SO2R Key Assignments
Backslash ( \ ) – Once you have launched your second Entry Window, the \ key will likely be your most widely used key in SO2R. The \ key will move RX and Entry focus between Entry Windows A & B (often referred to as Radio 1 & Radio 2 respectively). When using the \ key to control RX focus, you really don’t have to worry where TX focus is. By using the \ key to control only RX focus, when you hit a Fn key or Enter (using ESM), the TX focus will move to where the RX focus is, and send the corresponding message.
Example: You are CQing on Radio 1, and S&Ping on Radio 2. Both RX and TX focus start off in your Run Entry Window (Radio 1 in this example). You are S&Ping on Radio 2, and you hear someone on the S&P radio you want to look up in your Check Window. Hit the \ key to move RX focus to the S&P Entry Window. You type in the call, and you need it, and are just waiting for a good time to send your call. If no one is answering your CQ on the Run Radio, just hit the Enter Key (assuming you are using ESM), and the TX focus will move from the Run Radio to the S&P radio (Radio 2), and send your callsign (actually the first ESM message in the S&P sequence). If the station comes back to you, then hit Enter again to send your exchange, and you just completed a S&P QSO. Now move the RX focus with the \ key to the Run radio, or just leave it in the S&P Entry Window if S&P is more productive.
Now let’s assume in the middle of the S&P QSO, someone answers your CQ on Radio 1. Your exchange just happens to be sending on the S&P radio. To copy the call on the Run Radio (while your exchange is being sent on the S&P radio), hit the \ key to move RX focus to the Run Radio, and type his call in the Run Entry Window. Assuming your exchange is finished sending on Radio 2, just hit Enter again, and the TX focus will move back to the Run Radio, and the program will send his call and your exchange on the Run Radio. You now have QSOs going on both radios! Just move RX focus as needed to send/copy on what ever radio you need. This is easier said, than done during a contest !
In the above examples, you never have to control where TX focus is, since TX focus always moves automatically to where the RX focus is when Fn or Enter (ESM) is used. This should be your standard operating mode, as you only need to worry about using a single key to do most of your navigation between the two Entry Windows.
Ctrl+Enter, or Ctrl+Fn – Using these commands will send the corresponding message on the alternate radio; with the alternate radio defined as the radio that does not have RX focus. Using Ctrl+Fn (or Ctrl+Enter) will only move the TX focus to send the message – RX focus will stay in it’s current location. Once the message is sent, TX focus will remain on the alternate radio. This is done by design.
The most common scenario would be if you are CQing on Radio 1, but you are not getting callers. You hit the \ key to copy a callsign on the S&P radio. Without moving the RX focus from the S&P radio, at some point you will probably want to send another CQ on the Run Radio. You do this by hitting Ctrl+F1 or Ctrl+Enter. You will also likely use these commands if you have a QSO in progress at the same time on both the Run and S&P radio. The easiest way to send a message at the right time on the other radio is to use these commands, and leave RX focus where it is. Alternatively, you can program function keys with the {CTRLFx} macro to send messages to the other radio.
Pause Key – If both TX and RX focus are in the same Entry Window, hitting Pause will move both TX and RX focus to the other radio. If TX and RX focus are split between the Entry Windows, the pause key will move TX focus to where RX focus is. Mostly you will use this key in order to get your foci back in sync.
Ctrl+Right Arrow and Ctrl+Left Arrow – These commands will force both TX and RX focus to the right or left radio.
Ctrl+B – Toggle Dueling CQ’s.
{CTRLFn} macro – This macro allows the user to send on the other radio.
- Make sure that “Toggle {CTRLFx}” macro is checked on in the Configurer SO2R submenu (or use Ctrl-Shift-L to enable/disable the use of {CTRLFx} macros. When disabled, the {CTRLFx} macro is ignored.
- Thus, a CW Button might look like: “tu EXCH{CTRLF9}” Where F9 on the other radio is set to send a CQ.
- Example: If your entry focus is on the S&P radio and you manually press Ctrl+F1, the program will send F1 on the OTHER radio. That’s all the {CTRLFx} macro does. For a simple test, modify your S&P F4 key to read *{CTRLF1}. Now, when you press that key, the program sends your call on the S&P radio and then sends the contents of F1 on the Run radio. In a practical situation, you would probably not want to send a full-length CQ while trying to work someone on the S&P radio, because that will nearly always require you to interrupt it before it is done. So the idea of {CTRLFx} is that you can stash a short CQ (like “N1MM test”} in, for example, Run F12. Then make S&P F4 read “* {CTRLF12}. Now when you press F4 on the S&P radio, it will send your call, and immediately switch to the Run radio and send F12, that very short CQ. Should help hold your frequency.
- Another way to use this: Make your S&P F2 read, for example, 5NN14{CTRLF1}. Then when you press F2 or Enter to send your exchange and/or log the S&P QSO, the program will automatically begin a CQ on the Run radio as soon as that is done.
Mouse Assignments
- Left mouse and Right mouse buttons_
- On an empty space in one of the two Entry windows, these mouse buttons change the Receive focus to that radio/VFO
SO2R Menu
- SO2R
- Dueling CQ’s (Ctrl+B) – SO2R feature that alternates sending CQ on each radio in turn, listening on one while transmitting on the other. Supported for both CW and SSB. Changing either radio in frequency more than 200 Hz will terminate Dueling CQ.
- Set Dueling CQ Repeat Time (msec) – Adjusts time in milliseconds after CQ ends on one radio before it starts on the other (default 100 msec).
- Set Radio Swap Transmit Tail Time (msec) – Time delay after a radio has stopped transmitting, before initiating transmission on another band. Typically used to interrupt a CQ on one radio to S&P on the other radio.
- Set Radio Swap Transmit Lead Time (msec) – Time delay when swapping radios, whether or not the radio is transmitting. Typically used to allow station accessories to detect that the active radio has been changed.
- Focus on Other Radio – A method of focus control preferred by many contesters. When FocusOther is active, the RX focus is automatically shifted between the “Run” radio and the “S&P” radio, depending on whether the Run radio is transmitting. When the Run radio is transmitting, RX focus is shifted to the S&P radio. When the Run radio stops transmitting, RX focus shifts back to the Run radio, unless an unworked callsign has been entered in the S&P entry window. This allows a callsign to be entered in the S&P radio Entry Window while CQ is being sent on the Run radio.
- FocusOther Always Swap – Used in conjunction with Focus on Other Radio. Focus always switches to the other radio when one radio is transmitting, and always switches back to the original radio when transmission is completed.
- Toggle CTRLFx Macro – This enables/disables the use of {CTRLFx} in function key macros. When enabled and present in one of the function key definitions, the {CTRLFx} macro executes Fx (Function key definition x) on the opposite radio. An example is TU{CTRLF1} in Radio 2’s F3 slot, which sends TU and then sends the other radio’s F1, used to get quickly back to the Run radio and call CQ after finishing an S&P QSO on Radio 2.
- Toggle Stereo/OTRSP Macro (Ctrl+~) – Can be used to enable/disable all {STEREOOFF}/{STEREOON} and {OTRSP RX}/{OTRSPOTHER RX} macros temporarily. Used to disable stereo switching if only one EntryWindow is being used temporarily.
- Two Keyboards – Enables the use of two keyboards, one for each Entry window. Plug in two keyboards before starting N1MM Logger+. The first keyboard you type in after starting the program will control the left (Radio 1) Entry Window. The other keyboard will control the right (Radio 2) Entry Window. The pause key is disabled, since you no longer need to be able to switch Entry windows from a single keyboard. The \ key moves keyboard focus to the Entry Window associated with that keyboard without actually sending any keyboard commands to that window. Note that the use of keyboard remapping software, such as AutoHotKey, may not work correctly with two keyboard operation.
- TX Lockout ((Digital) – Select a lockout item (Digital modes only)
- Multi-TX – This is the default setting. Start CQ on radio A, start CQ on radio B, both are active (no lockout)
- First one wins – Start CQ on radio A, pause, start CQ on radio B. The radio B CQ is ignored since radio A is already active, so if you press a F-key for the second radio while radio1 is transmitting, the radio B F-key is ignored
- Last one wins – Start CQ on radio A (CQ starts), pause, start CQ on radio B. The CQ on radio A will be aborted and the CQ on radio B will start so if you press a F-key for the second radio while radio A is transmitting, the radio A transmission is interrupted and radio B transmits
Software lockouts are inherently less reliable than hardware systems, because of the vagaries of networking, RFI, etc. We urge you not to rely solely on software lockouts to prevent rule violations or hardware damage.
The Focus Other (Ctrl+Shift+K) and Ctrl+Fx settings, whether controlled through keyboard shortcuts or through the SO2R sub-menu of the Configurer, are “sticky” – that is they are remembered the next time the program is opened. This can surprise you if you don’t remember having set them.
Software Setup
Setting up SO2R and SO2V starts in the Config menu:
- Config > “Configure Ports, Telnet Address, Other” > Hardware Tab
| If SO2R | If SO2V |
| Set up radios | Set up radio |
| Set up keying if necessary (Serial port, LPT port or Winkeyer) | Set up keying if necessary (Serial port, LPT port or Winkeyer) |
| Click SO2R button | Click SO2V button |
| Click OK to close out | Click OK to close out |
| Launch N1MM Logger, set up contest etc | Launch N1MM Logger, set up contest etc |
| If 2nd Entry Window is not shown, hit the \ key (backslash key) | If 2nd Entry Window is not shown, hit the \ key (backlash key) |
| Selected mode | Radios attached | Choices | Selection |
| SO2R | none | SO2R – Left Manual, Right Manual | Automatically selected |
| SO2R | 1 (Kenwood) | sO2R – Left Manual, Right Kenwood Com1 SO2R – Left Kenwood Com1, Right Manual | Select one |
| SO2R | 2 (Kenwood & FT847) | SO2R – Left Kenwood Com 1, Right FT847 Com 2 SO2R – Left FT847 Com1, Right Kenwood Com 2 | Select one |
| SO2V | 1 (Kenwood) | SO2V – Kenwood | Automatically selected |
LPT Keying
When operating SO2V, and using LPT port keying, the Radio Nr in the LPT port configuration must be set to Both.
When operating SO2R, and using a single LPT port for keying, the Radio Nr in the LPT port configuration must be set to Both. This configuration will require an external box to switch the keying line between the two radios. The external box can be controlled using LPT pin 14.
When operating SO2R and using a separate LPT port for each radio, the Radio Nr in each LPT port configuration must be set to The corresponding radio, 1 or 2.
Winkeyer and WinkeyerUSB keying
When operating SO2R, and using Winkeyer, the Radio Nr in the Winkeyer COM port configuration must be set to Both.
When operating SO2R, and using a single Winkeyer port for keying and PTT, the Radio Nr in the Winkeyer COM port configuration must be set to Both. This configuration will require an external box to switch the keying line between the two radios. The external box can be controlled using LPT pin 14.
When operating SO2R and using Winkeyer’s 2nd CW and PTT Outputs (available in later models), the Radio Nr in the Winkeyer COM port configuration must be set to Both.
SO2R Radio Support
All supported radios will work with SO2R. N1MM Logger will allow you to use any combination of computer controlled and non-computer controlled radios. If you use a radio that is not supported or has no radio control, do not set up a radio COM port. You only set up that information when you have a computer controlled radio.
Using External SO2R Controllers
N1MM Logger is compatible with most older hardware SO2R controllers using the LPT port such as the Top Ten Devices “DX Doubler”, and the Array Solutions “SO2R Master”. These products will automatically switch keying, PTT and audio lines between radios. New products like the microHAM MK2R can be fully controlled via USB or via an LPT port. The EZmaster from Ham Radio Solutions is only supported using its LPT port and not its USB port.
Controllers using the LPT port will require a straight-through DB-25 cable from your LPT port of your computer to the input DB-25 connector.. For hooking up the rest of the keying and audio lines, consult their respective manuals. All products use the same pin-outs on the LPT port.
To get N1MM Logger to correctly key and control these devices, you need to set up your keying as follows:
LPT Keying with External SO2R Controllers Using LPT Port
- Open Config >Configure Ports, Mode Control, Other >Hardware tab
- Check LPT keying box – check only one LPT box unless using another one for antenna selection control
- Click on the corresponding “Set” button for the LPT port
- Click on “Radio Nr” drop down box and select “Both”
- Click on OK to set configuration
Using Winkeyer and WinkeyerUSB
The original Winkeyer, used a RS-232 COM port, and is not a USB device. Winkeyer has an internal pin 3 output, which is normally CW for 1 radio, and an internal pin 5 which is normally PTT for a single radio. Under N1MM Logger software control, pin 3 can set for Radio 1 CW output and Pin 5 can be set for Radio 2 CW output. The virtual serial port assigned to the Winkeyer USB device should have the “Hardware” tab “Set” and Winkeyer checked and Radio Nr set to ‘Both’. Then go to the “Winkeyer” tab and set Pin 5 function to “2nd CW”
The “K” output on the Winkeyer board goes to Radio 1 CW and the “P” output goes to Radio 2 CW. N1MM Logger takes care of all the switching provided you activate the proper radio.
The WinkeyerUSB (sometimes called “Winkeyer 2”) has separate CW and PTT outputs for each radio. The 2nd radio CW is enabled from the Winkeyer tab “Use 2nd Output”.
SO2R Using the DX Doubler
Setting Internal DXD Jumpers to Enable Stereo Feature
Thanks to W4NZ, long-time N1MM and DXDoubler user, for the following:
Here is my baseline configuration – the one that has been working for me in contests for quite a while. This is also compatible with all the SO2R features in N1MM. Control of the DXD is from a hardware LPT port.
Jumper 1: 2-3
Jumper 2: 5-6
Jumper 3: 9-10
Coincidentally, these are the same as the jumper settings for the “NA” software as shown in the DXDoubler manual.
If you change the jumper settings to those shown in the DXD manual for CT/TR/WL,
Jumper 1: 1-2
Jumper 2: 4-5
Jumper 3: 8-9
then testing the SO2R features, N1MM Entry window focus moves to the correct radio just as it should but the DXD does not automatically switch radios (RX audio/TX focus) to follow the window focus. However, the DXD can be switched manually by using the PAUSE key or CONTROL + Left/Right Arrow. The Backslash key (\) also moves focus without switching the DXD.
With the NA jumper settings, now you can use the “tilde” key (~/`) to toggle stereo audio (Left radio-left ear/Right radio-right ear) on and off.
You can use the macros {STEREOON} {END} {STEREOOFF} in Function Key Messages) to switch the audio automatically according to the operator’s preference. Refer to this page for more details.
Example for F1 – CQ Message: {STEREOON} CQ TEST * * TEST {END} {STEREOOFF}. This sequence will turn on Stereo during transmission of the CQ so that you can listen on the second radio, and then go back to both ears on the CQing radio when the CQ finishes. Note that the {END} macro is required, because otherwise the {STEREOOFF} macro will be executed before the CW is sent.
LPT Port Basic SO2R Controller Design
A basic SO2R controller design … it’s about as simple as there is but it works well with N1MM (or Writelog) in LPT mode. I decided to add support for CW from the LPT – the PTT relay can be replaced with a SPDT relay if CW is taken from two COM ports or Winkeyer USB is used (better). Joe, W4TV – 5/30/2009 – Revision 1.0
Basic SO2R LPT Port – Receive Interface
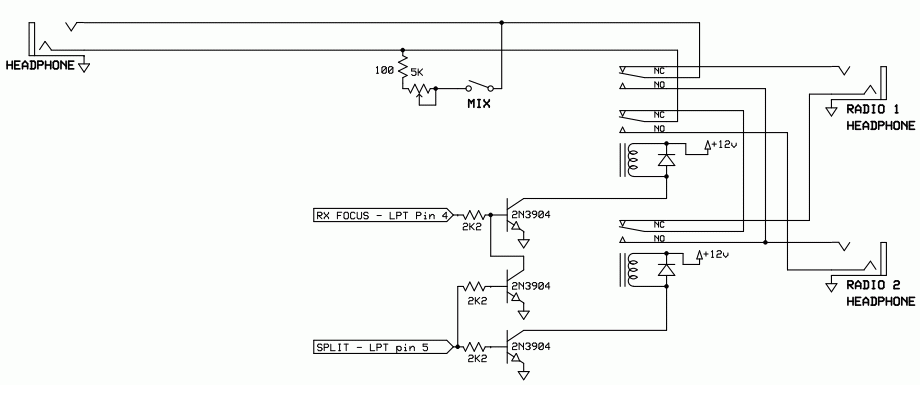
Basic SO2R LPT Port – Transmit Interface

Focus on Other Radio (FocusOther)
A method of focus control, preferred by many contesters. When FocusOther is active, the RX focus is automatically shifted between the “Run” radio and the “S&P” radio, depending on whether the Run radio is transmitting. When the Run radio is transmitting, RX focus is shifted to the S&P radio. When the Run radio stops transmitting, RX focus shifts back to the Run radio, unless an unworked callsign has been entered in the S&P entry window. This allows a callsign to be entered in the S&P radio Entry Window while CQ is being sent on the Run radio.
SO2R and MMTTY
Instructions for setting up two copies of MMTTY for use in SO2R (Note: there are more detailed instructions on setting up for digital modes in the Digital Modes section – this section focuses on the SO2R aspects):
- Create two separate folders for the two copies of MMTTY. This allows each copy to have its own configuration
- Copy the MMTTY.exe, MMTTY.ini and UserPara.ini files (plus extfsk.dll if you use EXTFSK, or extfsk64.fsk if you use EXTFSK64) from the main MMTTY program folder into each of the two folders you will use for SO2R
- Start N1MM Logger+ and open the Configurer (Config > Configure Ports, Audio, Mode Control, Other)
- Select the Digital Modes tab
- Under Digital Interface 1, TU Type, select Soundcard. Similarly for Digital Interface 2
- Under DI-1 MMTTY Setup, select AFSK or FSK as appropriate for your setup and set the MMTTY Path to point to the copy of MMTTY.exe in the first folder
- Under DI-2 MMTTY Setup, select AFSK or FSK as appropriate and set the MMTTY Path to point to the copy of MMTTY.exe in the second folder
- Select the Hardware tab
- Select the SO2R option
- This next step is optional for many users, but mandatory for some. If you are using serial ports for PTT and/or FSK from MMTTY, you may need to check the Digital check box beside the ports used by the two copies of MMTTY. This step is necessary if you use the same port for CW or PTT keying from N1MM Logger in CW or SSB modes; if the only place you use a port is from MMTTY, this step is unnecessary
- Click on the Set button for the port you will use with Radio 1 and set the Radio Nr and the Dig Wnd Nr both to 1
- Click on the Set button for the port you will use with Radio 2 and set the Radio Nr and the Dig Wnd Nr both to 2
- Close the Configurer
- Open the Digital Interface 1 Window (Window > Digital Interface menu item in the main or Radio 1 Entry window)
- If an MMTTY window does not appear (e.g. if you see an MMVARI window instead), then in the DI Window select the Interface > MMTTY menu item to open the MMTTY window
- Select the Setup > Settings menu item
- Under Preferred RTTY Interface (lower left), select MMTTY
- Under Alignment Frequency (lower right), enter your Mark audio frequency (e.g. 2125)
- Click on Save Configuration
- In the DI Window, select the Setup > Setup MMTTY menu item
- Select the TX tab and set the PTT & FSK port you will be using for the Radio 1 copy of MMTTY
- Select the SoundCard tab (MMTTY version 1.66 or newer) and select the Reception sound card you will use with Radio 1. If you are using AFSK, you must also select the Transmission sound card
- Under the Misc tab, select the channel (left or right) under Source. If you are using an older version of MMTTY, you may also have to set the Device numbers (this is not necessary if you have selected the sound card using the SoundCard tab)
- Close the MMTTY Setup window
- If the second Entry window is not open, open it by pressing the Pause key, the backslash (\) key or Ctrl+Right Arrow. In this window, select the Window > Digital Interface menu item to open the second Digital Interface window. Repeat the above steps using the COM port, sound card device and channel you will use with Radio 2
SO2R RTTY with 1 Soundcard
If you have a two-channel sound card and the necessary cabling to send audio output from both radios to the line input of the same sound card (left radio on the left channel, right radio on the right channel), you may be able to use a single sound card for SO2R RTTY. Just set both MMTTY instances to the same card, and in the configuration for each copy of MMTTY select the appropriate channel for that radio. Note that for AFSK transmit, MMTTY only uses the left channel regardless of which channel it is using on receive. Therefore if you are using AFSK for transmitting you will have to route the audio output from the left channel of the sound card to the audio inputs on both radios and rely on the SO2R switching to control which radio gets PTT.
If your sound card does not support separate inputs for the two channels, such as a laptop sound card with only a mono mic input, you won’t be able to do this and you will have to use two sound cards for SO2R.
Two-Computer SO2R
Some operators, particularly on RTTY, prefer to use separate computers for SO2R. This is not explicitly supported by N1MM Logger, but there is a way.
First, be sure both computers are running the same version of N1MM Logger. Turn on Networked-Computer mode (Config >Networked-Computer Mode), and configure the network between your computers as explained in the manual pages for the Network Status Window. Then set up your contest class as Multi-One.
Set your lockout style under the Network Status Window’s Options tab as explained in the Network Status Window documentation:
- First One Wins
- Make sure both stations are designated as “Run” stations
- Check the “Block my transmitter with M1 & M2 contest rules” checkbox
- Last One Wins
- Make sure both stations are designated as “Run” stations
- Check the “Block my transmitter with M1 & M2 contest rules” checkbox
- Check the “Stop my station from transmitting to prevent other station block” checkbox
Note that these are not band lockouts; they are only transmitter lockouts. They are not intended to prevent damage from operating both radios on the same band. They are intended only to prevent both radios from transmitting at the same time in violation of contest rules. Also, they are dependent on the reliability of networking. Network dropouts or high network latency can cause them to fail and allow overlaps between transmissions on the two radios.
Please note that a number of N1MM Logger’s advanced SO2R features cannot be used in this style of SO2R operation,. The list includes Ctrl+Fx (send Fx on the opposite radio), {CtrlFx} (the same option implemented as a macro), dueling CQs, and FocusOther. All of these require both radios to be connected to the same computer. Serial numbering, if used, will conform to the Multi-Single rules for the contest in question.
Don’t forget to change your entry class back to Single Op or Single Op Assisted in the Contest Setup window before you generate your Cabrillo file.
Please be aware that the developers will not implement Feature Requests or respond to Bug Requests that result from 2-computer SO2R’s not conforming to single-computer SO2R expectations.
Two Band Split Interleaved QSO (2BSIQ) with the YCCC Controller
This description of a sample 2BSIQ configuration posted to the N1MM+ reflector by Steve N2IC on 2019-05-30:
First of all, let me make it clear – there is nothing easy about doing 2BSIQ. I feel exhausted after just a few hours. I have huge respect for guys like KL9A, N6MJ, 8P5A (W2SC), CT1BOH, N4YDU, etc. that strive to stay in 2BSIQ mode for 48 hours. I couldn’t do it. Also, my way is not the only way to do it with N1MM+. I encourage folks to experiment and see what works best for them.
Settings:In SO2R menu: Two Keyboards, Toggle Stereo/OTRSP Macro. Nothing else checked.Configurer, Function Keys – set Again Key to F7.ESM (of course !)All radio sidetones muted.
In the YCCC SO2R Box settings, Headphones Normal. No latch or split stereo.
Make sure that two keyboards are activated – type one character on the left keyboard, it should appear in the left entry window. Type one character on the right keyboard, it should appear in the right entry window. Two keyboard mode is now activated.
I do all CQing manually by pressing the Enter key on each keyboard when needed. No dueling CQ or other automation. One hand on each keyboard. Yes, it has taken lots of practice to be able to use only one hand on each keyboard. Breaks all rules about touch typing that you might have learned.
Here’s the .mc file I used for WPX CW.
F1 Cq,cq test *{OTRSPOTHER RX}{END}{STEREOON}
F2 Exch,5nn|||#{OTRSPOTHER RX}{END}{STEREOON}
F3 Tu,tu *{CLEARRIT}{OTRSPOTHER RX}{END}{STEREOON}
F4 {MYCALL},*
F5 His Call,!
F6 ?,?
F7 NR,#
F8 LOGIT,{LOG}
F9 nr?,nr
F10 Call?,cl?
F11 STERTOG,{STEREOTOGGLE}
F12 RX Ant Toggle,{ANTRX1TOGGLE}
#S&P ———-, Search and Pounce Messages begin here —————————–
F1 Qrl?,cq test *
F2 Exch,5NN|||#
F3 Tu,tu
F4 {MYCALL},*{CTRLF7}{END}{STEREOON}
F5 His Call,!
F6 Repeat,{SENTRSTCUT} {EXCH} {EXCH}
F7 NR,#
F8 LOGIT,{LOG}
F9 nr?,nr
F10 Call?,cl?
F11 STERTOG,{STEREOTOGGLE}
F12 RX Ant Toggle,{ANTRX1TOGGLE}
The CQ is kept very short to match the duration of the callsign you are receiving on the other radio. The F11 {STEREOTOGGLE} is wired to a footswitch. You often want to quickly get out of stereo to focus on one radio. Pressing the footswitch is faster than searching for the ~ key.
Here’s an ideal 2BSIQ sequence. Each line represents events happening at the same time. The —- separates left and right entry window actions.
CQ enter key left keyboard—-(nothing done on right keyboard).
Station answers, type call on left EW—-CQ Enter key right keyboard (press the CQ enter immediately after the left CQ has completed).
Send run exchange enter key left keyboard—- Station answers, type call on right EW.
Receive exchange, typing on left keyboard—- Send run exchange enter key right keyboard.
Send TU enter key left keyboard—- Receive exchange, typing on right keyboard.
Station answers, type call on left EW—- Send TU enter key right keyboard.
There – you have just completed two QSO’s, simultaneously (and a third QSO is just getting started on the left EW). Ideally, you don’t have guys sending to you simultaneously on both radios. Ideally, you don’t have to make the other station wait while you are sending on the other radio. Real life is not ideal as you will quickly discover.
It is very important to be constantly looking at the echo’d CW characters at the bottom of the entry windows, so you know where you are in the flow.
That should get you started.
73, Steve, N2IC (and sometimes WK5T)
Single Operator Split Operation
Split operation is when you transmit on a frequency different from the one where you are listening. This is often used when stations have huge pileups like some DXpeditions, or when frequency allocations do not allow people in different countries or IARU regions to make contact on the same frequency. An example is 40 meter SSB between Europe and the USA. Many European stations operate below 7.125 MHz, the bottom edge of the US allocation. When N1MM Logger is controlling a transceiver with split capability, the program enables you to split and “unsplit”, to change frequencies, and perform other useful operations.
When used in this manual, the term “split frequency” always refers to the transmitting frequency. The assumption is that you will listen first, either to identify a station to call or a clear listening frequency to use while running, and then set your transmit frequency.
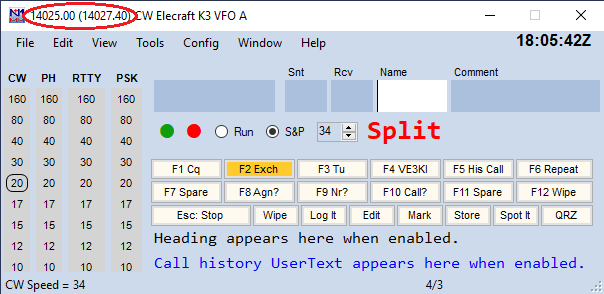
Am I Transmitting Split?
There are a number of ways that the program tells you whether you are in Split mode, which can avoid some embarrassing moments or potentially, a citation for out-of-band operation. In the Entry window Split is displayed in the title bar. The receive frequency is always displayed first, and the transmit frequency in parentheses, as in this example.
In the Bandmap, there are two sets of indicators, shown in this example.
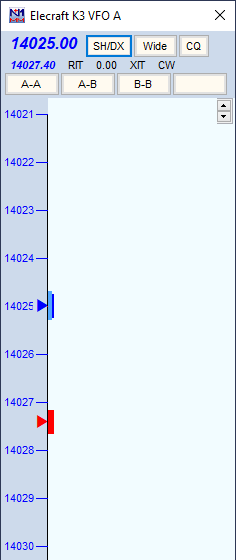
You’ll notice that the receive frequency is shown in bold blue letters at the top of the Bandmap, and the transmit frequency is shown below it in smaller type. You are also reminded by the indicators for your receive frequency (always blue) and your separate transmit frequency (always red).
Clicking on either the receive or transmit frequencies in the top part of the Bandmap will toggle split operation.
Some people prefer to be in Split mode while running, in order to use the main tuning knob to tune in calling stations that are off frequency. One drawback is that if you tune your receive frequency outside the tuning tolerance set on the “Other” tab in Config > Ports,Other, the program switches from Run mode to S&P. The way to avoid this is to use Alt+F11 to temporarily lock the program in the current mode. That is, if you press Alt+F11, the program will not automatically change modes when you tune. Press Alt+F11 again to return to normal operation.
Setting Split Transmit Frequencies Manually
The easiest way to set a split transmit frequency is to type the desired frequency in kHz into the Callsign textbox in the Entry window, and then hit Ctrl+Enter. Another alternative is to use Alt+F7 to open the Split dialog, type the transmit frequency, and hit Enter. The split frequency may be entered either in full (e.g. 7027), as a difference from the lower band edge (e.g. 27), or as a positive or negative difference from the receive frequency (e.g. +2) . Decimals are allowed (7032.3, or 7032,3 if your regional preferences in Windows use the comma as the decimal separator).
Split Mode and Frequencies Set Automatically from Cluster Spots
If you click on a station in the Bandmap which was spotted with a QSX (transmit) frequency specified — in the format “DX PA1T 7095 QSX 7130”), the radio will be put into split mode and the frequencies set automatically. You will be set up to transmit on 7130 (in this example).
Resetting to Non-Split Mode
Resetting to non-split mode is done by moving to another frequency or band, using the program to do so. Simply turning the VFO on your transceiver will not do it. You can:
- Click on another spot or frequency in the Bandmap
- Click on a non-split spot in the Packet/Telnet window
- Click on the transmit frequency or receive frequency in the top part of the Bandmap
- Click on a band button in the Available Mult’s & Q’s window to change bands
- Press Ctrl+PgUp or Ctrl+PgDn (which also changes bands)
Icom radios can’t report VFO B without being set to VFO B, and don’t report whether the radio is in Split mode. To operate split successfully, you need to set and cancel splits solely from the computer. Use Ctrl+Enter or Alt+F7, as above. Only turn Split on/off from the keyboard/program and not on the radio, to make sure it stays in sync with the program.
Split Operation Key Assignments
Alt+F7 – Set split frequency or offset from current frequency for the active radio. When hitting Enter or click OK with nothing on the line split will be cleared. Press ESC or click Cancel to exit.
Alt+S – When your rig is in Split mode, Alt+S will reset the receive frequency back to your transmit frequency, but the split mode is preserved. This is used to run a pileup with the rig in split mode. With a radio which has VFO A/B they use the 2nd VFO as an RIT. This is done since many RIT knobs are small or hard to get at, while some find it more natural to use the main VFO to tune in a caller rather than use the RIT. By running split, you can use the main knob to tune in the caller, while your TX frequency doesn’t change. The Alt+S acts like an “RIT clear” when you are running split.
This operates on VFO-A only. With Main/Sub radios like the Icom 756/7800 series you can not RX on SUB without receiving on both VFOs. In this case put RX on Main and TX on SUB for Alt+S to work.
“Reset RX freq when running split”, an option found on the Entry window’s Config menu, is a way of automating the Alt+S function. When this option is checked, the program will automatically do an Alt+S as you log each QSO. This gives you an automated “RIT clear” after every QSO when you are running split.
Ctrl+S – When not in split mode, the first press of this combination puts the radio and program into Split mode. After that Ctrl+S will toggle the RX frequency between the split RX frequency and the RX/TX frequency while maintaining split mode. Application: This was designed primarily to help SSB operators run on 40 or 80mM where split operation is widely used. For example, “CQ CQ de N1MM listening on this frequency (7183) and 7068”. Use the Ctrl+S key to toggle between 7183 and 7068 to check for both USA or DX callers.
Ctrl+Alt+S – Toggle Split mode on the radio. ‘Split’ will be shown in the Entry window.
Ctrl+Enter – Entering a frequency or offset in the callsign with Ctrl+Enter will set a split frequency.
Click on a spot in the Bandmap or Available window. Then look at the Bandmap or the Entry window title bar to see if you are going to transmit out-of-band. If you SINGLE-click on a spot on 40 or 80, and don’t see the split indicator, then wait for the station to announce his listening frequency. If he says “listening 214.5”, type 214.5 in the Callsign textbox and press Ctrl+Enter – you are then ready to call him.
Split mode vs. SO2V
With a dual-receiver radio, the difference between Split mode and dual receive operation can be tricky. If both receivers are on, the radio is set up exactly the same way for split from the VFO A Entry window (listen to the other station on VFO A, monitor your transmit frequency on VFO B, transmit on VFO B ) and for SO2V with the Entry window focus on VFO B (conduct a simplex QSO on VFO B while monitoring the VFO A receiver somewhere else on the band). However, although these two situations are identical on the radio, they are quite different in the logging software. In the split operation scenario, the QSO is logged from the VFO A Entry window, with different RX (VFO A ) and TX (VFO B ) frequencies in the log. In the SO2V scenario, the QSO is logged from the VFO B Entry window with the RX and TX frequencies the same (both from VFO B ).
By changing the transmit VFO from VFO B to VFO A, you can switch to either one of two new situations – split from the VFO B Entry window (listen to the other station on VFO B, monitor your transmit frequency and transmit on VFO A ) or SO2V with the Entry window focus on VFO A (conduct a simplex QSO on VFO A while monitoring the VFO B frequency somewhere else on the band). Again, these two are the same on the radio, but different in the logging software – split logged from the VFO B Entry window with different RX and TX frequencies in the log vs. SO2V logged from the VFO A Entry window.
Because there are four possible logging scenarios but only two different radio configurations, you cannot depend on making adjustments from the radio to get QSOs logged correctly. By default, in SO2V mode with both receivers active, N1MM Logger will assume you are operating in one of the two SO2V modes and will log QSOs using the callsign and exchange from the active Entry window and logging both TX and RX frequencies from the active Entry window’s VFO.
It is possible to work and log split mode QSOs in SO2V mode, but it takes care and practice to get it right. In order to work and log QSOs in split while the Logger is in SO2V mode, you must tell the Logger that you are operating split. Since you cannot do this from the radio, you must turn Split on or off from the keyboard/program, using Ctrl+S and Ctrl+Alt+S. You need to take care to do this from the correct entry window (the one whose VFO you are receiving the other station on), and to be aware at all times of which frequency you are transmitting on.
Single Operator Call Stacking
Call Stacking Overview
Single Operator Call stacking allows a CQing operator to enter multiple call signs that are received in response to a CQ message, and work them one after the other sequentially without re-entering a new call sign for each QSO. Macros and keystrokes used for call stacking include {SOCALLSTACK}, {STACKANOTHER}, CTRL+ALT+G, {LOGTHENPOP}, {LOGTHENNEXT}, ALT+G, and ALT+D. The first three are used to place calls onto the stack and the others are used to take calls off the stack.
The macros only operate in RUN mode. Stacked callsigns appear in a small CallStack window that appears immediately above the Entry window the first time a call is stacked. You can move this window to another location on your display with the mouse, or dismiss it with the X in the title bar, in which case the next time it appears it will be above the Entry window again.
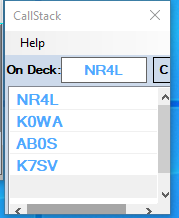
This window contains a stack of clickable call signs colored according to their multiplier status, a button labelled “C” that can be used to clear the stack, a font sizer, and a “Help” menu item that opens a Help window listing the following keyboard/mouse commands:
- Left-click on a call sign to select it
- The selected call sign can be deleted using the Delete key
- Right-click on a call sign to delete it from the stack
- Double-click on a call sign to move it to the top of the stack
- Ctrl+Alt+G moves the call sign in the Entry Window call sign box to the top of the stack
- Alt+G replaces the call sign currently in the Entry Window with the call sign at the top of the stack
- Alt+D deletes the call sign at the top of the stack
Single Operator Call Stacking is functional in CW, phone, and digital modes and is compatible with manual key operation or ESM. It can also be used in SO1V, SO2V and SO2R modes and in multi-station environments.
{SOCALLSTACK} or {STACKANOTHER} or CTRL+ALT+G
The operator can stack a full callsign or a partial callsign that may include a “?” that will be highlighted when that callsign is removed from the stack. In CW and SSB, callsigns that are new multipliers are prioritized over non-multiplier callsigns. Callsigns that are dupes are ignored. In Digital modes, there are options to control the stack priority in the Setup menu in the Digital Interface window.
The operation of the {SOCALLSTACK} and {STACKANOTHER} macros differ slightly:
{STACKANOTHER} or the keystroke short cut, CTRL+ALT+G, simply pushes callsigns onto the stack and clears the Entry Window callsign box.
{SOCALLSTACK} functions as a single level stack macro. The first execution of {SOCALLSTACK} stacks the first callsign and clears the Entry Window callsign line. When a second callsign is entered and {SOCALLSTACK} is executed again, the two callsigns are exchanged. If the callsign window is empty when {SOCALLSTACK} is executed, the callsign is removed from the stack and placed into the callsign Entry Window. The user can thus control which call sign will be worked first, whereas with {STACKANOTHER} the last call sign entered is the first one to be worked.
If you have {SOCALLSTACK} programmed to an F-key, pressing it once at any time will exchange the current callsign with the next callsign on the stack. If there is no callsign on the stack, then it stacks the call and gives you an empty callsign window to enter one. Pressing the F-key again will reverse them again.
{LOGTHENPOP}, {LOGTHENNEXT}, ALT+G, ALT+D
The stacked callsigns can be removed from the stack by using ALT+G or the Spacebar to replace the callsign currently in the callsign box in the Entry window with the callsign at the top of the stack without logging a QSO; by using {LOGTHENPOP} or {LOGTHENNEXT} to log the current QSO and unstack the next callsign into the callsign box; or the stacked callsign can be simply deleted from the stack with the keystroke ALT+D. The ALT+D keystroke is useful if a callsign appears on the stack via a telnet spot and is not one of the ones you want to work. The next callsign on the stack is displayed in the On Deck box in the CallStack window. Using the {LOGTHENPOP} or {LOGTHENNEXT} macro method, the next QSO can be started immediately without giving the pileup time to restart.
ESM Automation
The Configurer, Function Key tab, Next Call Key is used to select the function key that contains the {LOGTHENPOP} macro along with the message string for ESM automation. If a Next Call Key has been specified and that key contains a {LOGTHENPOP} macro, then when Enter is pressed to finish a QSO and there is another call sign on the callsign stack, the Next Call Key will be sent instead of the TU(F3) Key. The last option in the drop down menu for the Next Call Key allows the ESM SO Call stacking automation to be disabled. Alternatively, the {LOGTHENNEXT} macro can be used instead of {LOGTHENPOP} in order to disable this part of the ESM Enter key automation while still allowing the operator to use the capability manually by pressing the function key.
If the exchange for the current QSO has not yet been sent, or if the received exchange is invalid, the {LOGTHENPOP} and {LOGTHENNEXT} macros are disabled in order to prevent logging an incomplete QSO.
SOCALLSTACK ESM Example
Program F9 key to: {STACKANOTHER} or {SOCALLSTACK}
Program F10 key to: {LOGTHENPOP}TU NW {F5} {F2}
(Note: Do NOT use ! in place of {F5}, and in a serial number contest, do NOT use # in the {LOGTHENPOP} message.)
For SSB, an appropriate SSB wave file can be inserted into the F10 message in place of the ” TU NW” letters above.
Set >Config >Function Key tab >”Next Call Key” to F10
Select RUN mode and turn ESM on. For this example two stations are calling, N2IC and K3CT
Type K3CT, press F9, type N2IC and press Enter
Copy N2IC’s report and press Enter. This will log N2IC, and then instead of F3 it will invoke F10, which will send the TU, unstack K3CT, and send the exchange
SOCALLSTACK Non-ESM Example
Program the function keys as listed above.
Select RUN mode.
Type K3CT, press F9, type N2IC and press the exchange key programmed in Configurer, usually “;”. This key is programmed to F5 & F2.
Copy N2IC’s report and press F10. This will log N2IC, unstack K3CT, and send the exchange.
If multiple callsigns are stacked, ESM will continue to unstack the callsigns. The same is true in non-ESM mode as the Next Call key (F10) is pressed. Should a logging error occur such as a bad call, the sequence will be interrupted until the error is corrected. When no calls remain on the stack, the normal TU message is sent (if not using ESM, you would normally press F3 instead of F10 at this point). If there are multiple callsigns on the stack, the order that they are removed or exchanged with {SOCALLSTACK} depends on the internal sorting order and not necessarily the order they were stacked. In CW and SSB, multipliers will be unstacked before non-multipliers.
Additional SOCALLSTACK Information
If a callsign was placed on the callsign stack but you want to remove it without working it, use the ALT+D keystroke to remove it without popping it off the stack into the Entry window.
Single Operator Call Stacking and multi-operator call stacking work similarly. Multi-operator call stacking is the program feature that allows a second operator to listen on the run frequency and send calls to the run operator’s Entry Window.
Digital Call Stacking
In digital modes there are two different ways to work stations one after the other in series when more than one station responds to your CQ. The first method is based on the Single Operator Call Stacking described in the previous sections, adapted to use the features of the DI window. The second method, using the Grab list, is unique to digital modes.
LOGTHENPOP: To use this, you must program a function key using the {LOGTHENPOP} macro, e.g.:
{TX} ! {LOGTHENPOP} TU NW {F5}{F2} {RX}
When this function key is pressed or clicked on at the end of a QSO instead of the normal TU key, it will log the previous contact, pull the next call sign off the single operator call stack in the CallStack window, and send the exchange to the new station. If you designate this function key as the Next Call Key in the Configurer under the Function Keys tab, ESM will automatically select this key instead of the TU key at the end of a QSO whenever there is an unworked call sign remaining on the call stack in the CallStack window. Note that you must use two different function keys for the TU and Next keys; do not put {LOGTHENPOP} into the TU key. Don’t use ! in place of {F5}, and don’t program the exchange (e.g. # in a serial number contest) directly into the Next Call key; use the {F5} and {F2} macros to call up your regular exchange message, as in the example above. Using ! or # in the Next Call key will send the wrong callsign or serial number.
How do you get call signs into the CallStack? You can do this effectively in digital modes by selecting the Setup > Digital Call Stacking menu item in the Digital Interface window’s menu bar. This enables an efficient way to place call signs on the single operator call sign stack. You have three choices, depending on which order you want calls to be popped off the stack ready to be worked: Enable using First In First Out (FIFO – the first call to be worked will be the one that was placed on the stack first); Enable using Last In First Out (LIFO – the first call to be worked will be the one that was most recently placed on the stack); and Enable using FIFO Mults First (callsigns will be taken off the stack in order of their multiplier value. In those contests where one QSO can yield 2 or 3 mults, the higher-mult calls will be taken first. Among calls with the same multiplier value, the first call to be worked will be the one that was placed on the stack first).
When Digital Call Stacking is enabled and you are in Run mode:
- If there is already a call sign in the call sign box in the Entry window when you mouse-click on another call sign in the RX window, clicking on the new call sign in the RX window will either put the new call sign directly on the stack (FIFO), or else (LIFO) it will move the call sign that was formerly in the Entry window onto the stack in the CallStack window, and will bring the new call sign into the Entry window
- Alt+left-clicking on a call sign in the RX window will move that call sign directly onto the stack in the CallStack window without changing the call sign in the call sign box in the Entry window. You can place any number of call signs on the stack ready for working one after the other
- Instead of clicking directly on a call sign, you can also use {GRAB} or Alt+G to pull the highlighted call sign off the Grab list into the Entry window. The call sign that was formerly in the Entry window will be moved onto the stack
- Instead of using {GRAB} or Alt+G, you can use {STACKANOTHER} or Ctrl+Alt+G to move that call sign from the Grab list directly onto the stack without changing the call sign in the call sign box in the Entry window
When Digital Call Stacking is enabled, left-click, Alt+left-click, {GRAB}/Alt+G and {STACKANOTHER}/Ctrl+Alt+G give you a variety of ways to choose which call signs you want to place onto the call sign stack and into the Entry window. Once there are one or more call signs on the call sign stack, after working the first station in the Entry window, the Next Call key (automated with ESM) lets you work the call signs from the stack rapidly one after the other.
LOGTHENGRAB: There is a separate method that uses the Grab list in the DI window with the {LOGTHENGRAB} macro. You do not need to enable Digital Call Stacking to use this method. You can use any method you wish to get the first call sign into the Entry window so you can work that station. At the end of the QSO with the first station, if you want to work the call sign that is highlighted in the Grab list, you can use an F-key or message button that contains:
{TX} ! {LOGTHENGRAB} TU NW {F5}{F2} {RX}
This will log the contact with the first station, then grab the highlighted call sign from the Grab list and send the exchange to that station. You can repeat this for as long as there are workable call signs being highlighted in the Grab list. If the next highlighted call sign in the Grab list is invalid or not workable, you should press or click on the normal TU key instead, in order to avoid attempting to work a bad call sign. You can also program a {DELSEL} macro into an unused function key or DI message button for use in removing unwanted call signs from the Grab list. Don’t program the exchange (e.g. # in a serial number contest) directly into the function key that has the {LOGTHENGRAB} macro in it (the # macro in this key will send the wrong serial number); use the {F2} macro to call up your regular exchange message, as in the example above, to get the correct exchange sent to the second station. Likewise, don’t use ! in place of {F5} in the {LOGTHENGRAB} function key message; doing this will send the wrong callsign.
Using this method, the Grab list is populated automatically, but you have to decide manually whether to use the normal TU function key or the message key containing the {LOGTHENGRAB} macro. This is because of the possibility of unwanted or incorrect call signs in the Grab list – it is up to you to decide whether the next call in the Grab list is one you want to work using {LOGTHENGRAB}, or whether you just want to end the QSO with a normal TU message. Do not put a {LOGTHENGRAB} macro in your normal TU function key, or in the Next Call function key if you are using one with ESM. {LOGTHENGRAB} must be in a separate function key or in one of the DI message buttons. Also, if you have enabled the Next Call key in the Configurer, do not put a {LOGTHENGRAB} macro in the Next Call key message; the correct macro to use in the Next Call key is {LOGTHENPOP}.
Here is a sample generic function key message file using both {LOGTHENGRAB} and {LOGTHENPOP}, with the Next Call key for ESM set to F12:
F1 CQ,{TX}{ENTER} CQ * * CQ {RX}{CLEARRIT}
F2 Exch, {TX} (SENTRST) {EXCH} ! {RX}
F3 TU,{TX}{ENTER} TU * CQ {RX}{CLEARRIT}
F4 My Call,{TX} * {RX}
F5 His Call,{TX} ! {RX}
F6 Call?,{TX} UR CALL? {RX}
F7 Rpt Exch,{TX}{ENTER} {EXCH} {EXCH} {RX}
F8 Agn?,{TX} AGN? {RX}
F9 Now,{TX}{ENTER} ! {LOGTHENGRAB}TU ..NOW {F5}{F2}{RX}
F10 Grab,{GRAB}
F11 Stack,{SOCALLSTACK}
F12 Next,{TX}{ENTER} ! {LOGTHENPOP}TU ..NOW {F5}{F2}{RX}
F1 QRL?,{TX}{ENTER} QRL? * {RX}{CLEARRIT}
F2 Exch,{TX}{ENTER} TU {SENTRST} {EXCH} {RX}
F3 Spare,
F4 Call Him,{TX} * * {RX}
F5 His Call,{TX} ! {RX}
F6 My Call,{TX} * {RX}
F7 Rpt Exch,{TX}{ENTER} {EXCH} {EXCH} {RX}
F8 Agn?,{TX} AGN? {RX}
F9 Spare,
F10 Grab,{GRAB}
F11 Spare,
F12 Spare,
