
The Network Status Window
The N1MM+ network scheme also simplifies and automates the network setup. So long as each computer on the network is running in the same subnet, with the same version of N1MM Logger, and the same contest and multi-operator class in the Contest Setup, the network will be set up automatically.
If you open the Network Status window without enabling networking, you will see a framed warning: “Networked Computer Mode is off – Click here to turn on.” Do as it says (actually, click anywhere in the main body of the window), and the other computer(s) in the network will appear. If you turn on networking by accident with no other computers in the network, you can turn it back off using the “Stop Networking” button under the “Actions” tab.
When Networked Computer Mode is on, all of the computers in the network must be running the same version of N1MM+. Run-time errors may result if computers running different versions of the program are networked. Also, the country file in all of the computers should be the same, the station callsign in the Station Information dialog in all of the computers should be the same, and the selected contest log in all of the computers should be for the same contest type.
The computer names on the networked computers must all be different. Do not attempt to network two computers with the same name (each computer’s name can be changed from its Windows settings window or the Windows Control Panel).
Tabs
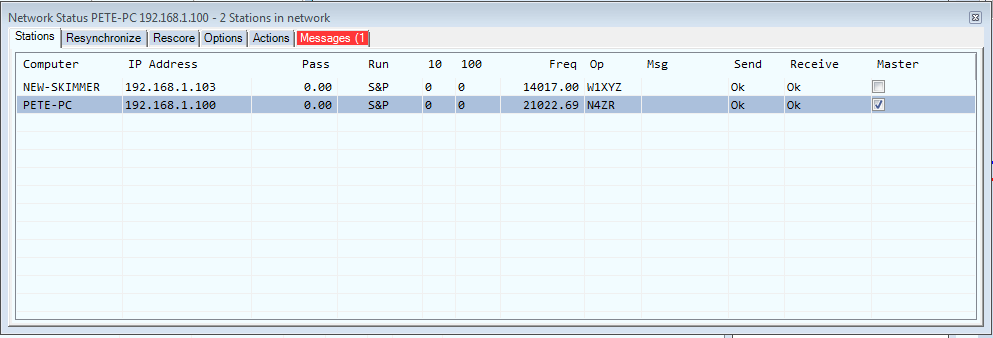
Whenever you open the Network Status window, it comes up in the Stations tab.
The Stations Tab
As you can see above, this tab contains all the basic information about each station in the network:
- Computer – This is the name assigned to the computer in Windows
- IP Address – on the local area network
- Pass – The pass frequency (to which other stations on the network can pass new mults). Each station can set or change this frequency for itself manually (on the Actions tab) and all stations can then see the new frequency.
- Run – Whether each station is in Run or S&P mode
- 10/100 – What its current QSO rate is (last 10 and last 100 QSOs)
- Freq – What frequency it is currently on.
- Op – Who is operating (as set by OPON or Ctrl+O)
- Msg – What, if anything, that station has just done, such as pressing a function key
- Send/Receive – normally reads “OK” unless there is a problem with the network.
- Master – Permits checking to select one station on the network as the master. Check one to determine which connects to the Internet for cluster spots and time synchronization.
- Band – Note that if you sort on band, you will also sort on Run/S&P as the secondary sort. This may be useful for very large multi-ops where the station name does not indicate the band.
- R/M – Run/Mult indicator for each station (Multi-Single: 1 for Run, 2 for Mult). Indicates Run1/Run2 for Multi-2.
- Mode – Logging mode (CW, SB or DG). Updated approximately every 10 seconds.
A (((*))) in the title bar of the Network Status window means that your computer just broadcasted its IP address, usually in the process of establishing a connection to the network. When connection is established, the title bar will reflect the number of stations in the network.
The red highlight on the Messages tab means that there is a network message waiting there that has not yet been read. In most cases, it is normal administrative traffic, such as a connect request from another station on the network. The red highlight may also be seen on the computer name during the connection process, usually accompanied by a red highlight in the Send or Receive column. These will disappear when a good connection is established.
In order to keep all of the clocks on a network in sync, either all computers must be running accurate time synchronization programs (like those used for computers running WSJT mode programs), or else all “slaves” – all computers other than the one designated as “master” – must be run as Administrator (by right-clicking on the desktop icon and selecting “Run as administrator” from the pop-up menu). The master computer will be responsible for ensuring that times are correct on all computers in the network.
Right-Click Menu
The right-click menu on the Stations tab opens a menu of powerful functions that most multi-op operators will find important in real time. The rationale for placing it here is that most operators will keep this tab on-screen, since it contains so much important operational information. Each of these functions requires right-clicking on the line entry of a computer other than the current one, to identify the affected computer and open the right-click menu.
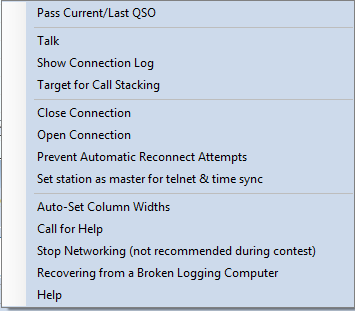
- Pass current/last QSO – If you right-click on a computer to which you wish to pass your current or last QSO (assuming that the station just worked has agreed to QSY), and then click this option, a Talk message will be sent to the Info window of the target computer, telling the other operator who to expect and on what frequency. If that computer’s Pass Frequency is set to zero, then the Message will show the receiving computer’s frequency at that time.
- Talk – A right-click on any computer in the network, followed by a click on this option, will open the Talk sub-window with that computer’s name already entered.Talk messages appear in the Info window of the receiving computer.
- Show connection log – Right-click on a computer and then on this option, and a log of communications events between your computer and the one selected will be displayed as an aid to trouble-shooting.
- Target for call stacking – The intended use of this feature is for large multi-ops that have more than one radio on a given band, to permit the “helper” operator to identify and queue stations for the run operator to work. If the two computers are on the same frequency (+/- a small tolerance), a right-click on the target computer turns on call stacking. Thereafter, any callsign that the “helper” op enters in his Entry window will appear in the call-frame of the target computer’s Entry window. The run operator only needs to hit [Space] to pull the call down into the call-sign textbox, ready to work. There is a checkbox on the Options tab which, if selected, will clear the sending computer’s Entry window if the target computer works the station that has been stacked.
- Close and Open connection – These options are used to open and close connections between the current computer and the one you right-clicked on.
- Prevent automatic reconnect attempts – used when trouble-shooting the network to stop the selected computer from sending reconnect requests every thirty seconds.
- Set station as master for telnet and time sync – Another way to set any given computer on the network as the Master for receiving DX cluster spots and performing time synchronization. Note that time synchronization requires that N1MM Logger+ be run as Administrator on the receiving computer(s).
- Auto-set column widths – used to adjust the format of the Stations display to the minimum required to display the information currently present on-screen
- Call for Help – Sends an audio request for assistance to the computer you clicked on, together with a text message in the receiving computer’s Info window.
- Stop Networking (not recommended during contest) – self-explanatory.
- Help – when Internet access is available, displays the appropriate section in the User Manual.
What, Another Right-Click Menu?
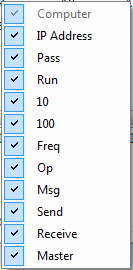
There is a second right-click menu associated with this tab. It is made visible when you right-clink on the column headings row of the tab (“Computer”, “IP Address”, etc.) . It allows you to select which columns on the Stations tab you want to display, in the event that you want to minimize required screen space while still monitoring network activity.
Adjusting the Stations Tab’s Format
If you put your cursor between column headings in that row and move it rightward almost to the next column to the right, you’ll see that it changes to a standard Windows “change width” character (a vertical line with horizontal arrows facing away from it). You can drag that marker right to increase the width of the column to its left, or left to decrease the width of that column.
It is possible using this control to make the heading of a column disappear altogether. If you do that and want to recover, right-click in the body of the tab, and select “Auto-Set Column Widths” to get back to the full set of minimum-width headings.
You can also reorder the columns, by clicking on a column heading itself and dragging it where you want it. Be a little cautious in doing this, though, because there is no command for automatically restoring column order to the original – you’ll have to do that manually or by erasing the NetworkStatus.ini file in SystemFiles directory.
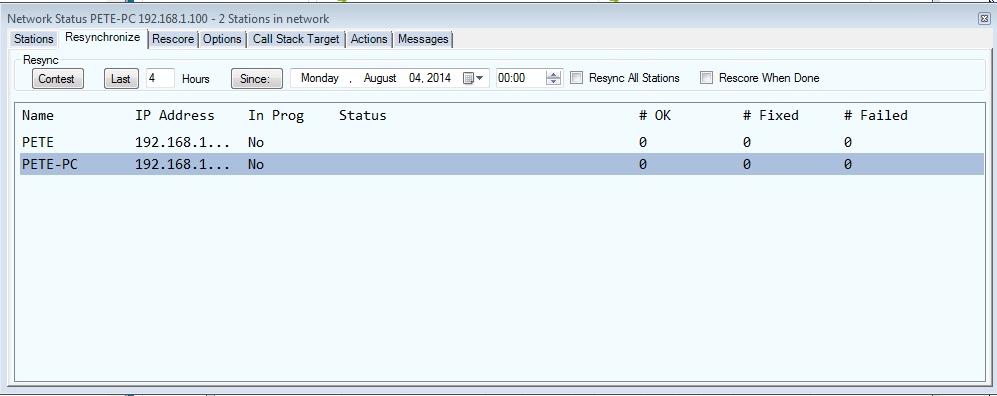
The Resynchronize tab
Normally every computer has a copy of every QSO in the log. If all computers stay connected at all times, new QSOs entered on one computer are broadcast to the other computers in the network so that every computer always has a complete copy of the log.
If it is necessary to edit or delete a QSO, the computer that the QSO was initially logged from must be connected. Any connected computer can perform the change.
If a computer becomes disconnected from the network, you can continue to log contacts on it. When the computer rejoins the network, all QSOs made on that computer will automatically be sent to the other computers, and all new QSOs made on the other computers will be copied to the rejoining computer. This process is called resynchronization (resync for short).
Resynchronization of newly added QSOs is automatic. However, if changes (edits or deletions) are made to previously existing QSOs while a computer is disconnected from the network, those changes will not be applied during the automatic resync process. In other words, the automatic resync when a computer reconnects to the network only updates new QSOs; it does not update QSOs that were already in the log. Because of this, if network communications have been interrupted during the contest it is a good idea to perform an additional manual resync at the end of the contest in order to ensure that all the logs are identical, and that is the purpose of this tab.
A manual resync operation initiated from this tab requests each other computer in the network to update the requesting station’s copies of all QSOs that were originally logged at the other computer in order to take into account the effects of any changes (edits or deletions) that were made during network outages.
- The “Contest” button will resynchronize from the start of the contest. This is for resyncing during or within a few hours after the contest ends. If resyncing logs later than this, use the Last # hours option below. The resync time period will be displayed in the Info window. If it doesn’t cover the contest time period, use the Last # hours option below. If “Resync All Stations” is unchecked, only one station will be resynced by all other computers.
- The “Last” button and the textbox next to it are used to resync for a shorter period when you know when the problem occurred or when resyncing logs greater than a few hours after the contest. The number of hours is backwards from the current time. If “Resync All Stations” is unchecked, only one station will be resynced by all other computers.
- The “Since” button works the same way but by resync start date and time rather than duration.
- The “Resync All Stations” checkbox syncs each log with all others simultaneously. Use this after the contest is over to ensure that all logs are identical. This can be a resource-intensive process; in order to avoid disrupting operations at other computers, do not use it during the contest while any computers are still being used to log new contacts. If this is unchecked, only one computer will be resynced.
- The “Rescore When Done” checkbox rescores the contest after the resync is complete on this computer, or all computers if Resync All is selected
The Rescore tab
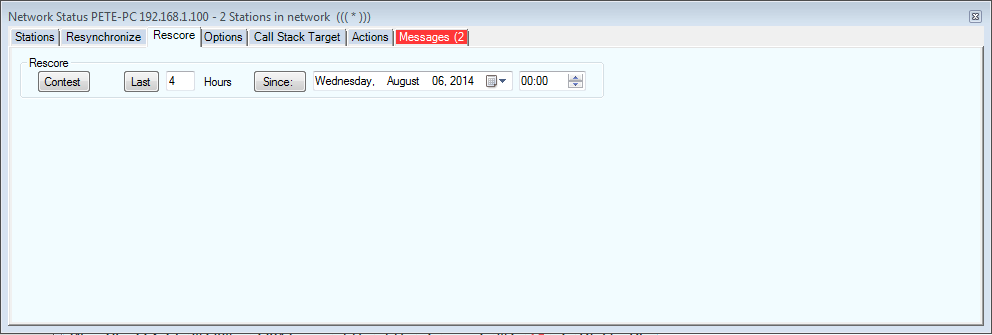
This tab controls rescoring the log on the local computer, recalculating QSO points and multipliers, in order to take into account the effects of any changes (edits or deletions) on the final score. This is recommended practice at the end of a contest, before a Cabrillo file is generated for sending to the contest sponsor. The buttons are the same as those on the left-hand side of the Resynchronize tab, and are used similarly .
The Options tab

Left to right and top to bottom, following is a description of the radio buttons and checkboxes on this tab.
- Run1 and Run2/Mult radio buttons – These buttons are greyed out except in the case of the Multi-Single and Multi-2 classes, in which case you can click the radio button to designate the current computer as Run or Mult (Multi-Single) or Run 1 or 2 (Multi-2)
- Log QSOs at all Stations – By default this is checked. It ensures that all QSOs logged at any station are broadcast to all other stations in the network so that the logs in all computers contain all of the QSOs, not just the QSOs made at that particular station
- Don’t work non-mults – This box is checked by default if you are entered in the multi-single class in contests where the current station is the Mult station and must not work non-multipliers. When checked, this will block the station from working non-mults. Function key messages will not be sent to a non-multiplier station
- Wipe callsign when logged by stack target – Use in conjunction with call stacking. If your partner logs the callsign that you stacked, your callsign textbox will automatically be cleared so you can stack another
- Trace Networked Computer messages – a trouble-shooting tool that logs messages between computers on the network to a file titled MultiUserMessages.txt
- Block my transmitter with M1 & M2 contest rules – For multi-single and multi-two stations. In multi-single in contests (like ARRL contests) that only allow a single transmitter at a time in multi-single, this will block transmitting while another networked station is transmitting. In multi-single in contests (like CQ WW) that allow a multiplier transmitter and if there is more than one Run or Mult station, if another station with the same Run/Mult selection is transmitting this will block transmitting to comply with the contest rules about simultaneous transmitters. In multi-two with more than one Run1 or Run2 station, if another station with the same Run1/Run2 selection is transmitting this will block transmitting to comply with contest rules about simultaneous transmitters
- At most one of the three “Block” choices can be selected. The “Block” and “Stop” selections do not have to be the same in all stations in the network. Blocking using this option is entirely dependent on reliable low-latency computer networking, and does not work on stations that are transmitting using radio control commands (such as by invoking CW or SSB memories in the radio). Grayed out in single-operator categories
- Block my transmitter only if another station is transmitting on same band. No M1/M2 rules – Regardless of the transmitter class, if another station is transmitting on the same band, this will block transmitting to prevent two transmissions on the same band at the same time while still allowing simultaneous transmitting on different bands
- At most one of the three “Block” choices can be selected. The “Block” and “Stop” selections do not have to be the same in all stations in the network. Blocking using this option is entirely dependent on reliable low-latency computer networking, and does not work on stations that are transmitting using radio control commands (such as by invoking CW or SSB memories in the radio). Grayed out in single-operator categories
- Block my transmitter only if another station is transmitting on same band and mode. No M1/M2 rules – Regardless of the transmitter class, if another station is transmitting on the same band and mode, this will block transmitting to prevent two transmissions on the same band and mode at the same time. Unlike the previous option, this option will allow simultaneous transmitting in different modes on the same band
- At most one of the three “Block” choices can be selected. The “Block” and “Stop” selections do not have to be the same in all stations in the network. Blocking using this option is entirely dependent on reliable low-latency computer networking, and does not work on stations that are transmitting using radio control commands (such as by invoking CW or SSB memories in the radio). Grayed out in single-operator categories
- Stop my station from transmitting to prevent other station block – This option and the following option are available only when one of the above three “Block” options is selected. Only one (or none) of the two “Stop” options may be selected. Converts the chosen “Block” option from “First one wins” to “Last one wins”, i.e. choosing this option allows another station to stop (interrupt) an ongoing transmission on this station in order to allow the other station to transmit without being blocked
- Stations using only a “Block” option without selecting a “Stop” option can be blocked by one another and by stations not using any of the “Block” options, but will not be blocked by stations using a “Stop” option
- Stop my station from transmitting to prevent other station block. CQ only – This option and the preceding option are available only when one of the three “Block” options is selected. Only one (or none) of the two “Stop” options may be selected. This is similar to the preceding option, except that it will only interrupt a CQ message
- The intent of this option is to allow an ongoing QSO from this station to be completed without interrupting messages such as exchange messages that have already been started, but to allow this station’s CQ messages to be interrupted while they are being sent
- Allow Direct Telnet Connection (appears only on non-Master computers) – if this check box is checked, the Telnet window will allow this computer to connect directly to a telnet cluster node; if it is unchecked (default), this computer will receive its cluster spots only from the Master station, not directly from a separate Telnet connection
- If this check box is checked and if the Master computer is sending telnet spots (next option), this computer may receive spots from two sources, namely the Master computer and a telnet cluster node this computer is connected to directly
- Do Not Send Telnet Spots to Other Stations in Network (appears only on the Master computer) – this option complements the previous option by telling the Master computer not to send spots to other computers; if this option is checked, the other computers will have to use the previous option and connect directly to telnet cluster nodes if they wish to receive cluster spots
The Actions Tab
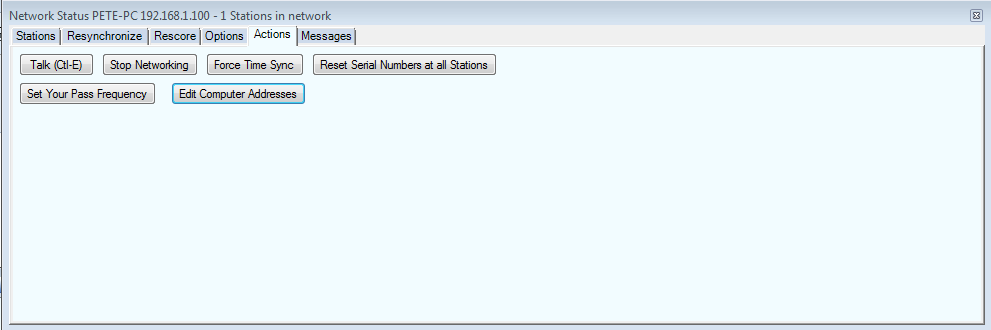
- Talk (Ctl+E) – opens a sub-window, in which you can send or receive talk messages to/from the other station(s) on the network.
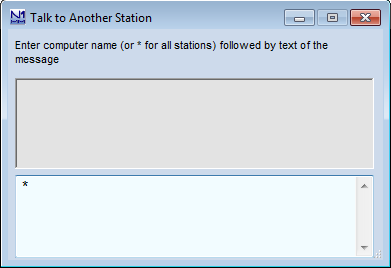
The first of these two illustrations is an empty Talk window. By default, Talk messages are sent to all stations, denoted by the asterisk. If you enter a computer name in place of the asterisk, followed by a space and the text of a message, the message will be sent only to that station. That computer name then becomes the default address for Talk messages from you until replaced. Note: you must enter the computer name exactly as shown in the left-most column of the Stations tab, except that whatever case you enter will be changed to all upper-case to conform with the Microsoft standard.
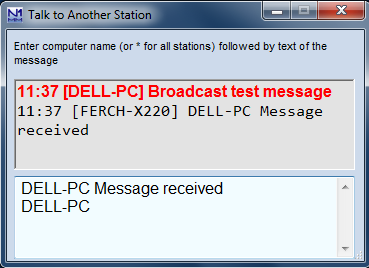
The upper pane is now where talk messages are received, as in the second illustration. Messages in red have been received, and are also displayed in the bottom pane of the Info window, Ctrl+E can now be used to toggle the Talk window between full size and minimized to the lower left corner of your screen.
The first time you receive a Talk message while the Talk window is open but minimized, you will notice a new icon in the right-hand end of the Windows taskbar, with a message balloon above it. The icon will remain there until the Talk window is closed. This is in addition to the N1MM+ logo you will see over to the left, which is present any time the program is open. Thereafter, each time a new talk message comes in while the Talk window is minimized, a message balloon will appear above the new icon, as illustrated below. The message balloon is displayed for 5 seconds and then disappears.

If you want to send a message only to a particular station, right-clicking on that station’s line on the Stations tab and then selecting “Talk” will relieve you of having to fill in the computer name. Other operation is as above.
- Set Your Pass Frequency – enter the frequency you want other stations on the network to pass stations to. It will appear on all stations’ Stations tab.
- Stop Networking – Self explanatory – strongly discouraged during a contest.
- Force Time Sync – Self-explanatory
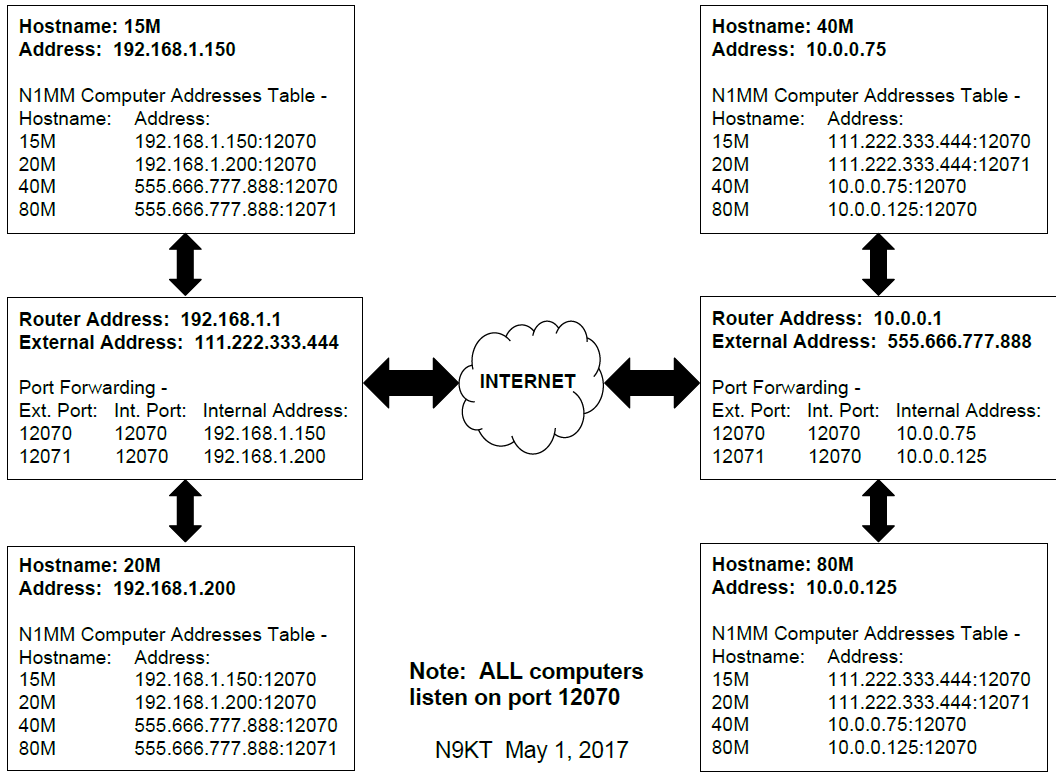
- Edit Computer Addresses – N1MM Logger+ networking is automatic within a single subnet, which is usually the case in local area networks. However, if you want to network across a Wide Area Network, or in rare instances where your network involves more than one subnet, auto-configuration will not work. In that case you will need to fill in computer addresses in this table exactly as assigned by the network(s). For WAN networking you must enter the external IP addresses of each LAN and also port numbers for all the computers you wish to connect to, in the format XXX.XXX.XXX.XXX:port number}. Separate port numbers are needed for computers outside the local network, in order to permit operators to set up forwarding through their router firewalls to the right computer. If going subnet-to-subnet, you do not need to enter port numbers and the IP addresses would be the internal IP address. Here’s an example in the WAN case, such as would be needed for a distributed IARU HQ “station”. Note that the Hostnames are the Netbios (computer) names of the computers being networked. In this example illustration, for clarity the computer Netbios names have been reassigned in the illustration to denote the various bands:
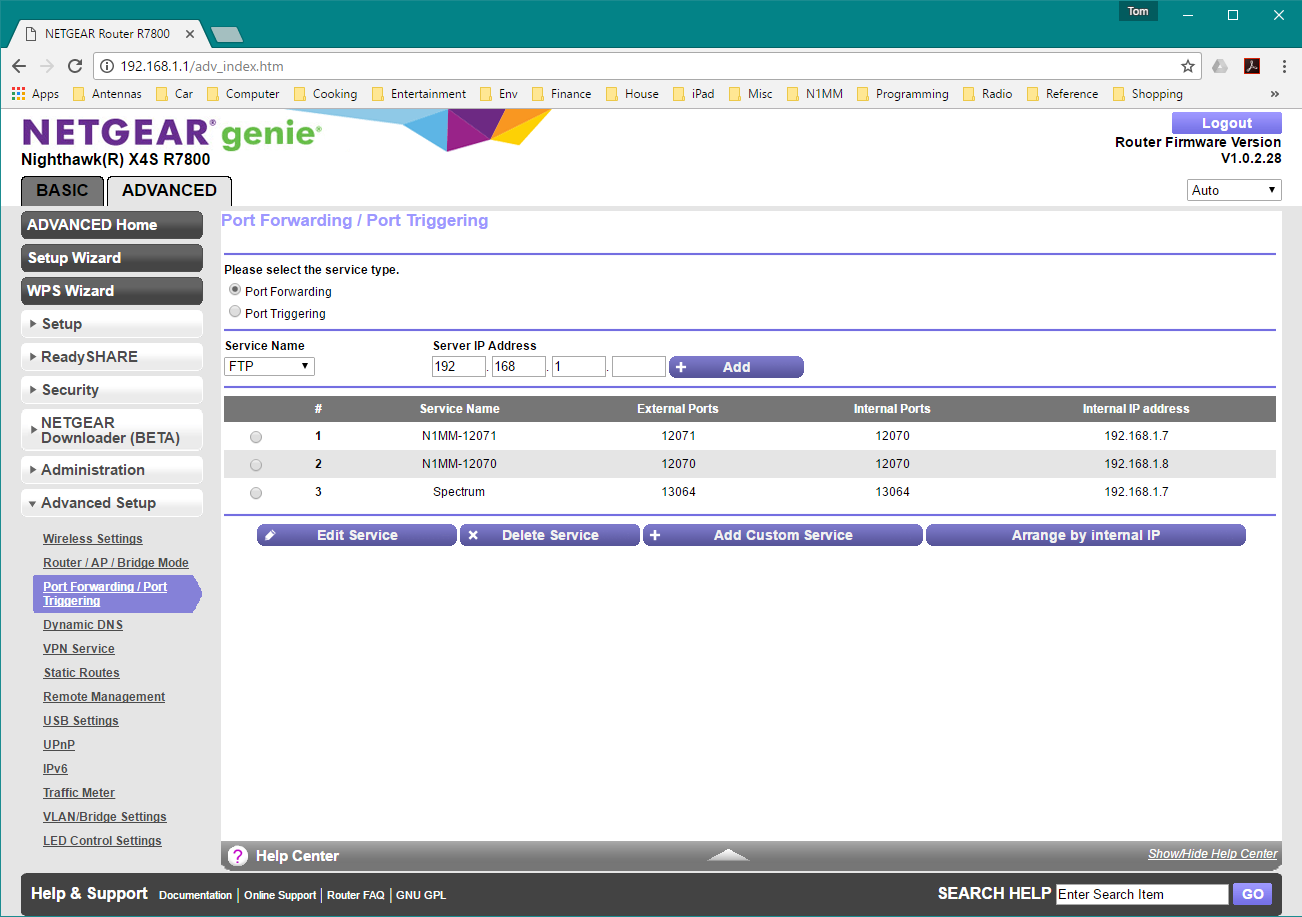
- Please refer to your router help file for instructions on setting up port forwarding. Here is a sample Netgear Port forwarding setup. In this example, the site has two N1MM+ instances running on 192.168.1.7 and 192.168.1.8. The router will receive TCP connections coming in on port 12071 and 12070, but both connections will be sent to 12070 on their respective computers. 13064 is a spectrum UDP port being forwarded to 192.168.1.7
- Reset Serial Numbers at All Stations – only for use when you have screwed up. Sets the serial numbers on all computers to the highest value in any of the logs, plus 1, so you can start a new serial number sequence without duplicate numbers. This does not change the serial numbers of QSOs that are already logged.
The Messages Tab
Displays networking messages
Networking Across a Wide Area Network (WAN)
N1MM+’s automatic network detection and configuration feature requires that all logging stations be connected to the same local area network (LAN) with the same subnet address. There are two options for configuring contest stations that are remote and not on the same LAN. The first option involves manually entering the IP addresses of every station. The second option uses a virtual private network (VPN) to simulate LAN addressing of the contest stations. Both options work, but you may find that the VPN option is easier to implement and manage. Although this is not a product endorsement, the N1MM Development Team members have documented the deployment of a Distributed Multi-Op Network with a Hamachi VPN in a step-by-step guide that you will find in the Additional Support Files gallery of the Download section of the website. In addition to Hamachi, N1MM+ users have been successful using other VPN products, including the free SoftEther VPN software. You will find their VPN descriptions in the same Additional Support Files gallery.
Be aware of the following when using a VPN:
- Hamachi, ZeroTier, SoftEther and OpenVPN in TUN mode have been tested and work with auto-discovery.
- Many other VPNs, including TailScale do not support auto-discovery.
- If you find that auto-discovery is not working with a VPN, enter all the computer NetBIOS names and their VPN addresses in the computer names table on all the computers in the network. You need to put all the computer names and ip addresses for all the computers.
- You should be able to email the list to new members of the VPN and have them import it into the computer names table. (To import/export, use File menu item in the Computer Names dialog.)
Troubleshooting
- Check first:
- All computers have different Netbios (computer) names and they are all 15 characters or less
- All computers are running the same version of N1MM+. Please use the latest version
- All computers have the same time with 2 seconds or you are running all the non-master computers in admin mode so they can set the time when the master requests it.
- All computers have the same copy of Master.SCP and wl_cty.dat
- All computers are configured with the same station callsign and have the same contest log open
- Computers don’t connect at all, or connect in one direction only
- If computers are not on the same subnet, they will not automatically connect. Enter their Netbios names and ip addresses in the computer addresses table – see Actions Tab to access. Note that you may specify NetBios names in the 2nd column if they are recognized by your network. You may also specify DNS names there as well.
- Start without a computer address table – make sure you do not have any entries in it. If you need entries, make sure they are correct. – see Actions Tab to access
- Make sure each computer is allowed to connect to other computers by Windows firewall or any other firewall. It may be quicker to turn off the firewall and test. If that solves the problem (like one-way communication), then figure out how to put N1MM+ into the firewall exception list and restart the firewall. We do not recommend running your computer without a firewall
- If a computer has more than one network connection, try disabling the one that you are not using.
- Turn off your antivirus program temporarily to see if that is blocking the connections. Don’t forget to turn it back on.
- Remote computers don’t connect
- N1MM+ receives data on port 12070. Routers must translate the port being SENT from remote computers to the particular computer on the network. If you SEND on port 12071 to computer Bob, the router must route 12071 as 12070 to Bob. You will need to route as many ports in your router as there are computers running N1MM+ at that location.
Recovering from a Broken Logging Computer
What do you do if one of your computers no longer works or you add another computer as you might during Field Day?
DO NOT ADD ANOTHER COMPUTER WITH THE SAME NAME!
If you do not replace it on the network
- Each computer will have a copy of the QSOs logged by the broken computer. If they all agree on the number of QSOs, then you should be fine. If not, you will need to compare the lists from each one and determine which QSOs are missing.
If you replace it on the network
- Locate a running network computer whose log includes the QSOs from the broken logging computer. SHUT THE PROGRAM DOWN on this computer.
- Copy that computer’s database_name.S3DB, database_name.s3db-wal and database_name.s3db-shm database files (the last two are temporary files that usually do not exist) to a network drive, diskette or flash drive.
- Copy the database_name.S3DB* database files from the temporary medium to the replacement computer’s \database directory
- Configure the replacement computer and N1MM Logger and begin logging. Any new QSOs will be identified by the replacement computer’s name, which MUST NOT be the same as the broken machine’s name.
- Restart the source computer and resume logging
NOTE:
Each computer is the “book of record” for the QSOs logged on that computer, even though all QSOs are normally logged on every computer for redundancy. Resync simply compares what your computer’s log shows for QSOs by a particular computer (as identified by its network name) to what that computer has in its log. If there is a difference, the computer that logged the QSO sends the updated QSOs to the requesting computer. If a QSO is deleted or removed from the log in the computer that “owns” the QSO (as identified by the computer’s name), the Resync operation will delete that QSO from the logs in the other computers.
Therefore, if the problem was with the database on the “broken” computer, DO NOT create a new database (or a new contest within the existing database) on the problem computer in order to resolve the problem. That will cause all the QSOs that were formerly logged on that computer to disappear from ALL of the logs. Likewise, DO NOT swap in a new computer with the same name and a new empty log, as that will have the same effect. To avoid this, make sure the name of the new computer is different from the name of the broken computer (the computer name can be changed in Windows if necessary to avoid duplication).
The best way to avoid all this is to keep a spare computer (with its own unique network name) up and running N1MM+ on the network. You can then just swap it in for the broken one. The QSOs from the broken computer will still be in the logs in all the other computers.
