
Introduction
Normally, localization (defined for the purposes of this document as GUI translations) is enabled in an application as the result of collaboration between developers and language experts. Developers use a series of tools provided by the software vendor (in this case, Microsoft Visual Studio) to extract a database of strings (text) from the code. Developers then process this database to denote which strings can be modified for translation, those which are static, and those that should never be translated. The processed database is then converted into a simple file (e.g. Excel or .csv) containing the (typically) English version of the strings that is sent to a language expert for translation into a target language. That file is then sent back with translations to the development team which further processes it into a “resource file” and includes it with the application install package. Further work is then required to allow the user to select a language to display in the application.
This is that way that many commercial applications are localized and it works well when the application changes infrequently and when the development team is rich enough with resources to manage the localization process. That is not the case with N1MM+.
In thinking of a way to extend the translation functionality to the multilingual community of radio amateurs without a massive development effort, a hybrid approach has been developed that offers some operational advantages for the users and which removes the support burden from the development team through a self-service approach that allows N1MM+ users to share both the effort of translation and the fruits of each other’s labors. Overall we tried to adhere to the Pareto Principle where the users get 80% of the benefits of a fully localized application with 20% of the work.
This document has two main sections.
- An overall description of how the process works
- Documentation for N1MM users
How it Works
Note the following is simplified considerably for clarity to the non-software developer.
N1MM+ consists of forms and code. The forms are readily recognizable as just about any window the user interacts with. Examples include the Entry Window, the Configuration Window and the Spectrum Display. There are approximately 48 forms in N1MM Logger+. Each form contains a number of controls that the user interacts with. Taking the Entry Window (the primary N1MM Logger+ form) as an example, there are text boxes where the QSO information is entered, buttons that initiate macros and other actions, menus that allow the user to navigate through the application, and a status bar that displays informational text to the user.
In the code, actions are taken that implement the functions of the application. Of interest to the localization process are instructions that display informational, warning or error messages to the users (i.e. message boxes) and those that update text displayed on the form to indicate a change in status or progress of an action, such as that displayed in the status bar.
Controls generally include a set of properties that determine how the object is displayed to the user. For example, a button has a “text” property that contains the word(s) displayed on the button so that the user knows what it does. A menu has a similar property that tells the user what function will be executed or form opened when an item is selected. Another common property is a “tool tip”. These are the pop up balloons that display help information when the mouse cursor is hovered over a control that supports tool tips and the programmer has provided such information.
Similarly, the code behind the form has a set of strings (text) that are displayed to the user under certain conditions as the code is executed.
For translation purposes, many of these various strings are stored in a database table that identifies the form, control, property, and string to be displayed. A function is executed for select forms (more on this later) on form open and redraw that substitutes a translated string from this database table for the default English, assuming it is available. Otherwise the default English is displayed. The language displayed by the application is determined by the setting of the “Language” control on the Configuration form on the “Other” tab.
There is a toolkit supplied within the N1MM Logger+ application that is accessible via the “Config” menu. This tool performs a number of functions related to maintenance of the database table that contains the translated text elements. The essential processes to enable translation of controls and messages in a form consist of the following steps:
- Create a baseline English “placeholder” in the database that identifies the control or string and extracts the English text associated with the appropriate properties.
- Export the baseline English database entries for the selected form to an Excel or .CSV file.
- The user adds a column to the right of the existing entries and translates the text field into the language they are translating to.
- After completion, the user imports the file back into N1MM Logger+ and indicates the language the translations are in.
- Upon opening of the now translated form, if the current language selection has translation rows in the database table, those translated strings will be substituted for their English counterparts.
Please note that the encoding for the text strings is UTF-8. This should handle all the Latin variants and idiomatic character sets such as Japanese along with other Asian sets. The characters for the right-to-left languages (e.g. Hebrew, Arabic) seem to work, but it is not known at this writing whether they are rendered properly in N1MM Logger+ without additional programming. This needs to be tested by someone who actually knows the language(s).
Programmers seeking information on how to enable N1MM+ forms for translation can read more in the appendix titled Translation Technical Information for Developers.
User Documentation
Installing Languages
From the Tools menu on the Entry Window, select the option Download and Install Language Pack (Internet). The following dialog will be displayed:
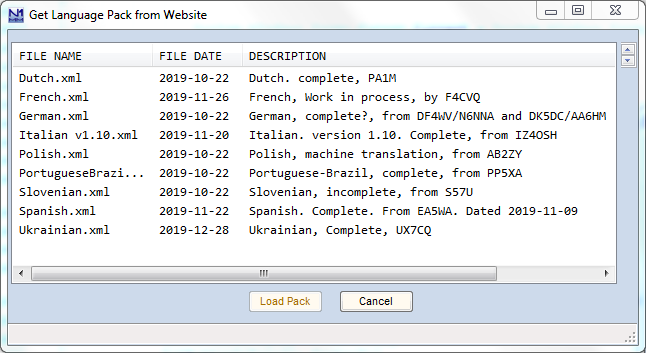
This displays a list of translations that are available from the N1MM Logger+ website. Clicking on a row will enable the Load Pack button. This will download the appropriate XML file and install it into N1MM Logger+ on your computer.
Selecting a Language
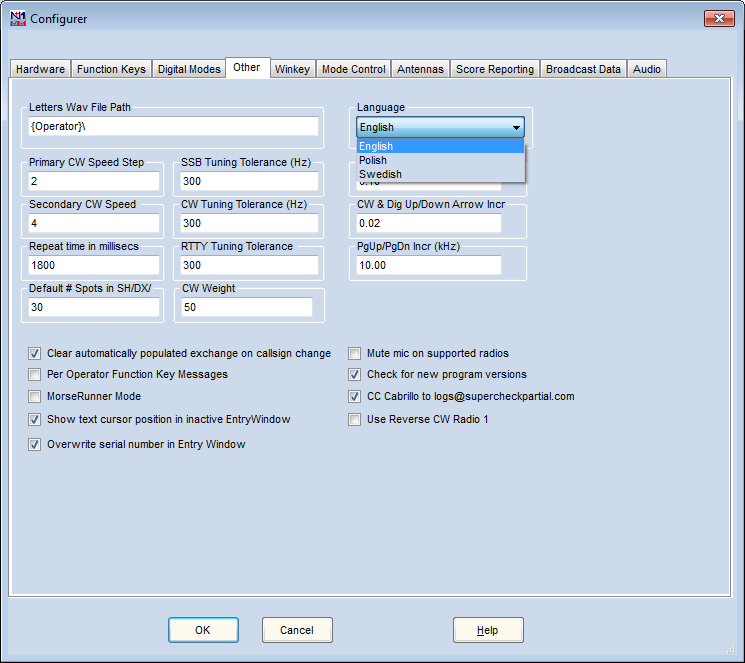
To enable a specific language for N1MM Logger+, go to Config…Configure Ports, Mode Control, Audio, Other… . On the “Other” tab, select the desired language from the Language Combo Box. Note that the only languages available will be those loaded into your translation database table. Before you run the translation tools (below) English may be missing as well but is not necessary for English functionality. The default setting is English.
Adding New Translations
GENERAL NOTE: The translation toolkit allows for the export and import of both Excel and .CSV files. In the authors opinion, Excel is the better format owing to the power of the Excel application and file recovery should a crash occur. Of course, not everyone has access to Excel and thus must use the .CSV format. No recommendation is made here with respect to picking a tool. Google search indicates many free versions are available online.
Regardless, DO NOT USE Excel TO CREATE .CSV FILES. You will run into no end of grief as the default settings in Excel do not allow for the export of UTF-8 characters into .CSV formats and you run the risk of corrupting your translations.
Open the dialog in Config…Manage Translations… The Manage Translations screen will appear. Click on the Translation Table Maint. Tab. It should look like the following:
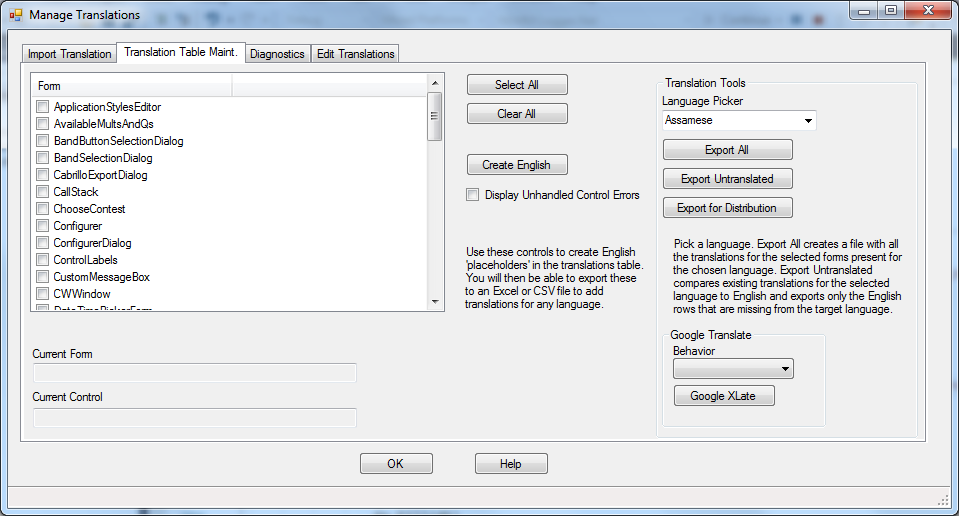
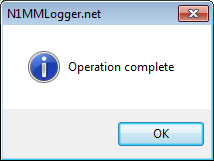
The list box will display ALL forms in the N1MM Logger+ application. Note that a few forms have not been enabled for translation by the developers, but these are relatively unimportant. Select the form(s) you wish to translate and then press the “Create English” button. This will populate the database table with all the translatable strings from those form(s). After the tool is finished it will display the following message:

In the “Translation Tools” section select “English” from the Language Picker combo box. Then click either “Export All” or “Export Untranslated”. “Export All” will allow you to export ALL of the English rows from the translation table for the select form(s). This is where you will start on a brand new setup of a language.
“Export Untranslated” will export ONLY those English entries that DO NOT already have a translation in the selected language present in the table. You might do this, for example, if adding translations for new controls on an updated form, or to add to a partially completed set of translations.
Note that by picking a language other than English in the Language Picker, the tool will export entries in that language. Note that this is useful for making changes to an existing set of translations, or to be used as a starting point to translate dialects or otherwise similar languages.
Clicking either button will display a standard file open dialog box. The type of file that will be created is determined by the file extension used. This can be either “.csv” for a comma separated value file or “.xlsx” for an Excel spreadsheet. I will use Excel for the examples in this documentation. The following message will be displayed upon completion:
The remainder of the “Translation Tools” section will be described later.
Open the file you created in the appropriate tool. Below is an example using Excel with the “Configurer” form.
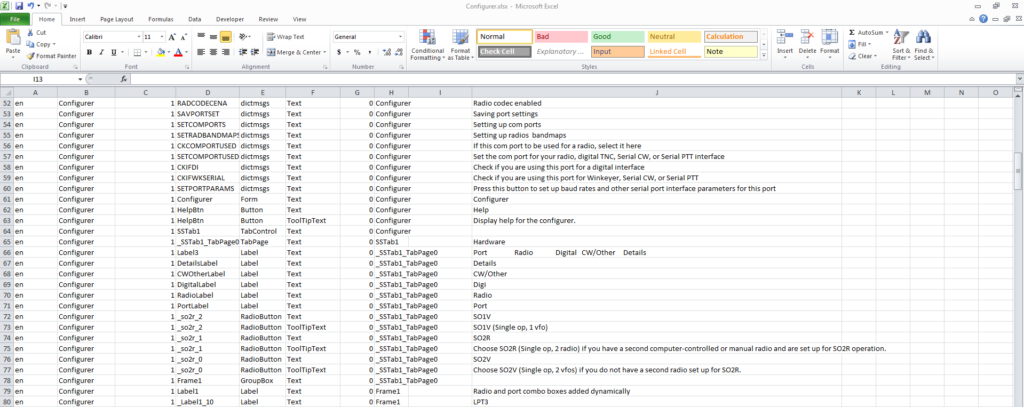
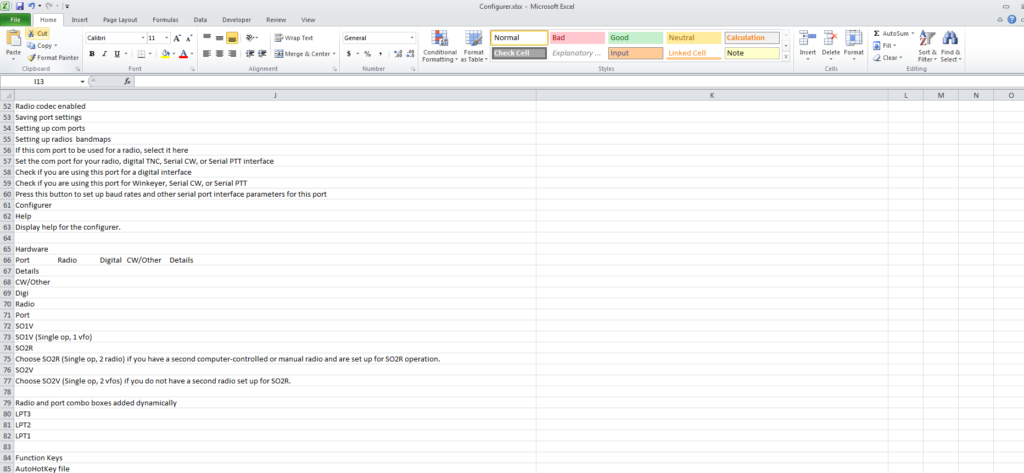
DO NOT ALTER ANY ENTRIES IN COLUMNS A-I!!!! They are hidden in Excel by default by setting the width to zero. Enlarge columns J and K so that the file looks similar to the following:
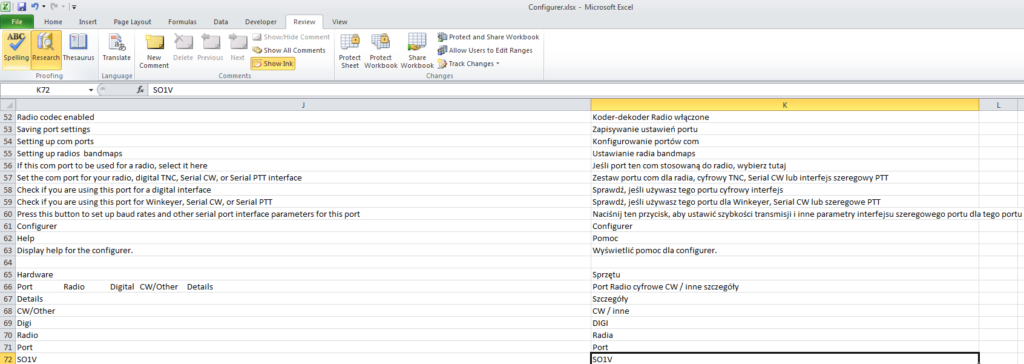
In column “K”, add your translation for the text in column “J”. This example is in Polish. Pay attention to the following rules:
- Don’t delete any lines, even if the text is blank. If the control is a container that has no translatable text, the entry is still necessary to determine the hierarchy of parent and children controls.
- If you don’t want to translate the text (say, because it is an acronym that is translated the same as English), copy the text from column J to column K.
After you are done, the file will look like this:
IMPORTANT NOTE: If you are only translating part of a form, make sure you delete all rows from your spreadsheet where the English column is not blank but the translated column is. Otherwise, the untranslated elements in those form(s) will display blanks instead of valid text elements.
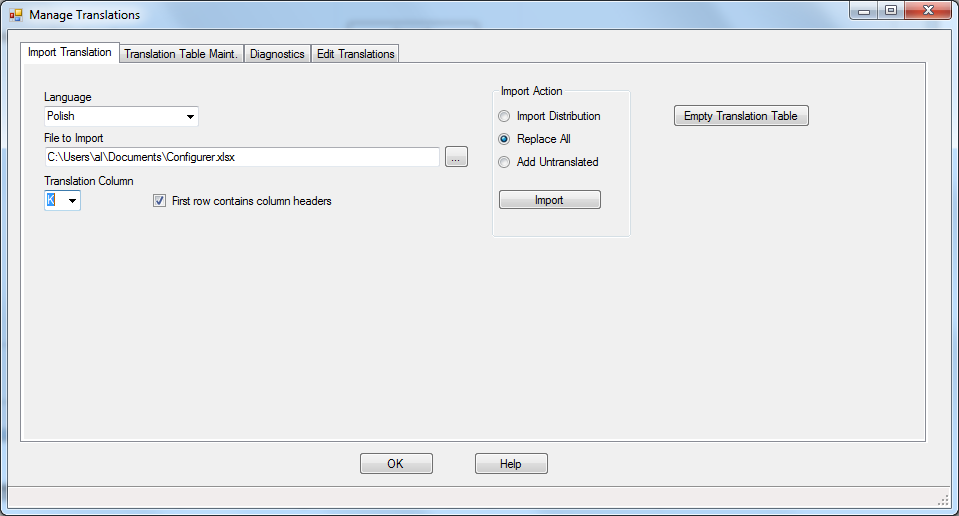
Click on the “Import Translation” tab. The following will be displayed:
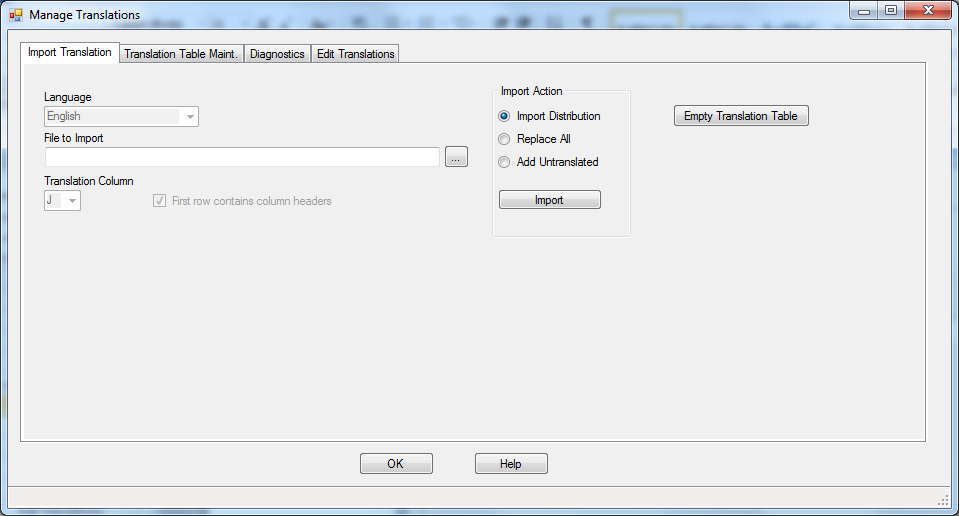
Click on the … button to browse to the file you created in the prior step or enter the path and file name in the text box.
Under “Import Action”, select “Add Untranslated” to add ONLY the rows from your input file THAT DO NOT ALREADY EXIST in the translation table in the target language. Select “Replace All” if you want to delete all translations for the selected forms prior to import. This will enable the disabled controls below.
Choose the language you have translated to.
Set the translation column to the one containing your translations (“K” in this case).
Uncheck the “First row contains column headers” checkbox if you deleted the first row.
NOTE: Column B in the import file contains the form name for the controls being translated. When you import your file, the value in this column is used to determine what form the control belongs to and what translations, if any, are to be deleted if “Replace All” has been selected. You will be asked for each new form whether you are sure you want to delete the existing translations.
The following shows the result from the above setup:
Click on the “Import” button when ready. A message will be displayed when complete:

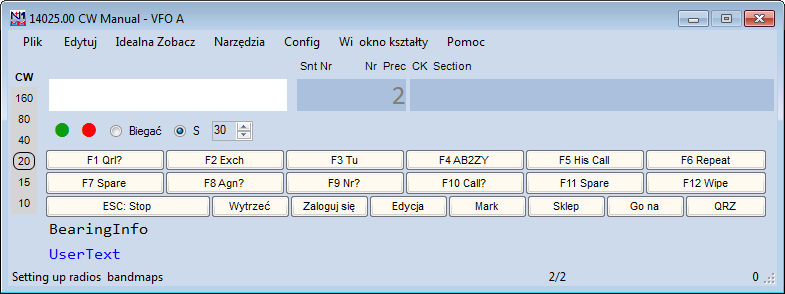
Now go to the Entry Window and select Config…Configure Ports, Mode Control, Audio, Other… . On the “Other” tab, select the language you just translated to from the Language Combo Box. Using the Polish example, the following should happen to the Entry Window upon clicking OK in configure:
Sharing Translations and Using the Translation Work of Others
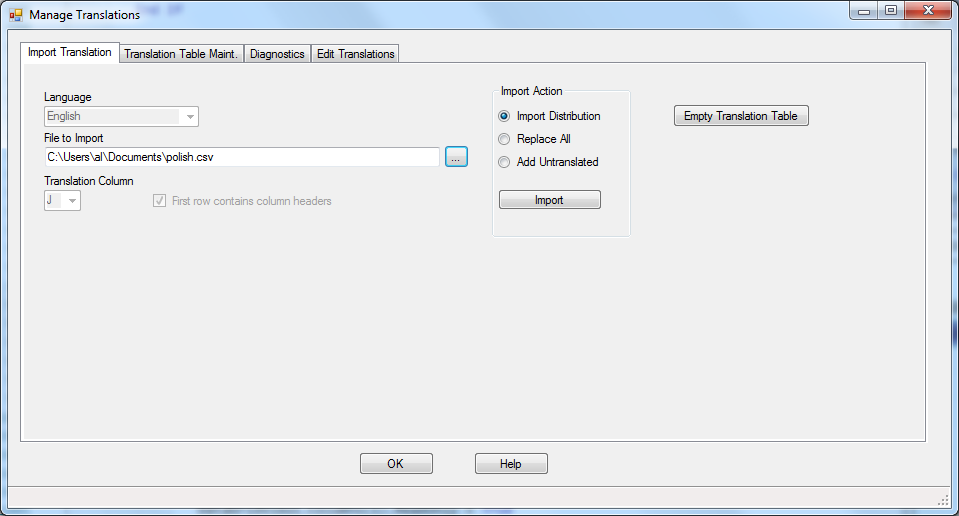
To share your translation work with others, click on the Translation Table Maint. Tab and select the forms you wish to share with others. Choose the language you have translated in the language picker. Click on the Export for Distribution button.
This will open a standard file open dialog box and allow you to pick a location and name for your export file. Note that this file is ONLY in XML format. Click OK and the file is created.
Users of the file do not need to use any of the functionality described above to enable translations for the forms and language saved in the distribution file. Use the … button to select the file to be imported and then click on the Import button. Then go to the Configure Ports…Other tab and select the language just imported. The windows translated in the imported file will then be displayed in that language.
Below illustrates a user import:
Please note that only translation team members might need to use this function. General users should use the fully automated Download and Install Language Pack function described previously.
Empty Translation Table
The Empty Translation Table does just what it says. It clears the translation table of ALL entries, both translated and English. Don’t use it if you do not have copies of your translation work saved as Excel or .csv files.
Google Translate
This functionality was originally included to assist developers in creating test translations. It may or may not be useful to translators as a tool for getting started. Select the desired forms and choose either Refresh All or Add Untranslated from the Behavior drop down box. Refresh All will delete any existing translations for the selected form(s) and language while Add Untranslated will use Google only to translate English text elements that are not yet translated.
Some notes regarding this function:
- It is unsupported.
- It uses undocumented functionality from the Google Translate website that bypasses the need for any additional Google software to be installed on the client computer.
- Because of this, it has a quota of about 500 translations before the user is temporarily denied access. Access is restored after about an hour. If you use the “Add Untranslated” behavior after receiving this error, it will restart where the error occurred.
- Translations are terminated at the first period in the text element being translated. Thus multi-sentence text elements will only have the first sentence translated.
Diagnostics Tab
The diagnostics tab is used to check the integrity of the translation table. It will show translations for GUI objects that do not or no longer exist in the application and English objects that have not been translated into the selected language. Note that this is driven by the forms selected on the Translation Table Maint. tab. It is intended mainly as a developer tool but there is no harm to be done by accessing it. It does not use any existing English placeholders for comparison purposes. Rather, it performs a complete new scan of the forms selected and uses that for the comparison baseline.
Edit Translations
The Edit Translations tab displays the translations database in a grid control that offers a limited ability for the user to edit text. Initially clicking the tab will display the entire database in the grid control. Three filters are available to limit the display to a particular language, form, and control. The funnel icons are used to apply and remove the filters, respectively. The form is illustrated below:
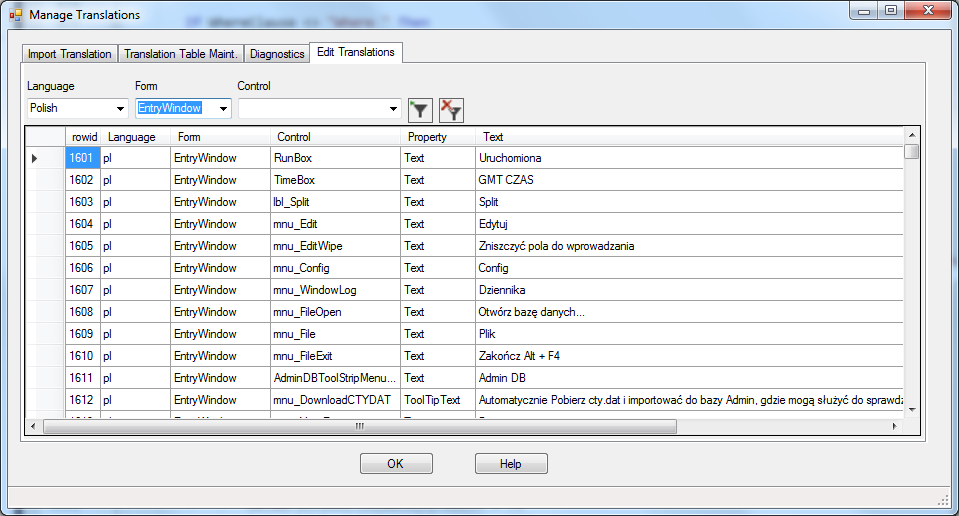
The only column that can be clicked in and edited is the one labelled “Text” and only non-English rows are allowed to be edited. You will get an error message and the text will be restored to its state prior to editing if you try. The purpose of this function is to allow for minor “tweaks” to a handful of control translations without the need to perform a full export & import process.
Clicking the “Remove Filter” button will also refresh the screen.
