
The CW Reader Window
The Logger’s CW Reader is receive-only. The CW reader engine cannot be used to transmit CW; to transmit CW, you must configure some other method in the Logger (serial or parallel port keying, or a Winkeyer, for example).
CW Reader Setup
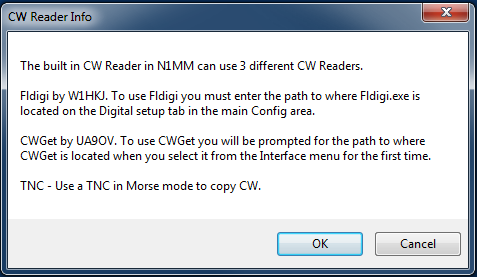
The first time you open the CW Reader window, or any time the window is opened with no CW reader engine selected in the setup, the following dialog will be displayed:
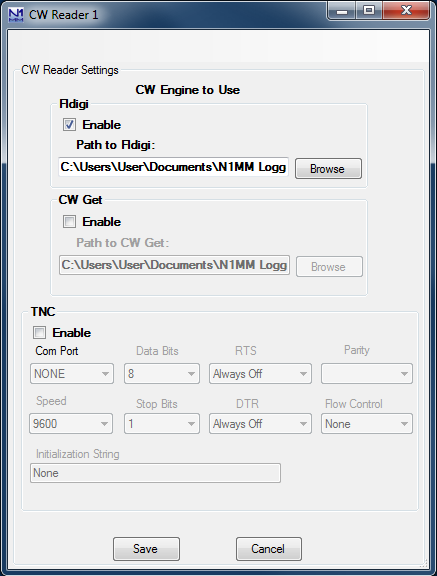
After clicking on OK in the above window, or at any time thereafter by selecting the Setup menu in the main CW Reader window, the following setup window will be displayed:
N1MM Logger+ supports three different CW reader programs, or “engines”.
The first, Fldigi by W1HKJ, is also one of the digital engines that is supported by the Logger for digital modes. Fldigi is not automatically installed with N1MM Logger+; if you want to use it, you must download and install it. Once fldigi has been downloaded (and optionally configured for digital mode operation – see the Digital – Fldigi for Sound Card Modes chapter), it can also be used as a receive-only CW reader (N1MM Logger+ does not support transmitting CW from fldigi). Click on the Enable check box for Fldigi and set up the location of the fldigi.exe file you are using as a CW reader. You should create a separate folder for the fldigi CW reader and copy fldigi.exe from the main fldigi installation folder into this separate folder. You may wish to use a separate copy of fldigi for CW from the N1MM+ digital modes copy as well; that way, the configuration setups for fldigi for CW and for digital modes can be saved separately. Both of these copies of fldigi should be outside the Program Files or Program Files(x86) paths in Windows Vista or later, in order to enable the configuration files to be saved. Although you can run fldigi stand-alone from a location in the Program Files path, any copy of fldigi that is run from N1MM Logger+ in Windows Vista or newer must not be located in a protected Program Files path. When you first install fldigi, you do not need to do the original installation of fldigi outside the Program Files path. Simply install in the default location, create a new location outside the Program Files path, and copy the fldigi.exe file from the original installed location into the new location. The first time it is run from the Logger, fldigi will create the other files it needs in the new location.
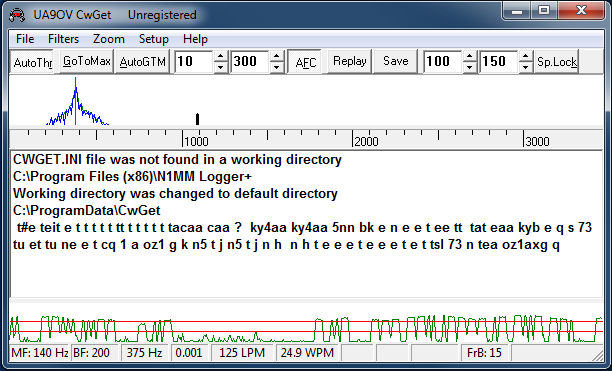
The second supported CW reader program is CwGet by UA9OV. This is a shareware program that can be downloaded from the www.dxsoft.com web site. It may be used either unregistered (free), or registered (requires a fee to be paid to the author). The unregistered version does not save configuration information between runs, which means that you will have to perform the setup (primarily selection of the sound card to be used) each time the CwGet engine is started. In either case, after downloading and installing CwGet you can select it in the CW Reader setup window by checking the Enable check box for CW Get and entering the path to the program. It is also possible to select command line settings for CwGet in the setup window. Unlike fldigi, CwGet may be run from the default installation location even if that location is in C:\Program Files or C:\Program Files(x86). You do not need to make a separate copy of CwGet outside the Program Files path.
The third supported CW reader type is an external TNC that is capable of decoding Morse code. You set up the COM port communications parameters for the TNC in the bottom part of the window.
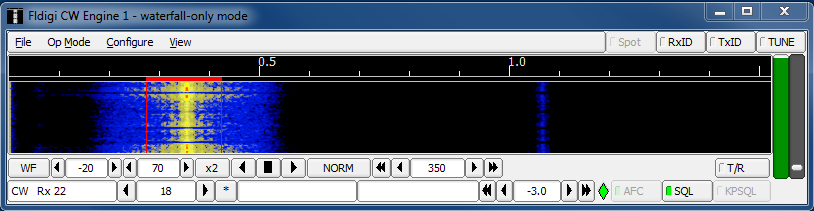
Once the CW reader engine has been selected, click on Save to save the selection and exit the Setup window. This will open one or two new windows: the CW reader engine window (if you are using fldigi or CwGet) and the CW Reader text window (see next section). There will be further configuration required in the CW reader engine window the first time it is used (or every time if you are using an unregistered copy of CwGet), in order to select the sound card that is used for decoding. The fldigi configuration window may open the first time you use it; if it does, the first part of the configuration information that is needed for the CW Reader engine is the sound card setup. You also need to ensure that rig control and PTT control are both disabled in fldigi. The first time fldigi is used as a CW reader engine, it may start up in a digital mode and you may need to change its operating mode to CW.
Since N1MM Logger+ supports two Entry windows (for two VFOs in SO2V, or for two radios in SO2R), it also supports two CW Reader windows. The CW Reader window corresponding to each Entry window is opened from the Window > CW Reader menu item in that Entry window. In order to save separate configurations for the fldigi engines in the two CW Reader windows, you will need to use two separate copies of fldigi, one for each CW Reader window. If you want to use CwGet in both Entry windows, it should be a registered copy.
Both CW Reader software engines (fldigi and CwGet) use a sound card for decoding. If your radio has a built-in USB audio codec you would normally use that for audio input. If it does not, you would need an audio cable connection between the radio’s audio output and a sound card input. The radio output can from a speaker or headphone output, or a line output if a separate output (possibly labelled for digital modes) is available. The sound card can be a motherboard sound card or a separate sound card, either internal or external. If possible, the input used should be a line-level input. If the only input available is a microphone input, you may need to supply an attenuator (resistive voltage divider) between the high-level output from the radio and the low-level microphone input on the sound card. In Windows 10 and 11, starting with the Spring 2018 update of Windows 10, you may need to adjust a Windows privacy setting (Windows Settings > Privacy > Microphone) called “Let apps use my microphone”. This option must be turned On to give programs like the CW Reader software engines access to sound card inputs, and the program using the sound card (CwGet or fldigi) would need to be included in the list of apps authorized to use the “microphone”.
If you are using a TNC as the CW Reader engine, the audio connections will be between the radio and the TNC, and there will be a serial port connection between the TNC and the computer.
Note that older versions of fldigi only use the left channel on input; for that reason, in most SO2V installations these older versions of fldigi can only be used from Entry Window 1. Starting with fldigi version 3.22.06, fldigi is now capable of using either sound card channel for input. In any copy of fldigi that you want to use with the right channel of the sound card, use the Configure > Sound Card menu item in the fldigi window to open the fldigi configuration window. Select the Right channel tab, and near the bottom under Receive Usage, check the Reverse Left/Right channels check box to switch fldigi to use the right channel on receive. Click on Save to save the configuration change, and then close the configuration window.
Recent versions of fldigi may default to requiring confirmation from the user before you shut them down. If that shutdown is initiated by shutting down N1MM Logger+, instead of by shutting down the CW Reader window and engine first, this can result in fldigi continuing to run after the Logger has shut down. This can cause problems the next time you start up the Logger. To prevent this from happening, you need to make a change in the fldigi configuration file. In each folder that fldigi is run from, find the file called fldigi_def.xml. (Note: this file is created the first time fldigi is run from this location, i.e. it will not exist until after you have run that copy of fldigi at least once). Right-click on the file name, select Open with… and then select Notepad or WordPad as the program to open the file with. Look for a line that reads <CONFIRMEXIT>0</CONFIRMEXIT> or <CONFIRMEXIT>1</CONFIRMEXIT>. If you see a 1 between the two keywords, change it to a 0 and save the file. Repeat this for every copy of fldigi you use from within N1MM Logger+ (CW Reader 1, CW Reader 2, DI1, DI2, and any digital RX-only windows you use fldigi in).
If you choose to use CwGet as the engine, note that if you use an unregistered copy of CwGet, that unregistered copy will only transfer decoded text to the first CW Reader window. In most SO2R or SO2V installations CwGet will have to be registered if you want to use it from both Entry windows. Also, unregistered copies of CwGet will not save their configuration data, meaning you will have to set up the sound card parameters every time you start CwGet; registered copies will save their configuration data and remember it between sessions. The configuration data is stored in an ini file in the N1MM Logger+ user files area (the same location as the N1MM Logger.ini file). It will be called CWGET1.INI (Entry Window 1) or CWGET2.INI (Entry Window 2 in SO2R or SO2V).
CW Reader Operation
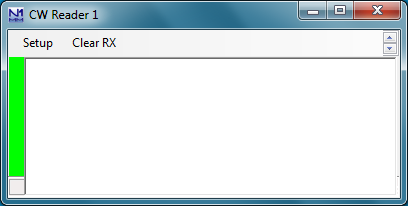
The CW Reader window is where decoded received text appears. If the scrolling method selected in the Digital Interface Setup window is “scrolling”, then as new incoming text is decoded, older text is scrolled off the top of the screen. If the scrolling method selected for the Digital Interface is “non-scrolling”, then text does not move, but incoming text overwrites previous text on the current line; the current line where incoming text is displayed is indicated by underlining, and moves down the window one line at a time, jumping back to the top of the window once the bottom line is filled. You can stop scrolling temporarily by clicking on the green bar at the left of the window; the green bar will turn yellow and the text will stop scrolling so you can copy it without having to follow it up the screen or catch it before new incoming text overwrites it. When you click on the yellow bar to resume normal scrolling, the bar will turn green, text that was decoded while scrolling was stopped will be sent to the window, and then normal operation will resume.
You can click on call signs and exchanges in the text window; depending on where the focus is in the Entry window, this will automatically transfer the text that was clicked on into the call sign or exchange box in the Entry window. This operation is similar to the way the Digital Interface window is used in RTTY and PSK31.
There are two menu items in the CW Reader window. The first one, Setup, opens the setup window to enable you to change the CW reader engine. The second one, Clear RX, simply clears the received text window.
In order for the CW reader engine to work, the signal you wish to copy must be tuned in correctly. The CW reader engine has tuning aids (either a waterfall or a spectrum display in Fldigi, and a spectrum display in CwGet) to help you tune signals accurately. You can fine tune by clicking in the spectrum display, but be aware that fine tuning in the CW reader engine will have no effect on your transmitted signal’s frequency. If you wish to transmit on the same frequency as you are receiving on, your best bet is to set the CW reader engine’s audio frequency to be the same as your transmitter’s sidetone frequency, and then tune signals using the transceiver’s tuning knob (not by clicking in the spectrum display or waterfall).
Software decoding of CW (Morse code) has its limitations. The signal to be copied must be fairly strong (at normal CW speeds, the human ear can decode CW at lower signal-to-noise ratios than software can) and clear of QRM and QRN (heavy QRM or QRN can render the CW undecodeable). The sent CW timing must also be accurate (e.g. machine-sent CW). On a good machine-sent signal such as ARRL CW bulletins, software copy can be nearly perfect. On the other hand, sloppy hand-keyed CW can result in errors ranging from poor spacing (v e 3 k i instead of ve3ki) to a complete failure to copy (nothing but Es and Ts displayed, as the reader software triggers on individual dits and dahs).
