
The Info Window
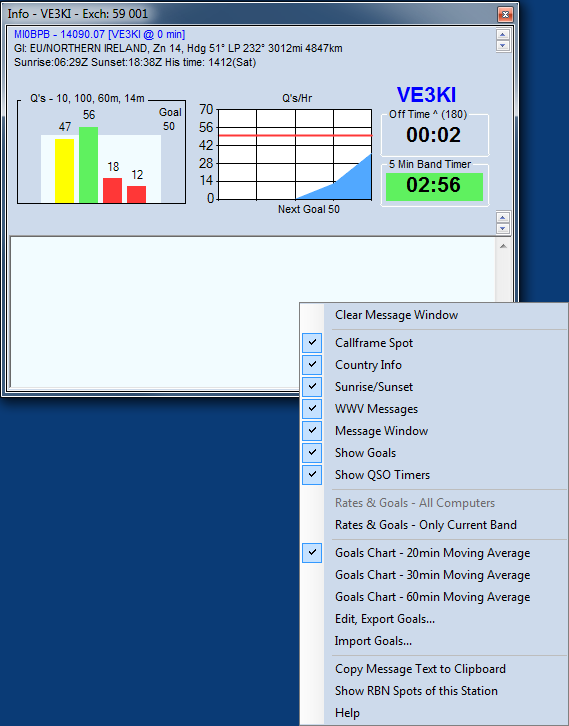
The illustration below is a typical Info window with all options enabled in the right-click menu, also shown.
To open the Info window, select “Info” on the Window menu of the Entry window
Key Features
- The title bar shows the station call sign (from the Station Data table) and the default Sent Exchange for the current contest. The operator’s call sign is shown in blue on the right side of the window. If another operator signs on using Ctrl+O or the OPON text command, that call sign will replace the previous one.
- The sent exchange is shown in the title bar. The next QSO number will be shown on the title bar if it is a serial number contest. Example: Exch: 59 002
- The content of the window, other than the long-term and short-term rate displays, is selectable from the right-click menu.
- The first line is the spot that is in the call-frame of the Entry window, including any comment.
- The second line provides country information, including long and short-path headings, as well as short path distance to the country of the call-frame spot.
- The third line provides sunrise and sunset times in UTC at the DX location, plus his local time
- The fourth line displays the last WWV message received from the connected Telnet node. There were none when this screenshot was taken.
- Below the information lines are two graphs for rates (and if selected from the right-click menu, goals). The left-hand one shows near-term rates. Left to right, these are the rate for the last 10 QSOs, the last 100 QSOs, the last hour, and the interval since the start of the current clock hour. The right-hand graph displays hourly rates for five intervals, selected from the right-click menu to be either 20, 30 or 60-minute moving averages. Each vertical line represents one such interval – the rightmost edge is the current interval, which may not have been completed at any given moment
- When “Message Window” is selected from the right-click menu, there is an open area in the bottom part of the window for messages from the program. One important use is for notification when you are spotted on the DX Cluster network, and by whom. It is also the place, in a multi-op, where the program reports any difference in entry category between computers on the network (multi-single versus multi-two, for example).
One of the right-click menu options (“Show RBN Spots of this Station”) opens a browser window displaying recent spots for the station call sign on the Reverse Beacon Network (RBN). This can be a useful indicator of whether and where your signal is being heard in CW and RTTY modes; it is of no use in phone contests. If you are connected to a DX cluster node that carries RBN spots and the Message window area is displayed, spots of your call sign are displayed in the message window as they arrive, whereas the “Show RBN Spots of this Station” option shows the last 25 (or 50 or 100) spots of your call sign recorded by the RBN in a browser window regardless of whether you are connected to a cluster node or not.
Note that with the advent of the RBN, the sheer number of spots received and listed in the Available Window and on the Bandmaps within the spot timeout period may exceed the computer’s capacity to process them. The program monitors CPU utilization, and when it approaches a dangerous level, automatically trims a small number of the oldest spots. When this takes place, you will see an advisory message in this section of the window, so that you can decide if you wish to make any changes in your DX cluster filtering or other variables.
QSO Timers and Counters
When “Show QSO Timers” is checked in the right-click menu, the Info window also displays, under the current operator’s callsign, a number of useful indicators. These include:
– A timer to indicate off time for contests where there are minimum limits on off times, or to display the time elapsed since the last contact was made as a supplement to the goals charts. Right-clicking on the time in this box will open a pop-up menu in which you can choose what is displayed in this timer. The available options include:
- Display Off Time (full clock minutes with no QSO’s) – off time timer for rules compliance
- Current Interval Count Down Timer – counts down in hours and minutes from the beginning of the clock minute after the last QSO was logged, starting at the off time limit and counting down towards zero
- Current Interval Count Up Timer – counts up in hours and minutes from the clock minute after the last QSO was logged, starting at 0:00
- Cumulative Contest Off Time – adds the durations of off times that were long enough to qualify under the contest rules. If the current off time is not yet long enough to qualify, it is not included in the total. Note that the Start date and time for the contest in the Contest Setup dialog must be correct for the cumulative off time to be calculated correctly.
- Time Since Last QSO (not for off time rule compliance) – counts the minutes and seconds since the last QSO was logged
- All Computers Radios – the time since the last QSO was logged from any station in the network
- Both Radios (SO2R), VFO A/B (SO1V/2V) – the time since the last QSO was logged from this station
- Left Radio (SO2R), VFO A (SO2V) – the time since the last QSO was logged from the left/VFO A Entry window
- Right Radio (SO2R), VFO B (SO2V) – the time since the last QSO was logged from the right/VFO B Entry window
When an off time option is selected, the frame for this timer includes, besides the words “Off Time”, an arrow (^ or v) indicating whether the timer is counting up or down, and the minimum duration (in minutes) for off times for that contest and category. The timer is in hours and minutes; the background will change to light green once the minimum time has been reached.
– In some contests and entry categories, there is a second timer or counter display to help you comply with contest rules for band changes when there are band change time limits or counters. If there is a band change time limit, this timer appears below the QSO timer, and counts down in minutes and seconds from the beginning of the clock minute after the first QSO logged on a new band. The band change timer does not start until the first band change of the contest. The background color changes to pale green once the required time limit has been reached and the counter has reached 0:00.
If the contest and category has a limit on the number of band changes per hour, there is a band change counter which appears to the right of the QSO timer (you may have to make the Info window wider to see it). This band change counter has a “stop light” (red/yellow/green) colored background, to warn the operator when nearing or exceeding the allowed number of band changes in the current clock hour.
– There may also be a mult-run indicator that displays MULT or RUN in the Multi-One category or “1” or “2” in the Multi-Two category. This indicator is below the band change counter, to the right of the band change timer. The Multiplier or Run status for this station can be toggled with the key combination Ctrl+Alt+M.
Contest Goals
In N1MM Logger+, goals are stored in a table in the Admin database. Only one set of goals can be active at any time, and regardless of the contest you open, they remain active until replaced. However, if you have defined a goal file on the Associated Files tab for a given contest, that goal file will be loaded whenever you start a new instance of that contest. For example if you define CQWW goals.txt as an Associated File in one instance of CQWWCW, that goal file will be loaded any time you open any instance of that contest.
Here are some other key things to remember about N1MM Logger+ goals:
Editing and Exporting Goals
Right-click in the Info window, and click on Edit and Export Goals. That opens the following dialog:
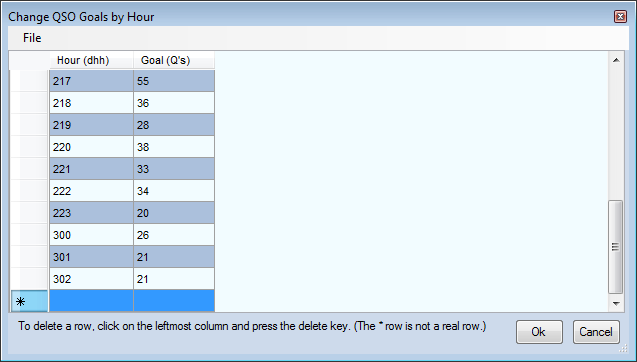
You’ll note that the hour is stored in the form “dhh” where “d” is __the day of the contest and “hh” is the beginning of the hour, in clock time, not in terms of the hour in the contest. Hence, for example, “222” denotes the second day of the contest and the hour beginning at 2200Z. In the example, the goals were derived from an ARRL November Sweepstakes, which runs until 0300Z on the third day.
You can edit this table just as you would any other table in an N1MM Logger+ database. Be careful with the “hour” column until you are comfortable with the convention. When you have made your changes, you can either export to a goals file in text format, which will be placed in Documents\N1MMLogger+\GoalFiles, or simply OK out of the dialog, in which case the changes are saved to the Admin database’s Goals table.
Goal Files
This is the Goal file format:
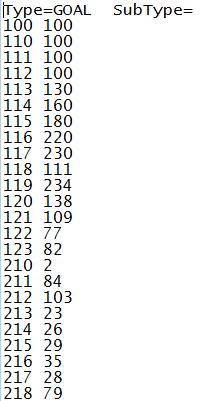
You can create a Goal file with a text editor and import it into the database using the Import Goals function (see below). Be sure that you use a straight text editor for this, such as Notepad. Word processing programs can insert special codes that N1MM+ does not understand.
Note that you do not need to enter anything for those hours when you do not plan to operate, but you do need the header just as it appears here.
Be sure to set the contest start time (in the Contest Setup dialog) to the correct value for any contest in which you intend to use goals. As you can imagine, this is important to ensure that the appropriate goal is displayed for the appropriate hour of the contest.
Importing Goals
Click on Import Goals, and this submenu will appear. You can import goals from a prior contest log or a .txt file in the GoalFiles Document directory
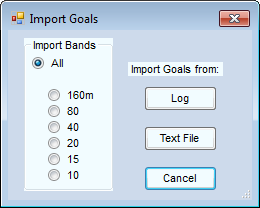
- Typically, you will want to import goals from all bands, but if you plan to enter a contest single-band, you can set goals for that band only by clicking the appropriate radio button.
- Click on the “Text File” button, and a dialog opens showing you all the goal files in the GoalFiles document folder. Select one, open it, and the contents are transferred to the database.
- Click on “Log” and something new happens. This window opens:
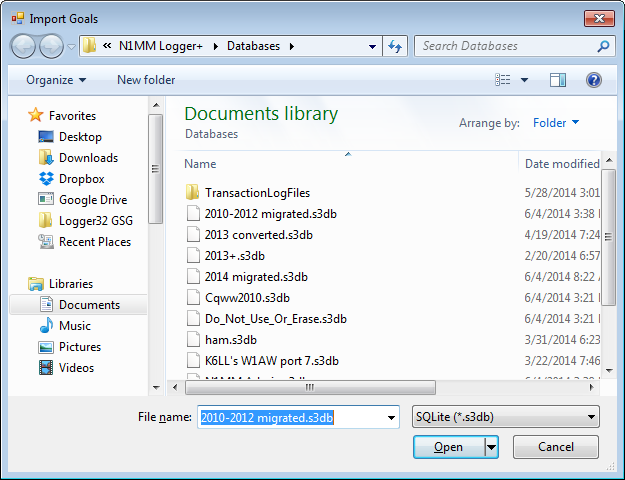
Select the database you want to get your goals from, and click “Open”.
Now this dialog opens:
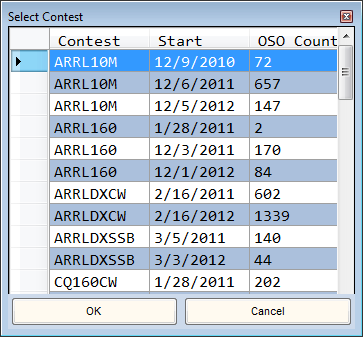
Select the contest from which you want to derive your new goals, and OK out. Once imported you can edit the goals as outlined above, and optionally export them to a Goals file.
Importing Goals (Developer notes)
For the goal import files:
- All import blank lines are ignored.
- All import lines beginning with a # in the first character position is considered a comment line and is ignored.
- The Goals hour is defined as the hour of the day, not the hour of the contest. This is to make it easy to align goals with GMT time when the contest doesn’t start at 00:00gmt.
- Before the contest start, the Goals will be set to the contest first hour goal.
- The Goals are set to zero if Info window charts display 96 hours after the start of the contest.
- If the user Right Clicks on a QSO in the Log Window and selects the option to display Rates & Goals in the Info Window, the Charts will update with the Goals as if it occurred during the contest.
- If the database doesn’t contain goals, a default goal of 50 is used.
- If an error occurs during the selecting the goal, a a goal of 50 is used.
- File formats accepted:
- The View, Statistics text file (*.TXT or *.txt) can be used as a goal import file. All bands or one band can be selected during import. Opened in an editor it has this format:
     Day        Hr  1.8   3.5     7   14   21   28   Tot  Accum
     2010-11-27 00    0    70   146    5    0    0   221    221
     2010-11-27 01    0   116   119    0    0    0   235    456
     2010-11-27 02   71    27   128    0    0    0   226    682
     Total       0  306   867  2088 2156 1763  542  7722   7722
- The Goals import file can be a .TXT or *.txt file hand generated space(s) or tab delimited, repeated spaces or tabs are OK. Examples are:
0  100
1  111
2  222
- The Goals import file can be a *.CSV or *.csv hand generated file, comma separated, repeated spaces or tabs are OK, only one comma in the line is allowed
0, 100
1, 111
2, 222
- The Goals import can also be the *.TXT file exported from Edit, Goals window.
Type=GOAL  SubType=
     100     350
     101     337
     102     321
