
The Multipliers Window
The Multipliers window is opened from the Entry window’s Window menu. Clicking on the “Multipliers” selection opens a sub-menu from which you can choose one of seven multiplier displays. Which of these displays is relevant or useful depends on the contest.
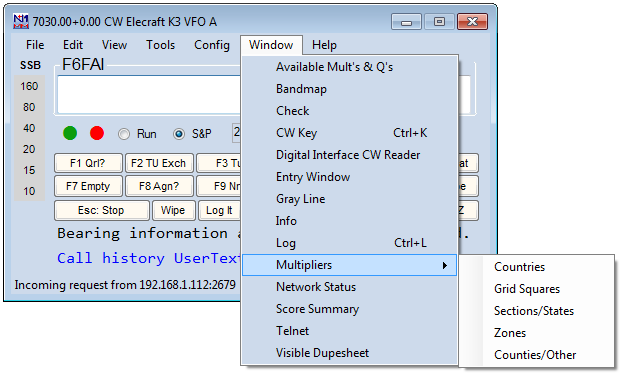
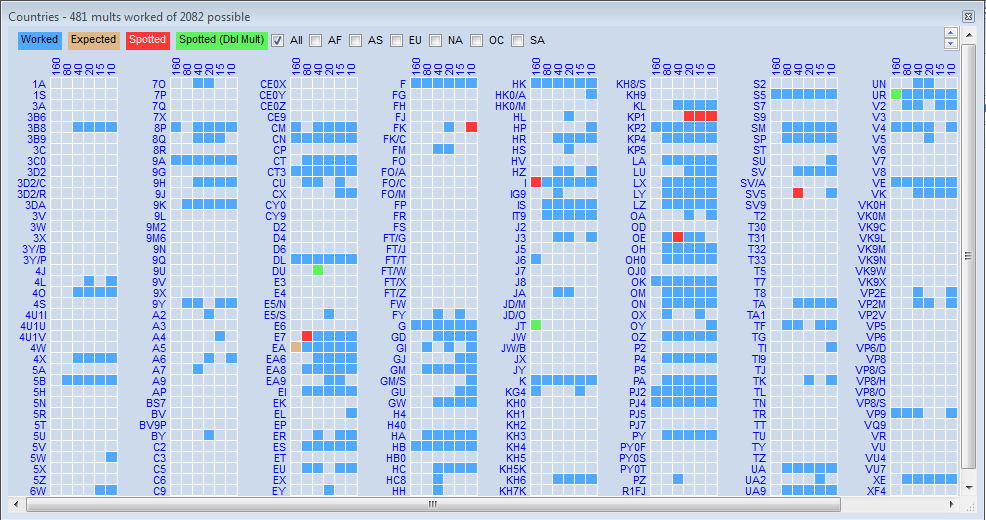
Choosing Countries, in a CQWW log, displays a chart like this:
If your Multipliers window is empty or incomplete, right-click and look on the right-click menu for the option “Show Only Worked & Expected to be Worked Mults.” If it is checked, then The multiplier window will only show mults that have been worked, ones that you have included in an expected mult list, and mults that have been spotted. Uncheck it, and the Multipliers window will show all possible spots, worked or not.
Key Features
The drop-down menu gives seven choices, each of which is tailored to meet needs in certain contests. Whichever you pick, there are some key common features.
Color-Coding
The color blocks displayed are, by default, blue for a band where the mult has already been worked (but a valid QSO is available), red meaning that a station is available for a single multiplier on that band, and green meaning a double multiplier QSO is available on that band, in those contests that have them. These colors may be changed to meet special needs through the Manage Skins, Colors, and Fonts editor on the Config menu of the entry window.
Decisions by the program about whether a multiplier is available on a given band are based on callsigns, and for those contests in which multipliers are determined by the content of the exchange, the color-coding may not be accurate. A multiplier block remains on the chart until the underlying spot has expired under the current bandmap spot timeout setting. Open a Bandmap along with the Multipliers window, set a short timeout, and you will be able to see this happen.
Tailoring Mult Lists for Particular Contests
Users will often want to tailor one of the seven available multiplier lists to a particular contest or QSO Party; for example, in WAE, non-European competitors will only want to keep track of European country multipliers.
As a first step in this direction, the seven check boxes across the top right of the Countries multiplier window permit you to limit the display to a single continent. Only one can be displayed at a time, but once you leave the “All” display, you will discover that you have some flexibility in the way that the columns of multipliers are arranged, to help you make best use of your screen space. This varies from one type of multiplier to another – for example, the States/Sections window must be displayed as a wide rectangle to group 10 US call areas and the Canadian sections in logical order.
Gerald, VE1DT has done considerable work on defining the other tailoring possibilities, and much of what follows is based on his efforts.
Options for doing this are found in the right-click menu reached from any of the multiplier lists. Depending on the contest and the window, some of these entries may be greyed out.
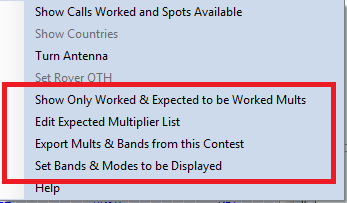
Show Only Worked & Expected to Be Worked Mults – Checking this option limits the mults displayed to those specified by one of the methods below.
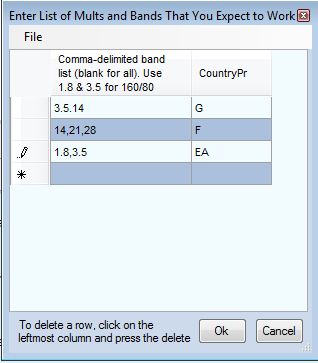
Edit Expected Multiplier List – Clicking this option opens the following dialog
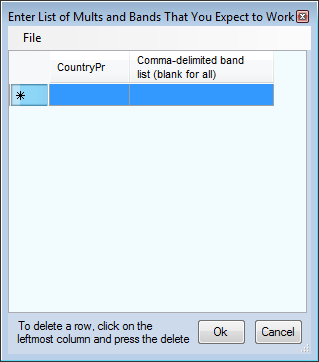
You can use this dialog to edit the list of expected multipliers, one at a time. For example, if you are editing the countries to be displayed, you’ll need to enter the country prefixes one line at a time, in upper case exactly as they are shown in the Multipliers window. For example, you need to enter “CE0X” not “CE0/X”. If you enter specific bands, note that they are specified by frequency in MHz, not by wavelength in meters. Here’s a simple example:
Click OK to save the list, and if you check the “Show Only” option described above, the Multiplier window will look like this:

Similarly-limited multiplier displays can be generated by the same process in the Zones display. Before the “Show Only” option is checked, this display may look like this:
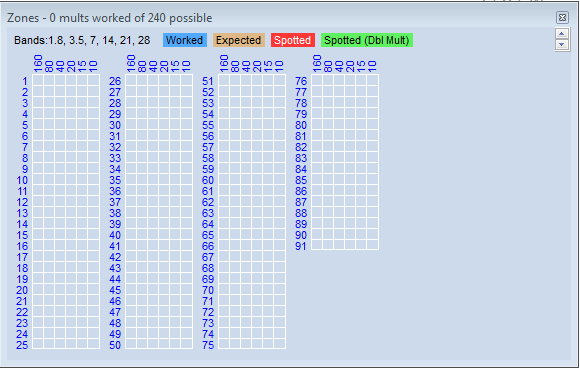
The reason for the 91 zone lines in this example is to cover both CQ and ITU zones. In the CQWW contests, the display will only show the 40 CQ zones. In the ITU list, zones 76-91 are sea zones and you may wish to eliminate them from the display.
- Hand editing – you can use the Edit Expected Multiplier List dialog to enter each of the 75 land zones and list all six bands for each zone, in order to limit the display to only those 75 zones. After creating the list, you can use the File > Export menu item in the edit window to export the list to a file.
- Create a list of the zone/band combinations worked in the current log using the Export Mults & Bands from this Contest menu item. This will create a file of those combinations that appear in the log, which can later be imported using the next method.
- Imported file – after having created a file by either of the first two methods, you can use the File > Import menu item in the Edit Expected Multiplier List dialog to import the list. The list is a simple text file, so you can use a text editor instead of the edit window to make changes before importing the file.
Mouse-over
Mousing over any prefix will display information about it – the name of the country, its continent and zone, long and short-path bearings, and the distance
Resizing
The Multipliers window may be reduced in size, in case your screen real-estate is too limited to show the whole thing. If you shrink it right-to-left or left-to-right, a horizontal scroll bar will appear to remind you that there is more information to be seen. Vertically, down-sizing causes the chart to be rearranged, so that a vertical scroll-bar is not necessary.
Clicking on Multipliers
Left-clicking on a block that is colored to denote either a single or double multiplier will QSY VFOA or Radio A to the frequency of the station that you can work for that multiplier. Blocks denoting stations that would be valid QSOs but not multipliers are not clickable.
- The program will first look for multipliers that match on this band. If their are no mults that match on this band, then it will look on all band for the latest mult spotted.
- The program searches through all spots regardless of the filter settings for the mult window. If, for example, you do not want to jump to SSB spots in a cw contest, filter out those spots using the Telnet window filters. You might want to move a SSB station however, so consider that possibility.
Right-clicking on a multiplier block or elsewhere in the open Multipliers window (other than the title bar)opens the right-click menu.
Right-Click Menu – multiplier-specific options
- Some of the options are keyed to the particular multiplier block clicked, and will be greyed out if you click elsewhere. To Show Calls Worked and Spots Available, you will need to right-click one of the band blocks, not the prefix.
- Show Calls Worked and Spots Available will display a list of all stations already worked for the multiplier, regardless of band, whether the box you clicked is green, blue, red or empty. It will also display a list of spots currently available for the multiplier on a new band or mode.
- Show Countries – If you are showing a chart of zones worked (in CQWW, for example), this option can be clicked to show the country prefixes that count for the zone on which you right-clicked.
- Turn Antenna – if rotator control is enabled, clicking on this option will turn the antenna to the short-path direction of the multiplier from your QTH.
- Set Rover QTH – If Rover mode is enabled, the RoverQTH county or grid square can be set using this option.
Other Right-Click Options
- Set Bands and Modes to be Displayed – opens a dialog that looks very much like the Telnet and Available windows’ Bands and Modes dialogs. The purpose of this option is to control the boxes that appear beside each multiplier. For example, you might use it to eliminate the boxes for a band(s) for which you do not have an antenna, or to limit the display to only a single box for the band of a single-band entry. Note that this operates on the display boxes, not on the spots themselves. In a contest in which there are no per-band multipliers (e.g. ARRL Sweepstakes or ARRL RTTY), and in which there is only one box per multiplier, using this option will have no effect on which multipliers are spotted and displayed.
- Set Grid Square Map Center (grid square map only) – On the grid square map (which is not really a map, since there is no geographical information displayed, only grid square designators), you can choose which grid square to center the display on. This is functionally equivalent to scrolling the display left/right/up/down.
- Show Beam Heading to Grid Center (grid square and grid field maps only) – Right-clicking on a grid or field square in the map will display a beam heading to the center of that grid square or field.
- Help – will take you via the Internet to this section of the manual.
In contests with separate grid square or grid field multipliers for each band, the Grid Square or Grid Field map will display multipliers for the current band only. In SO2R or SO2V, the current band follows Entry Window keyboard focus (e.g. pressing the \ key to switch EW focus will change the band displayed in the map).
