
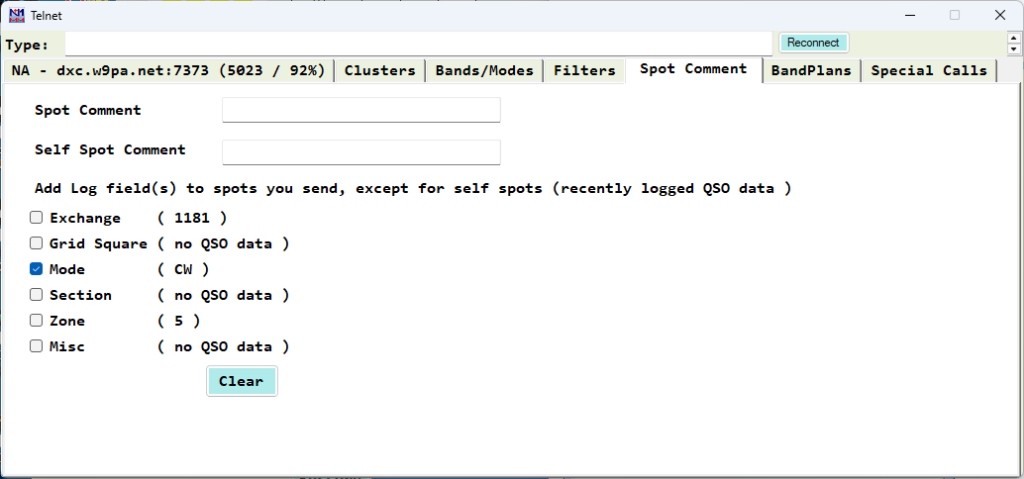
The Telnet Window
Your Telnet window will be similar to this one, but with seven tabs.
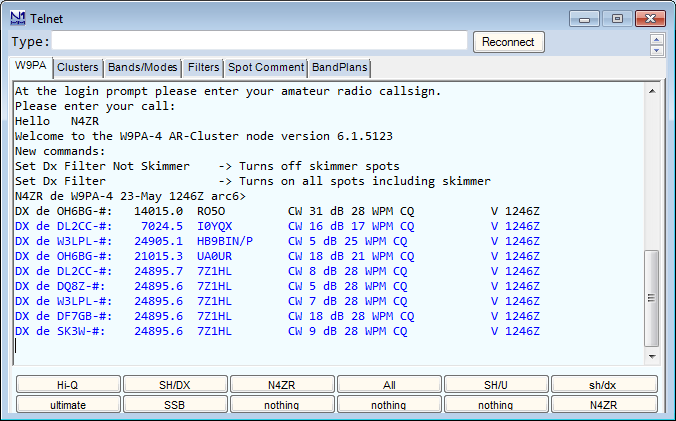
- The textbox labeled “Type:” is where you can input any text commands to send to the cluster. For example, typing “bye” without the quotes and hitting Enter will disconnect you from most clusters.
- The “Reconnect” button will re-establish your connection to the cluster shown on the label of the first tab (see below). Note that if you change clusters under the “Clusters” tab, you must use the “Connect” button under that tab to establish a connection with the new cluster before using the “Reconnect” button.
- A font sizer is at the upper right, just below the “X” to close the window. Click the up or down arrows to change the size of the text in the text pane below.
- The text pane is where all messages from the Telnet cluster will appear. Click in the text pane to temporarily halt scrolling; move the mouse cursor out of the text pane to restart it.
- All incoming information from the connected DX cluster is displayed in the text area of the Telnet window. They are color-coded by mode – defaults are blue for CW, magenta for digital, and black for SSB. Spots forwarded to the Bandmaps and Available Mults & Qs window are filtered as provided on the Filters tab. Spots that are filtered out (not forwarded) are greyed out in the text area.
Split information given in the spot comment will be recognized and forwarded to the Bandmaps and Available window. When such a spot is selected the transceiver will go into split mode (if applicable). The program recognizes: UP, U, DOWN, DN, D and the word QSX. Examples: QSX 3.838, QSX 4, UP 5, DOWN 2, U 5, D4, U4, DN4, UP4, DOWN4, QSX7144 etc.
Telnet Window Tabs
There are seven tabs above the text pane, which is displayed by default and also tied to the left-most tab, which always displays the call-sign of the currently-selected cluster.
Current Connection Tab
The first tab displays the name of the Telnet cluster node to which you are connected, and opens the lower pane so that you can see the flow of spots from the node. Except as noted, any changes made on the other tabs take effect when you switch back to this tab.
Clusters Tab
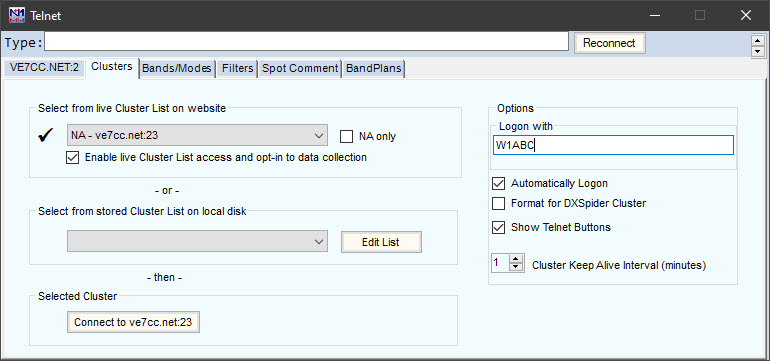
Choosing a Cluster
The Clusters tab is used to select a cluster from two sources:
The Live Cluster list contains the names of clusters that N1MM+ users have recently reported as exhibiting acceptable availability and performance. The names of the clusters will be sorted alphabetically by continent. If you only want to see names of clusters reported by users on your continent, click the [__ only] checkbox. You can read more about the Live Cluster list HERE.
The Stored Cluster list contains a static collection of cluster names, some of which may no longer be available. The Edit List button opens a new edit window where you can make changes to the list and customize it to your preferences. You can also import or export the list of clusters from/to a file using the File menu in the edit window. By default, these files are stored in the ExportFiles folder in the N1MM Logger+ user files area.
Cluster Keep Alive interval (minutes) – sends ” “<cr> to the cluster every N minutes to prevent the cluster from assuming you are no longer using it.
The default Stored Cluster list contains 251 sites – some of which are unavailable and many that you will never use. After identifying your favorite cluster(s), delete the surplus sites in the list so that you can quickly select only the ones you prefer.
Also on the tab:
- A checkbox to tell the program to automatically log on to the selected cluster whenever the Telnet window is open.
- A checkbox to format some commands properly when you are connecting to a DXSpider cluster.
- A “Logon with” field, where you fill in the callsign the cluster is expecting to see at logon.
- A “Show Telnet Buttons” checkbox. Uncheck it to reduce the size of the Telnet window as much as possible, saving screen space.
- A “Connect” button that will send the logon sequence to the selected cluster and return you to the Telnet window’s Current Connection tab. When changing clusters, you must use this button to change the cluster, at which time the name of the cluster displayed in the Current Connection tab will change.
Problems Connecting to a Cluster Site
If you cannot connect to a cluster check the following:
- Edit the clusters list and make sure that the domain name of the cluster is correct.
- Edit the clusters list and make sure the port of the cluster is correct and it is separated from the domain name by a colon (:), e.g. k1ttt.net:7300
- When changing clusters, use the “Connect” button under this tab to make the initial connection to the new cluster; until you have done this, the “Reconnect” button on the Current Connection window will continue to point to the previous cluster.
- Disable your anti-virus software and (re)install the latest update. Test the connection. Re-enable your anti-virus software.
- Check your software firewall to make sure N1MM Logger+.exe is allowed to connect externally.
- Check your hardware firewall to make sure that connecting to port 23 (default) or port nnnn (as specified in the cluster list) is allowed.
- Try testing using the Windows Telnet program to connect. For Windows 10 or 11, you can enable Telnet by going to Programs and Features, Turn Windows Features on or off, select Telnet client and press OK.
- Connect via Telnet by issuing the following command in the Windows command box next to the Windows button: Telnet , e.g. Telnet dxc.w9pa.net 7373 If this connects, it means that you have the wrong dns or port, or that something in your machine is blocking N1MM Logger+ from connecting.
Connecting to Telnet from a multi-computer network
If you are using N1MM Logger+’s networking to connect multiple computers together in a network, only one of the computers in the network (the one designated as “Master”) connects to a Telnet cluster. The other, non-Master computers need to have their Telnet windows open to receive spots from the Master computer, but they do not connect directly to a Telnet cluster.
Importing a Downloaded Cluster List
A more recent cluster list is maintained on the the N1MM Logger website under >Additional Support Files. To replace N1MM+’s default cluster list with a downloaded list:
- On the website, navigate to >Downloads >Category Menu >Additional Support Files
- Download the latest cluster .txt file, placing the file in your Documents \N1MM Logger+ \ExportFiles folder
- Open the Telnet Window, select the Clusters tab, and click the Edit List button
- When the Edit List dialog window opens, click on >File >Import and select the file you have just downloaded.
Bands/Modes Tab
The Bands/Modes tab allows you to select which bands and modes will be passed through to the Bandmap(s) and Available Mults & Qs window. Select bands individually or select groups of bands with the large buttons across the top (“HF”, “VHF”, etc.). Select mode(s) individually, by clicking the “All” button, or by checking “Contest” to pass only the mode(s) valid in the current contest. The “Reset All Defaults” button will check every band and mode.
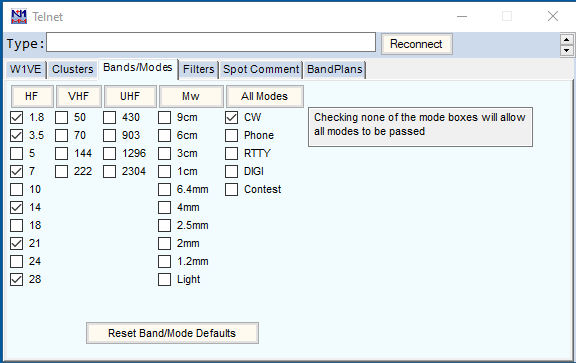
Note that if any of the check boxes in the mode column is/are checked, spots for that or those modes are the only ones that will make it through the filter. The sub-bands set up in the Bandmap window for CW, Digital and SSB can have a major effect on this, too. Any spot that does not have its mode mentioned explicitly in the spot notes will be assigned a mode based on its frequency relative to the Bandmap window band plans, and spots that have been assigned a mode that is not checked will not be passed through. If spots do not seem to be getting passed from the Telnet window to the Bandmap and Available windows, check the sub-band definitions in the bandmap as well as the mode and band check boxes in this window.
Filters Tab
The Filters tab provides another set of filters, as well as checkboxes for a few related options.
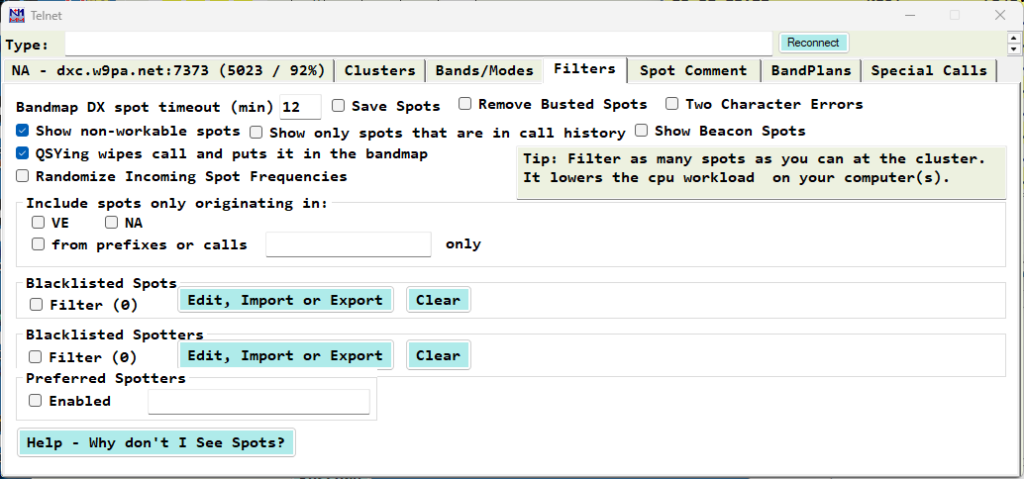
- Set the desired Bandmap timeout for DX spots by entering time in minutes. Note that spots originating from CW Skimmers, such as RBN spots, will automatically time out after 20 minutes, or the spot timeout value, whichever is less.
Save Spots
The “Save Spots” checkbox is a new feature, added to solve an issue with packet spot processing that caused the spots database (Spots.s3db in the Databases folder) to grow too large and impact program performance. If you are experiencing symptoms of this, check the size of your Spots database. If it is more than a few MB, that may be why.
The “Save Spots” box is unchecked by default, and if left that way, the Spots database is not used at all. The advantage is very low performance impact from Telnet use. The drawbacks are that when you restart N1MM Logger+, the Bandmap will be empty. The check for Telnet spots in the Check window will not be active, and the “Spotted” option in the Multiplier window will not work.
If the box is checked, N1MM+ now honors the Bandmap timeout value set on this tab. For example, if you set the timeout value at 20 minutes, the Spots database will only retain spots for the last 20 minutes. When you restart NL+, the Bandmap will only display spots for the last 20 minutes, and the Check and Multiplier windows will only use spots from the last 20 minutes. The developers are aware that the latter is a slight drawback, and may look at other options after the high contest season is over.
Remove Busted Spots
This checkbox can be used to remove busted spots from the spot table. These spots are identified by the program based on spotted callsigns appearing near the same frequency (within the tuning tolerance) and differing by one, or optionally two, characters. The busted call may arrive either before or after the correct call. The code trains to the contest spots and purges the history after 60 hours.
Two Character Errors
When this checkbox is checked, the busted call option will consider two-character errors as well as single character errors.
Show non-workable spots and QSYing wipes call and puts it in the bandmap
These options have the same effects as the corresponding entries in the Config menu in the Entry window. “Show non-workable spots” will display duplicate or zero-point call signs so you know to tune past those frequencies instead of having to stop and listen to determine whether the station is workable. The “QSYing wipes” option automates the adding of spots to the bandmap when you are S&Ping. If you enter a call sign in the Entry window and then tune away, perhaps because the pileup is too large at the moment, the call sign will be placed in the bandmap, marked with its multiplier color status, so you can easily tune back to it later (or avoid that frequency if it is a dupe). If you work a station and then tune away, and if “Show non-workable spots” is selected, the worked call sign will be placed in the bandmap in grey as an indication that the station on that frequency has been worked. By default these spots to the bandmap are local only, i.e. they are not sent to the spotting network unless you have also selected the Config > Spot All S&P QSOs option in the Entry window.
Show only spots that are in call history
This option can be used to limit the spots displayed in the bandmap to call signs that are in the currently loaded call history file. This might be useful in an event where you are only interested in working certain stations, such as members of a club. However, if this option has been selected and a different call history file is loaded (for example, by changing to a different contest), it can result in wanted spots not appearing in the bandmap because the call signs don’t happen to be in the current call history file. If you are not seeing spots in the bandmap, try unchecking this option to see if it is the cause of the lack of spots.
Randomize incoming spot frequencies
Automatically adds or subtracts a small amount from the received spot frequency, so as to improve your chances of breaking a “packet pileup” when you click on a spot.
Spot origin filtering
If you only want to see spots originating (i.e. the spotter’s location) in certain countries or areas, you can use the Filter by Prefix area to limit the spots to those from your own country, continent or specific call area(s) using the check boxes in the top row, and/or by entering country or call area prefixes in the text box in the second row, separated by spaces. Beware: if anything is checked in this section, the *only* spots that will make it through the filters are those that meet the prefix, country or continent criteria you have checked or entered into the list.
The filtering capabilities of the cluster node are usually more powerful and flexible. Using them also reduces telnet traffic and the processing load on your computer’s CPU by limiting the number of spots sent to your computer from the cluster node. Generally, we recommend that you use the spot filtering at your chosen Telnet cluster where possible.
Spotter and spotted station blacklisting
You can “blacklist” either specified spotters or specified stations spotted, or both. The Edit, Import or Exportbuttons allow you to create and edit lists of stations whose spots you do not want to see, while the Clear buttons allow you to clear the list and start over. In both cases, the feature is enabled by a check box, i.e. you can create a list but only enable it in certain contests or at certain times. This filtering acts in addition to filtering by origin, or by bands and modes, i.e. the various filters are cumulative.
Preferred Spotters
When enabled, this command permits listing 1 to 3 spotters whose spots you wish to have highlighted in all windows where spots appear. Enter the preferred spotters’ callsigns in the box, separated by spaces. This is particularly designed to highlight a local Skimmer if you have one. In the Available Mults & Qs window, spots from preferred spotters are indicated with a star in the preferred spotter column.
As an added touch, the three preferred spotters can each include variations on the base callsign. Hence, listing WZ7I will also highlight WZ7I-2, WZ7I/3, etc. You may include your station callsign.
Spot Comment Tab
This tab lets you specify a comment for each spot you make (such as “WPX”) and add log data fields to the fixed comment.
Band Plans Tab
The Band Plans tab formerly permitted setting limits for mode segments within band plans. This function has now been moved to the Bandmap window, and is accessed by right-clicking on a frequency label (e.g. “7045”) in the Bandmap window.
Nevertheless, even though this function is no longer carried out from the Telnet window, the choice of sub band limits in the Bandmap window can have a significant effect on telnet spot processing. Spots that do not have a mode designated in the spot notes will be assigned a mode based on those sub band limits, regardless of whether the Bandmap window is actually open or not. If the sub band limits are not set appropriately, this can result in incorrect modes being assigned to spots, which can in turn affect how those spots are filtered and processed, and whether or not the spots are displayed in the Bandmap and Available Mults & Qs window. The sub band limits are not set based on FCC regulations, as new US licensees might expect. The appropriate sub band limits vary depending on the nature of the contest (CW vs. SSB vs. digital vs. mixed mode, domestic vs. DX contest). It is up to the user to set the limits in the Bandmap window according to the patterns of usage in the current contest.
For example, in a DX phone contest you might need to set the top of the 40 meter CW sub band very low in the band in order to ensure that spots of DX stations operating split, transmitting below 7100 kHz and listening higher in the band, show up on the bandmap and in the Available window. On the other hand, if you leave this same setting in place for a CW contest, that could result in CW spots being missed because the program assigns unlabeled spots of CW signals to SSB. To prevent this, you will need to manage the location of the CW vs. SSB sub band limit in order to ensure that it is consistent with the current situation.
If you want to use spots for a digital contest, you may need to define digital sub bands for each band in the Bandmap window. On 40 meters, the appropriate location of the digital sub band will depend on whether the contest is a DX contest or a domestic North American contest. After the digital contest is over, if you don’t remove or adjust the digital sub band, some CW spots might get missed because the program assigns a digital mode to them based on the sub band limits in the Bandmap window.
Special Calls Tab

This feature, added in N1MM+ version 1.0.10763, allows users to create and maintain a list of special callsigns, such as bonus stations, contest club members, IARU HQ stations, or friends. When a callsign in the list is spotted using exact callsign text, it will be identified in the Available window “heart” column with a heart symbol. The column is sortable and can be disabled.
The Automatically include QSO Party callsigns checkbox can be used to automatically add bonus stations to the list that are included in the QSO Party contest definitions without having to edit the list.
Sending Stored Commands to the Cluster
Across the bottom of the Telnet window are twelve buttons which can be individually programmed with stored messages to be sent to the Telnet node. Right-click in the button area to bring up the editor.
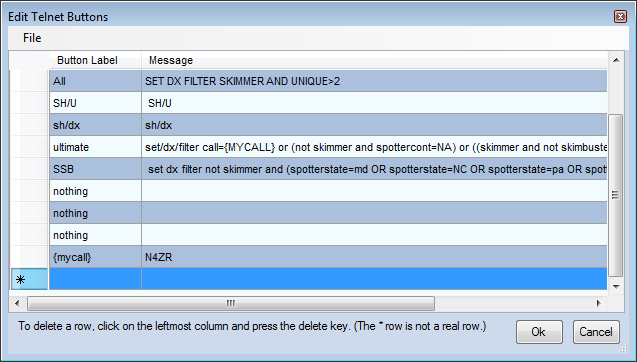
Different button sets can be saved and recalled for use with the File menu at the upper left. By default the text files containing sets of button messages are stored in the FunctionKeyMessages folder in the N1MM Logger+ user files area.
You can also use one or multiple buttons to store a quick-connect command to connect to a specific telnet cluster. The syntax expects a ‘{CONN} node’. Example: Assuming you have added a cluster with the name RBN to the list of clusters, you can assign it to a button by adding ‘{CONN} RBN’ to a button value.
Mouse Clicks
- When the you left- or right-click in the text area, scrolling is stopped. A right-click on a callsign brings up a small menu

Click on “Jump to this spot” to send the active radio to the spot frequency. This option is mainly retained for nostalgia. It makes far better sense to click in the Bandmap or the Available window while maintaining the Telnet window minimized, once you have the filters, bands and modes set up as you want them.
Multi-User Setup
When running in networked computer mode, only the Master station has to be connected to the DX-cluster. The master station will relay all information to and from the connected computers to the cluster node.
CW Skimmer and the Reverse Beacon Network (RBN)
CW Skimmer version 1.1 and up has a built in Telnet server which allows N1MM Logger to receive spots from it. Add an entry to your Telnet list with the address: 127.0.0.1:7300 if you are running Skimmer on the same machine as N1MM Logger. If running on a different PC on the same network, use that machine’s internal IP address in the same format.
The Reverse Beacon Network’s Telnet relay servers make all of the RBN’s Telnet spots available to users worldwide. Because of the huge volume of spots on a major contest weekend – at least fifty times as many as the conventional cluster network – we highly recommend that you connect to a “retail” server and use the node’s filtering capabilities to manage the quantity actually sent to you.
Spots originating from CW Skimmers, such as RBN spots, will automatically time out after 20 minutes, or the spot timeout value, whichever is less.
Because of the high volume of spots, the RBN uses specially-designed relay servers on its Telnet nodes, which are internally streamlined. A side-effect is that these nodes do not respond to user commands. This is another good reason to connect to a “retail” cluster that handles both RBN and traditional spots. You can find a list at this site .
Local Skimmer spots can be merged with spots from conventional DX clusters using software such as WintelnetX or CC User, freeware by K1TTT and VE7CC respectively. Skimmer spots are distinguished from regular spots by the addition of unique markers. In the Bandmaps, Skimmer or RBN spots are identified with “#” after the callsign and bearing; spots from your own Skimmer, identified by the callsign set in your Station Data), are marked with “!”
Spot Filtering
There are three levels of spot filtering available. The first and most powerful of these using whatever filtering capabilities are built into the node. The second is established by the Band/Modes and filters tabs of the Telnet window. A third is set by the Available Mults & Qs window’s Bands and Modes button. The latter only affects what is seen in that window.
AR Cluster V6’s Skimmer Spot Quality Filtering
Because of the large volume of spots generated by the RBN, even at very high accuracy rates (over 99 percent), a large number of busted spots have been noticed. Toward the end of major contests, these may be a significant problem for serious competitors. In addition, calibration and image errors are occasionally encountered due to hardware and software issues.
CT1BOH has developed and AB5K has implemented DX cluster-based evaluation of spot quality, in an effort to reduce the number of bad spots seen on the RBN. This nice piece of work was implemented in Version 6 of AR Cluster. AB5K.net was the first node offering this feature, and many more now have it too. You can find an exhaustive list at this web site.
The evaluation is subdivided into 3 categories:
- Validation – When a callsign is first spotted on a given frequency, it is tagged with a “?” in the last column of the Comment field of the spot. When two or more other RBN nodes agree on the spot, the tag on each subsequent spot becomes “V”
- Frequency – After a station has been spotted on a given frequency, if it is then spotted on another frequency the spot is tagged as above, but with a “Q”, for QSY? Again, once the move is confirmed, subsequent spots are tagged with V. The idea here is to catch I/Q image spots, spots sent by badly-calibrated Skimmers or spots inadvertently sent on the wrong band.
- Busted Spots – This is the real high point of the Quality Tags. The algorithm uses some sophisticated measures of the “resemblance” between the busted spot and the real one, and will tell you both what spots are busted and what the real call is, based on other spots at or very near the same frequency.
Here is a brief snapshot of one minute of RBN plus traditional spot flow.
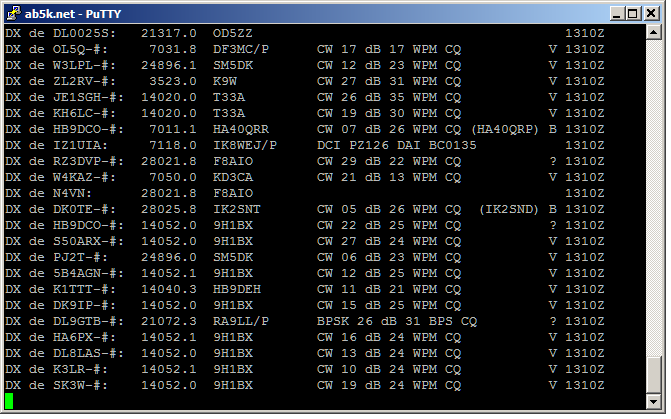
You can see that the node software picked up two busted spots, and also was skeptical about others until they were repeated. There are no QSY spots in this sampling, but if there had been, you would have seen the “Q” tag.
When you first connect to an AR Cluster, make sure it is sending RBN spots as well as traditional ones by commanding it to “set dx filter”. Once RBN spots are flowing, you can set any other filters you want to, such as limiting spots to stations in your geographic area. Then all you have to do is send “set DX extension skimmerquality”, and the Quality Tags will start to appear at the right end of the Comment field.
Some operators will prefer to filter out certain of these spots. Most likely candidate for this treatment are spots tagged with “B”, but you can filter out “?” or “Q” spots too, and the node will not send spots of those stations to you until they are confirmed (and tagged V). Here’s a partial list:
Set DX filter Skimbusted – only send me those spots that are marked as busted, together with the node’s identification of the correct spot)
Set Dx Filter NOT Skimbusted – don’t send me any spots that are tagged as B
Set DX filter NOT SKimQSY – don’t send me any Q spots until they are verified
Set DX filter Skimvalid – only send me spots that have been tagged with a V
These and other Skimmer-related filtering commands are found in the AR Cluster V6 manual, for example at the NC7J website in the section called “Set DX Filter”.
One of the neat things about AR Cluster V6 is that you can create complex filters to show you exactly what you want. For example:
SET DX FILTER {MYCALL} OR (spotterstate=MD OR spotterstate=PA OR spotterstate=VA OR spotterstate=WV)
This filter will tell me whenever I am spotted anywhere in the world, and otherwise will show me all spots, both traditional and RBN, made by stations in the states around my QTH.
While N1MM Logger+’s Telnet buttons will accommodate fairly long commands, stringing together a lot of “state=” or “cty=”, or “ state<>” or “ cty<>” commands could be too much. Fortunately, there is an abbreviated syntax. The “[entity]=/<>” filters can be abbreviated as follows:state=[MD,VA,WV,PA] or CTY=[K,VE,KP4]
You could add some Quality Tag-specific filters – for example:
SET DX FILTER call={MYCALL} OR NOT skimbusted and (spotterstate=md OR spotterstate=pa OR spotterstate=va OR spotterstate=WV)
This filter will work the same as that above, but also will not show me any spots that the cluster evaluates as busted.
Here’s another filter that lays on some more complexity, written by CT1BOH and recently published on CQ-Contest:
Set DX Filter (skimValid OR not skimmer or ((SkimQsy OR SkimUnknown) AND (cty<>K AND cont<>EU )))
This filter shows human spots, Skimmer spots appraised as V(alid), and Q and ? spots from outside Europe and the USA. It filters out Q(new frequency?) and ? (not yet valid) spots from the US and Europe, on the theory that it’s less important to jump on those first.
So that’s the story – whether you choose to filter at the cluster node, or see everything coming in and make your own decisions, Quality Tags can be a very useful tool. Congratulations to CT1BOH and AB5K for their achievement.
Using Filters
Many operators will prefer to make their own judgments, rather than using filters. There are some advantages to this, probably. For example, a rare multiplier spotted initially by only one RBN node would carry a “?” tag until two more confirm the spot. Waiting for it to come through a Skimvalid filter could result in your being twentieth in the pileup instead of first or second. Late in a big contest, a large multi-op will have worked many of the stations on each band. A lot of busts will seem to be valid, but operators may want to make that judgment quickly for themselves rather than relying on the node. The next section shows how you can use N1MM features to make this approach easier.
N1MM Logger has two main ways of initiating S&P QSOs, by using either the Available Mults and Qs window or the Bandmap(s). Of the two, the Bandmaps are the easiest way to work with Quality Tags, simply because the Available window scrolls so quickly when receiving spots from the RBN. Just mouse over the callsign on the Bandmap that you wonder about, and the full spot, including the Quality Tag, will appear in a tooltip. This makes it really quick and easy to skim over the bandmap and dismiss the busted ones with Alt+D Here’s an example
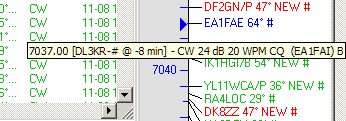
In this example, if you had worked EA1FAI a couple of minutes before, when you saw EA1FAE pop up, you moused over him, and he was revealed as a busted spot. Alternatively, you can click on a call to select him for a possible QSO, and if the tooltip reveals he’s a bust, you just hit Alt+D and move on.
Spot Flow in N1MM Logger+
The following diagram may help you visualize how Telnet spots flow through N1MM Logger+
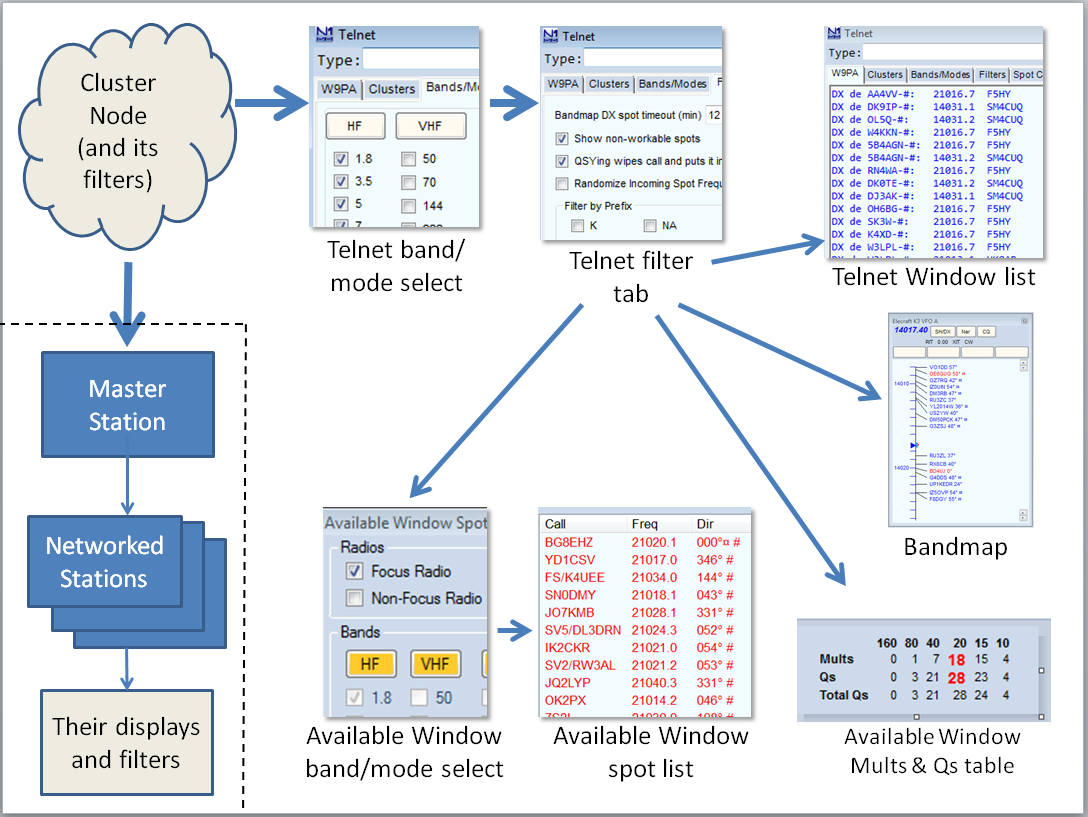
There are several layers of filtering in the spot flow. An important point to remember is that filters act to remove spots from the stream, and they are cumulative. Once certain types of spots have been removed at one stage of spot flow, there is no way to restore them at a later stage.
The first layer is at the cluster node itself. Cluster nodes generally supply a variety of ways to filter the spots that they send to you. These filters are set and cleared by sending commands to the cluster node, either programmed into the buttons in the main Telnet window or by typing the desired command(s) into the text box at the top of the window and sending them to the cluster node (using the Enter key). In addition to filtering by band and mode, there may be filters offered that allow filtering by the spotted station’s continent, country, state or zone, and/or by the spotting station’s continent, country, state or zone. There may be other capabilities as well (such as the skimmer quality filters mentioned above). There are several different software programs used by cluster nodes (AR Cluster, CC Cluster, DX Spider, and so on), and one of the main ways these software programs differ from one another is in the way they implement filters and filter commands. Consult the user manual for the software used by the cluster node you are connecting to.
The Telnet window is the point where spots internal to the program (from the Store button in the Entry window, or from the “QSYing wipes…” option) are added to the spot stream. These local spots are forwarded to the Bandmap, Spectrum Display and Available Mults & Qs windows, but are not sent to the cluster. The Telnet window also provides the first layer of filtering within N1MM+. These filters are local to the computer they are applied in, i.e. they do not affect other computers receiving spots from the master computer in a networked setup. They are not as sophisticated as the ones at some cluster nodes, but they are easier and quicker to change on the fly. The choice of whether to display non-workable spots (including dupes) is also made at this stage in the spot flow.
The Available Mults & Qs window has an additional layer of filtering. One main use for this is to restrict the display in the Available window to the current band automatically without having to go into the Telnet window to reset filters there every time you change bands.
In the Spectrum Display window, in addition to choosing whether to display non-workable spots you can also choose whether or not to display spotted callsigns at frequencies where there is no signal visible in the spectrum trace.
The Available window band/mode settings only affect what is displayed in the Available window’s spot list. Spots flow to them through the band/mode and filter tabs of the Telnet window, and so must be the same as, or more restrictive than, those settings. If you discover that certain band or mode choices are greyed out, take a look at your Telnet window settings. Also, check to make sure that the sub band limits in the Bandmap window are set appropriately. Inappropriate choices for the sub band limits can result in spots being assigned to the wrong mode and being greyed out as a result.
In networked-computer mode, spots flowing to the Networked Computers are not affected by any filter settings in the Master Station. Networked Stations’ spots arrive unfiltered, in order to let the operators at those stations set their own filters in N1MM Logger+.
